
Ali Waqas Official
259 Posts

Ali Waqas Official
Report
Block User
Crypto Trader | Technical Analyst• Trade Setups •
Open Trade
High-Frequency Trader
4 Years
119 Following
65 Followers
39 Liked
Posts
Portfolio
·
--
Bullish
$DOGE
Trade plan
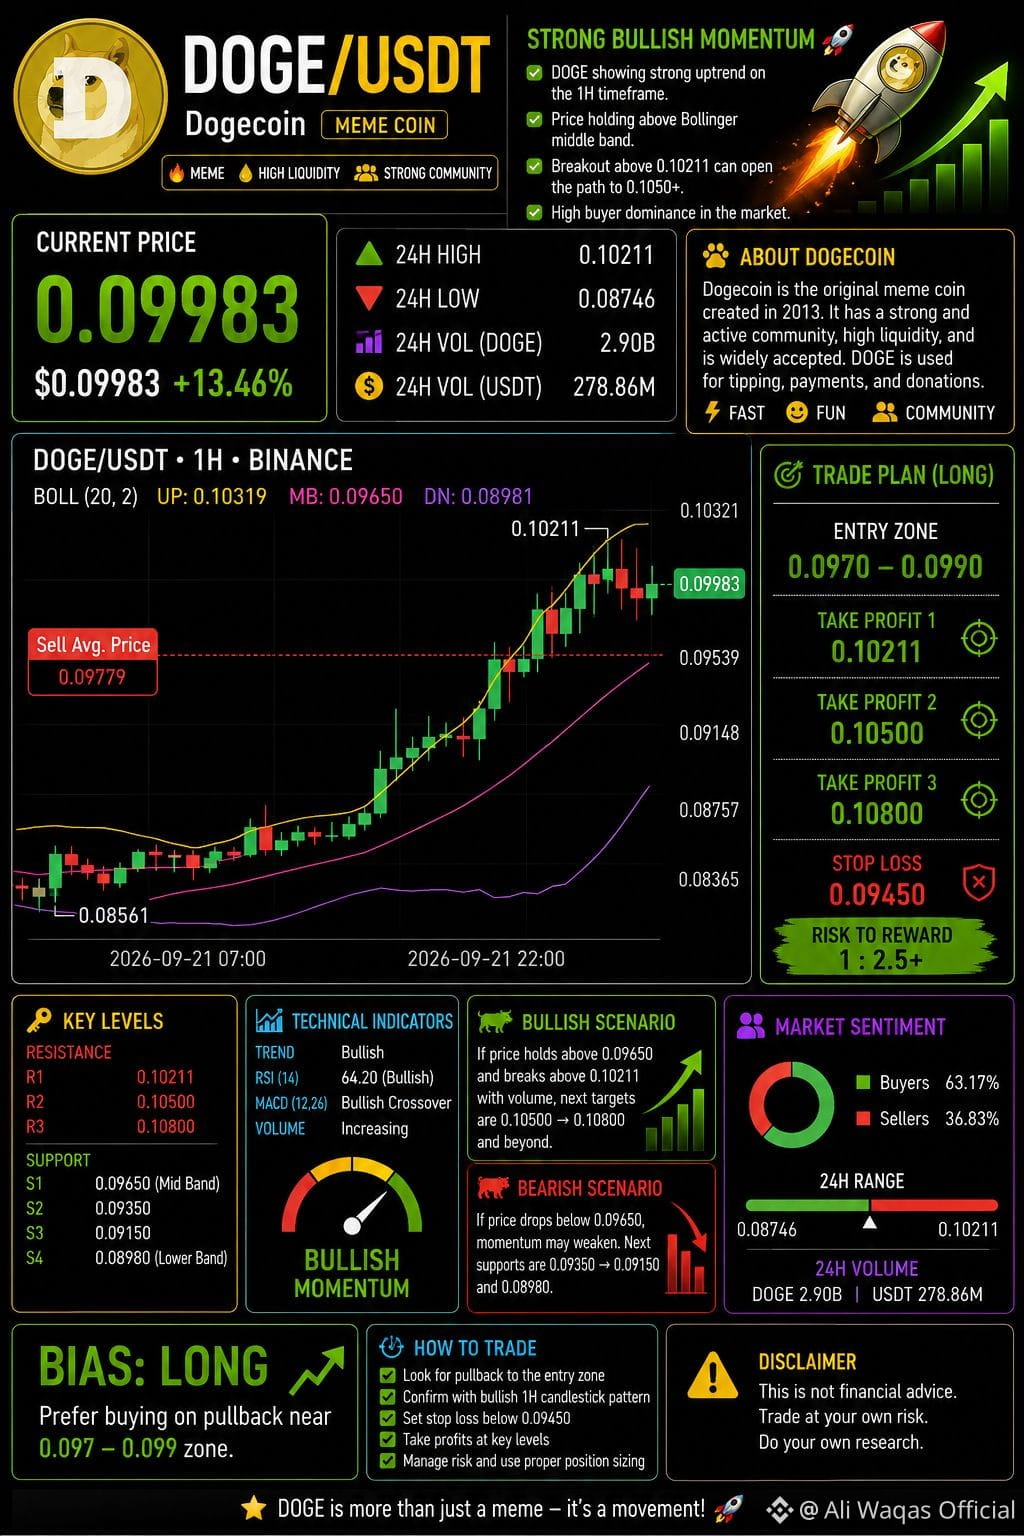
Entry zone: 0.0970–0.0990
Take Profit 1: 0.1021
Take Profit 2: 0.1050
Take Profit 3: 0.1080
Stop Loss: 0.0945
⚠️ Important: DOGE has already made a strong move, so a pullback/retest is preferable to entering after a sharp breakout. The screenshot shows buyers at 63.17% versus sellers at 36.83%, but order-book imbalance can change quickly.
Recent DOGE market commentary also highlights the importance of technical resistance and support levels, so the 0.1021–0.1032 area is particularly important for this setup. �
The Coin Republic +1
Risk management: Keep leverage modest and risk only a small portion of your trading capital. This is chart-based analysis, not a guarantee of future price movement.
{future}(DOGEUSDT)
#DOGE
#Dogecoin
#doge⚡
#DOGEUSDT
$DOGE
Trade plan
Entry zone: 0.0970–0.0990
Take Profit 1: 0.1021
Take Profit 2: 0.1050
Take Profit 3: 0.1080
Stop Loss: 0.0945
⚠️ Important: DOGE has already made a strong move, so a pullback/retest is preferable to entering after a sharp breakout. The screenshot shows buyers at 63.17% versus sellers at 36.83%, but order-book imbalance can change quickly.
Recent DOGE market commentary also highlights the importance of technical resistance and support levels, so the 0.1021–0.1032 area is particularly important for this setup. �
The Coin Republic +1
Risk management: Keep leverage modest and risk only a small portion of your trading capital. This is chart-based analysis, not a guarantee of future price movement.
#DOGE
#Dogecoin
#doge⚡
#DOGEUSDT
Trade plan
Entry zone: 0.0970–0.0990
Take Profit 1: 0.1021
Take Profit 2: 0.1050
Take Profit 3: 0.1080
Stop Loss: 0.0945
⚠️ Important: DOGE has already made a strong move, so a pullback/retest is preferable to entering after a sharp breakout. The screenshot shows buyers at 63.17% versus sellers at 36.83%, but order-book imbalance can change quickly.
Recent DOGE market commentary also highlights the importance of technical resistance and support levels, so the 0.1021–0.1032 area is particularly important for this setup. �
The Coin Republic +1
Risk management: Keep leverage modest and risk only a small portion of your trading capital. This is chart-based analysis, not a guarantee of future price movement.
#DOGE
#Dogecoin
#doge⚡
#DOGEUSDT
112
·
--
Bullish
$SUI
LONG Setup
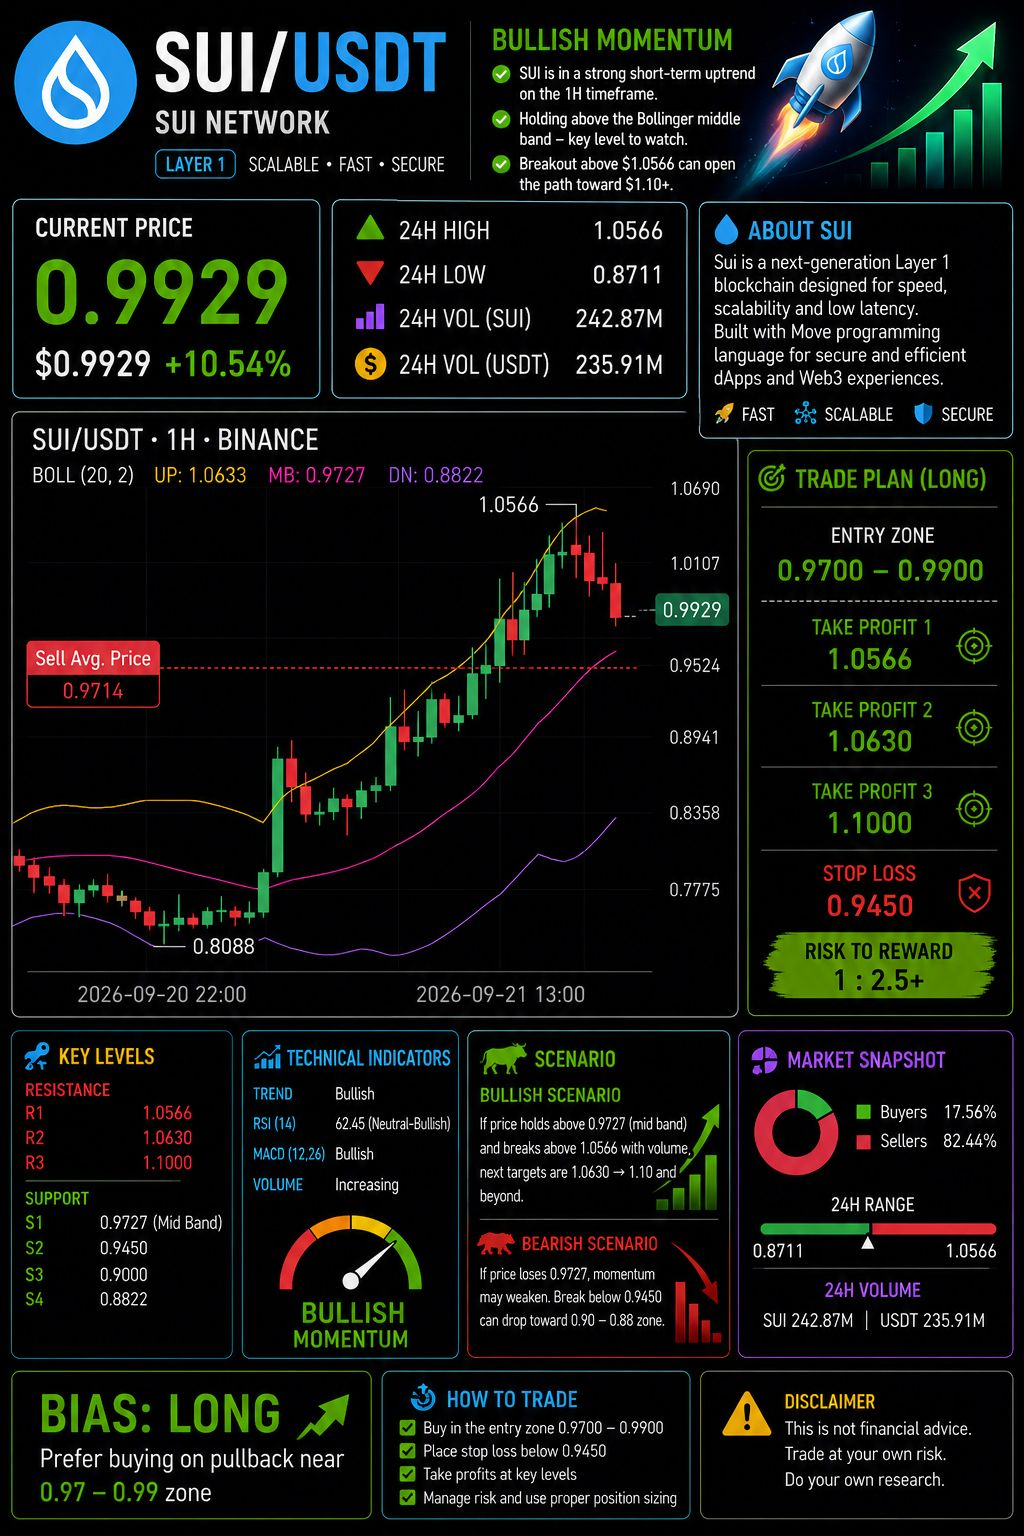
Preferred entry: 0.9700 – 0.9900
TP1: 1.0566
TP2: 1.0630
TP3: 1.1000
Stop Loss: 0.9450
Breakout setup: A strong 1H close above 1.0566 could provide a continuation entry, preferably after a successful retest.
🔴 Bearish Invalidation
If SUI loses 0.9727 decisively, momentum weakens. A break below 0.9450 would make 0.90–0.88 the next important downside area.
Chart bias: LONG above ~0.97, but avoid chasing while price is pulling back from 1.0566.
⚠️ SUI is volatile, and the levels above are based on the supplied 1H chart—not guaranteed future prices. Use a defined stop and appropriate position size.
{future}(SUIUSDT)
#SUI🔥
#sui
#supportBB
#SUIUSDT
#SUIUSDC
$SUI
LONG Setup
Preferred entry: 0.9700 – 0.9900
TP1: 1.0566
TP2: 1.0630
TP3: 1.1000
Stop Loss: 0.9450
Breakout setup: A strong 1H close above 1.0566 could provide a continuation entry, preferably after a successful retest.
🔴 Bearish Invalidation
If SUI loses 0.9727 decisively, momentum weakens. A break below 0.9450 would make 0.90–0.88 the next important downside area.
Chart bias: LONG above ~0.97, but avoid chasing while price is pulling back from 1.0566.
⚠️ SUI is volatile, and the levels above are based on the supplied 1H chart—not guaranteed future prices. Use a defined stop and appropriate position size.
#SUI🔥
#sui
#supportBB
#SUIUSDT
#SUIUSDC
LONG Setup
Preferred entry: 0.9700 – 0.9900
TP1: 1.0566
TP2: 1.0630
TP3: 1.1000
Stop Loss: 0.9450
Breakout setup: A strong 1H close above 1.0566 could provide a continuation entry, preferably after a successful retest.
🔴 Bearish Invalidation
If SUI loses 0.9727 decisively, momentum weakens. A break below 0.9450 would make 0.90–0.88 the next important downside area.
Chart bias: LONG above ~0.97, but avoid chasing while price is pulling back from 1.0566.
⚠️ SUI is volatile, and the levels above are based on the supplied 1H chart—not guaranteed future prices. Use a defined stop and appropriate position size.
#SUI🔥
#sui
#supportBB
#SUIUSDT
#SUIUSDC
104
·
--
Bullish
$PEPE
Trading Setup — LONG
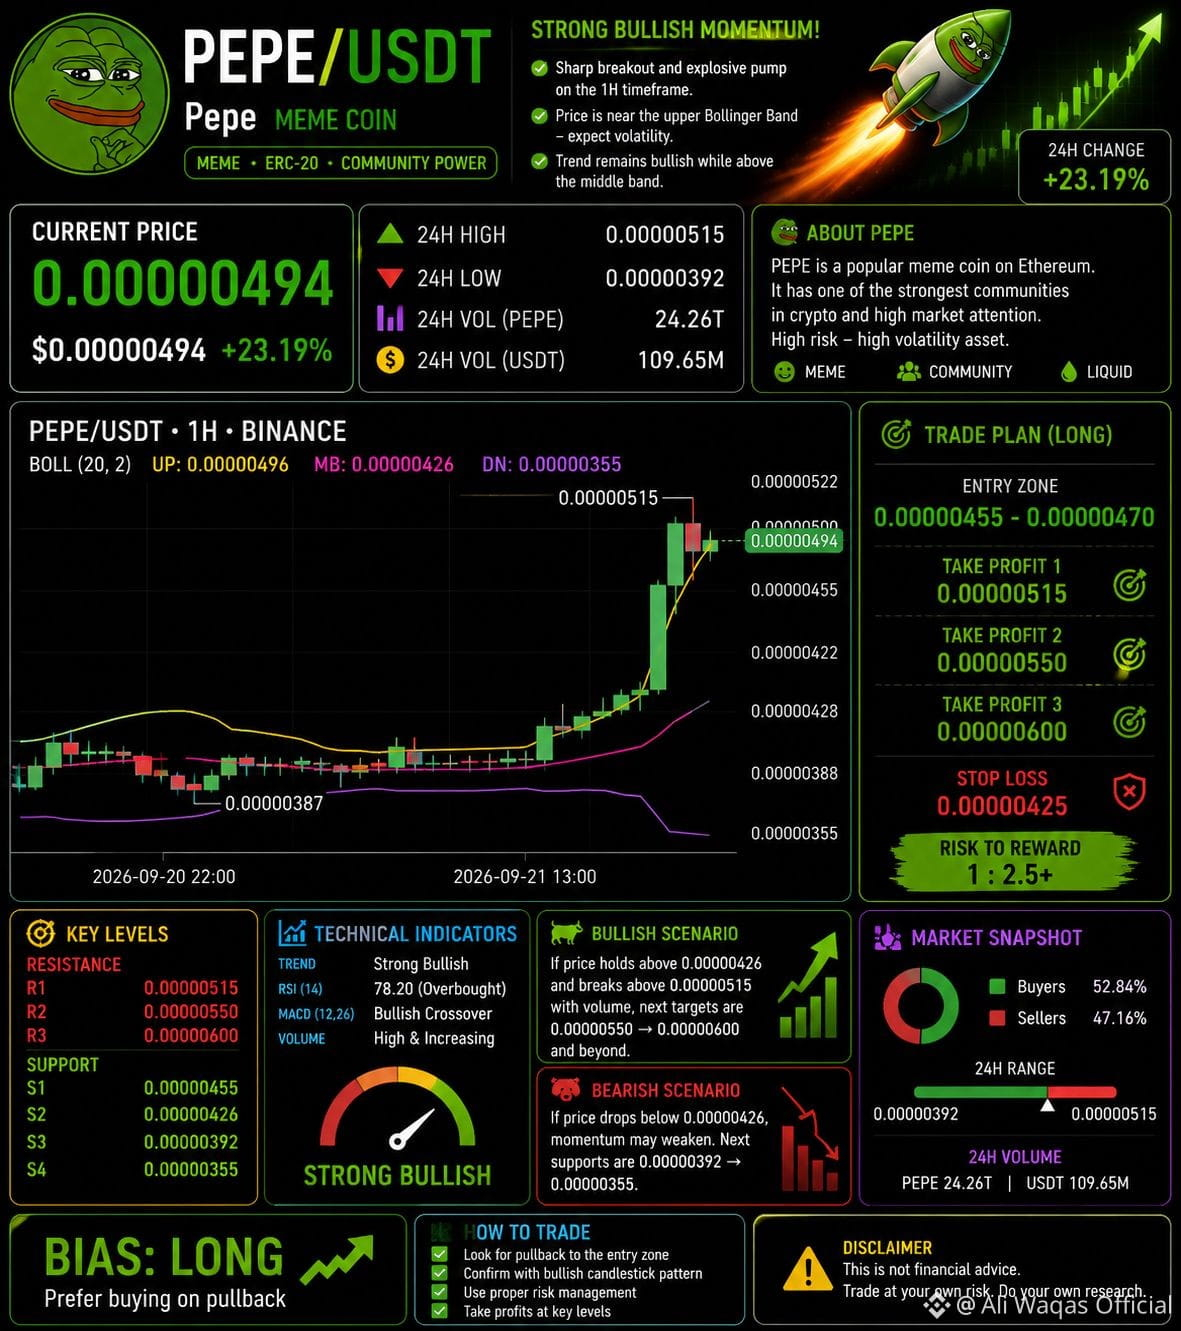
Preferred entry: 0.00000455 – 0.00000470
TP1: 0.00000515
TP2: 0.00000550
TP3: 0.00000600
Stop Loss: 0.00000425
Alternative breakout entry: If PEPE gets a strong 1H candle close above 0.00000515, a retest of that level can provide another long setup.
⚠️ Important
The move is already extended after a +23% 24H rally, so a pullback is possible. If the price drops below 0.00000426, the bullish setup weakens and the next downside area is around 0.00000392–0.00000355
{spot}(PEPEUSDT)
#PEPE创历史新高
#PEPE市值超越LTC
#pepe⚡
#PEPEATH
#PEPEUSDT
$PEPE
Trading Setup — LONG
Preferred entry: 0.00000455 – 0.00000470
TP1: 0.00000515
TP2: 0.00000550
TP3: 0.00000600
Stop Loss: 0.00000425
Alternative breakout entry: If PEPE gets a strong 1H candle close above 0.00000515, a retest of that level can provide another long setup.
⚠️ Important
The move is already extended after a +23% 24H rally, so a pullback is possible. If the price drops below 0.00000426, the bullish setup weakens and the next downside area is around 0.00000392–0.00000355
#PEPE创历史新高
#PEPE市值超越LTC
#pepe⚡
#PEPEATH
#PEPEUSDT
Trading Setup — LONG
Preferred entry: 0.00000455 – 0.00000470
TP1: 0.00000515
TP2: 0.00000550
TP3: 0.00000600
Stop Loss: 0.00000425
Alternative breakout entry: If PEPE gets a strong 1H candle close above 0.00000515, a retest of that level can provide another long setup.
⚠️ Important
The move is already extended after a +23% 24H rally, so a pullback is possible. If the price drops below 0.00000426, the bullish setup weakens and the next downside area is around 0.00000392–0.00000355
#PEPE创历史新高
#PEPE市值超越LTC
#pepe⚡
#PEPEATH
#PEPEUSDT
139
·
--
Bullish
$AVAX
Trade setup
Bias: LONG on confirmation/retest
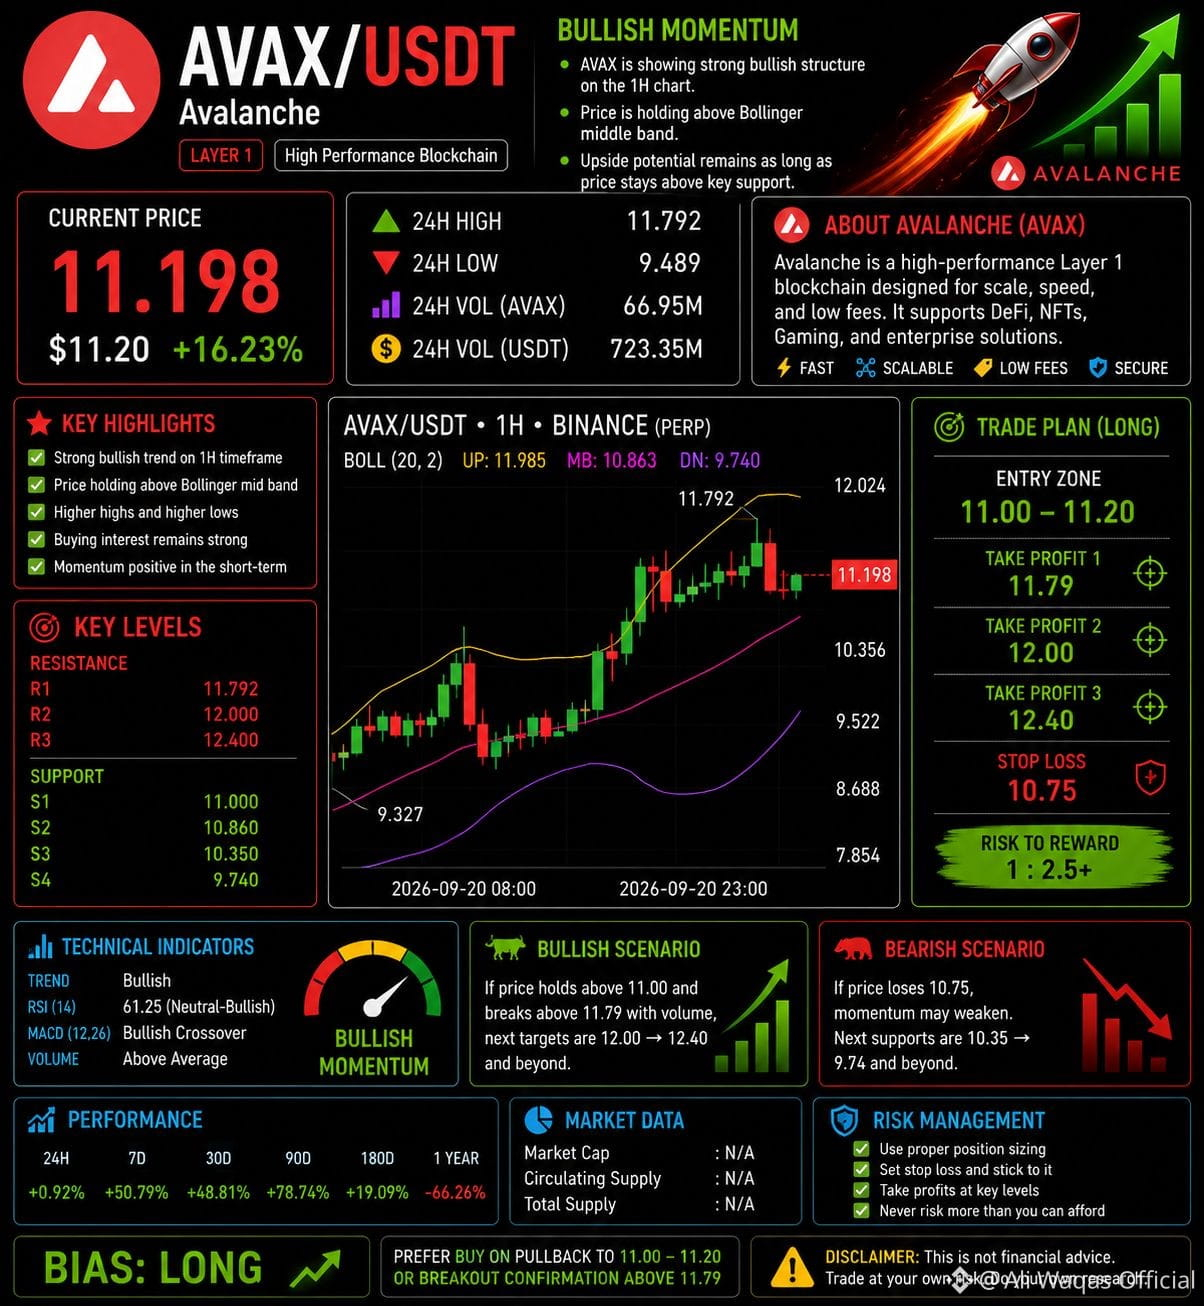
Entry: $11.00–$11.20
Take Profit 1: $11.79
Take Profit 2: $12.00
Take Profit 3: $12.40
Stop Loss: $10.75
A safer entry would be after a pullback toward $10.85–$11.00 and a bullish reaction rather than chasing a breakout candle.
⚠️ Risk: AVAX has already moved sharply upward, so a rejection around $11.79–$12.00 could trigger a quick pullback. The screenshot is a 1-hour chart, so levels can change rapidly. Use controlled leverage and risk only a small portion of your account.
Technical picture: Bullish structure + price above Bollinger mid-band, but extended near the upper band. The upcoming Avalanche Helicon upgrade is also being reported as a current catalyst. �
{future}(AVAXUSDT)
#AVAX✈️
#AVAXUSD
#AVAX✅
#AVAXUSDT🚀
$AVAX
Trade setup
Bias: LONG on confirmation/retest
Entry: $11.00–$11.20
Take Profit 1: $11.79
Take Profit 2: $12.00
Take Profit 3: $12.40
Stop Loss: $10.75
A safer entry would be after a pullback toward $10.85–$11.00 and a bullish reaction rather than chasing a breakout candle.
⚠️ Risk: AVAX has already moved sharply upward, so a rejection around $11.79–$12.00 could trigger a quick pullback. The screenshot is a 1-hour chart, so levels can change rapidly. Use controlled leverage and risk only a small portion of your account.
Technical picture: Bullish structure + price above Bollinger mid-band, but extended near the upper band. The upcoming Avalanche Helicon upgrade is also being reported as a current catalyst. �
#AVAX✈️
#AVAXUSD
#AVAX✅
#AVAXUSDT🚀
Trade setup
Bias: LONG on confirmation/retest
Entry: $11.00–$11.20
Take Profit 1: $11.79
Take Profit 2: $12.00
Take Profit 3: $12.40
Stop Loss: $10.75
A safer entry would be after a pullback toward $10.85–$11.00 and a bullish reaction rather than chasing a breakout candle.
⚠️ Risk: AVAX has already moved sharply upward, so a rejection around $11.79–$12.00 could trigger a quick pullback. The screenshot is a 1-hour chart, so levels can change rapidly. Use controlled leverage and risk only a small portion of your account.
Technical picture: Bullish structure + price above Bollinger mid-band, but extended near the upper band. The upcoming Avalanche Helicon upgrade is also being reported as a current catalyst. �
#AVAX✈️
#AVAXUSD
#AVAX✅
#AVAXUSDT🚀
72
·
--
Bullish
$SUI
LONG setup
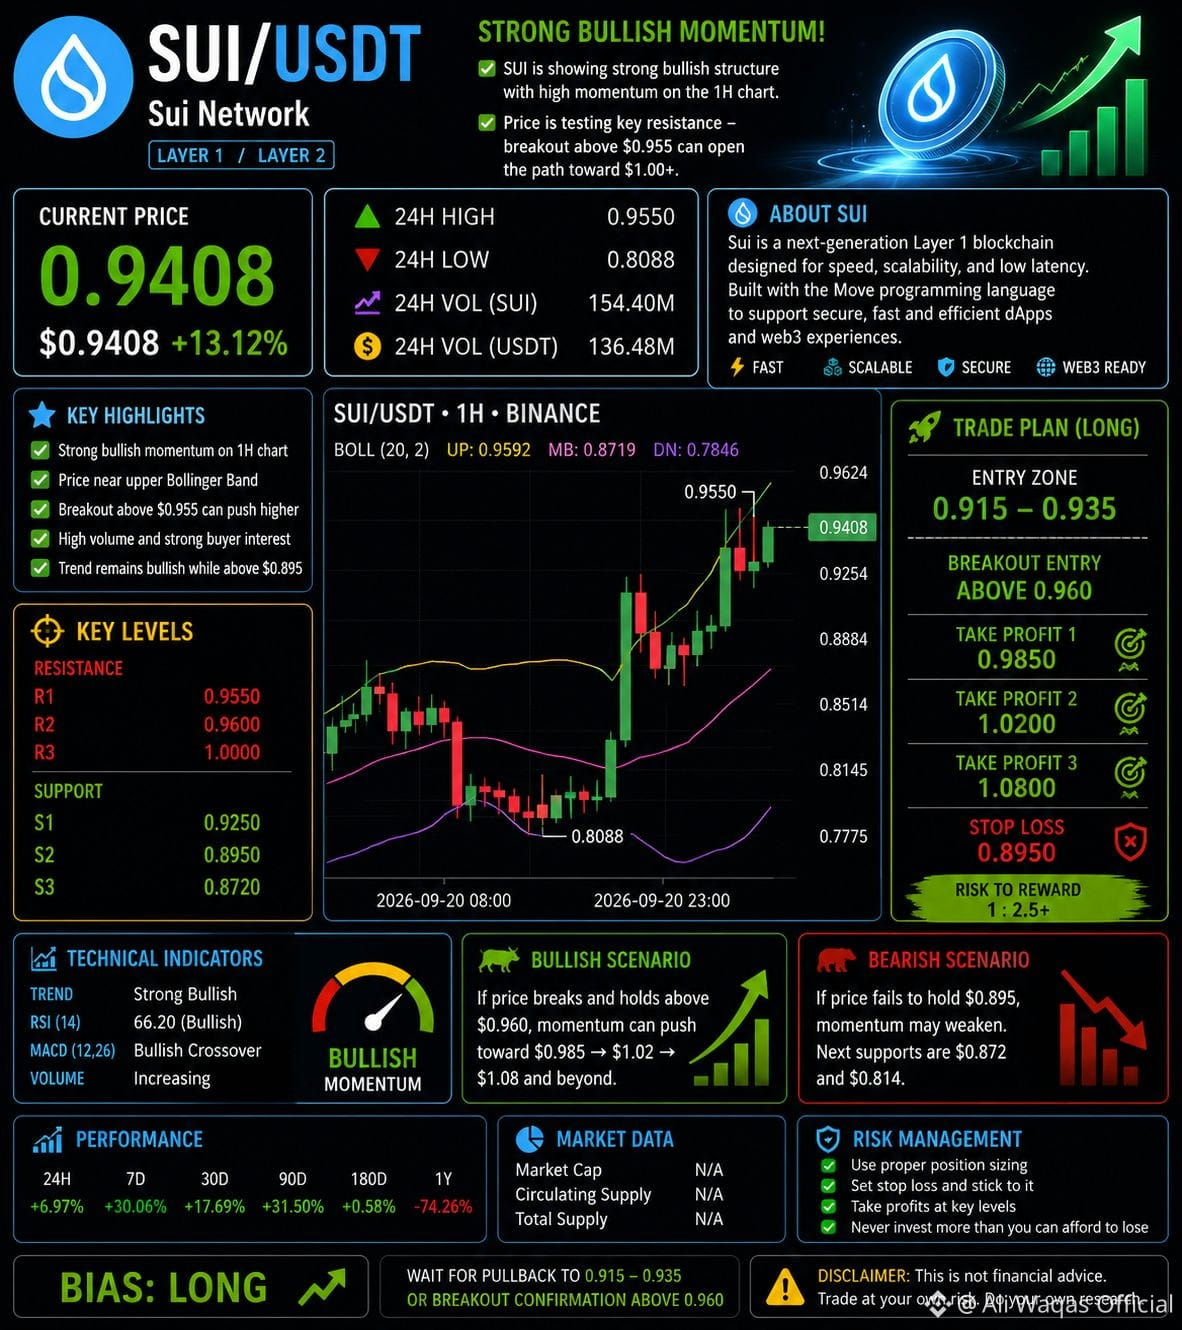
Entry zone: $0.915–$0.935
Breakout entry: Above $0.960 with a confirmed 1H candle
TP1: $0.985
TP2: $1.020
TP3: $1.080
Stop Loss: $0.895
🔑 Key levels
Resistance: $0.955 → $0.960 → $1.00
Support: $0.925 → $0.895 → $0.872
Bullish invalidation: A sustained 1H move below $0.895 would weaken this setup.
⚠️ Price is already near resistance after a strong move, so chasing at $0.94+ carries higher pullback risk. A retest/hold of support or a confirmed breakout is technically cleaner.
**Bias: 🟢 LONG / bullish, with confirmation.**
{future}(SUIUSDT)
#SUİ
#sui
#SUI🔥
#SUIUSDT
$SUI
LONG setup
Entry zone: $0.915–$0.935
Breakout entry: Above $0.960 with a confirmed 1H candle
TP1: $0.985
TP2: $1.020
TP3: $1.080
Stop Loss: $0.895
🔑 Key levels
Resistance: $0.955 → $0.960 → $1.00
Support: $0.925 → $0.895 → $0.872
Bullish invalidation: A sustained 1H move below $0.895 would weaken this setup.
⚠️ Price is already near resistance after a strong move, so chasing at $0.94+ carries higher pullback risk. A retest/hold of support or a confirmed breakout is technically cleaner.
**Bias: 🟢 LONG / bullish, with confirmation.**
#SUİ
#sui
#SUI🔥
#SUIUSDT
LONG setup
Entry zone: $0.915–$0.935
Breakout entry: Above $0.960 with a confirmed 1H candle
TP1: $0.985
TP2: $1.020
TP3: $1.080
Stop Loss: $0.895
🔑 Key levels
Resistance: $0.955 → $0.960 → $1.00
Support: $0.925 → $0.895 → $0.872
Bullish invalidation: A sustained 1H move below $0.895 would weaken this setup.
⚠️ Price is already near resistance after a strong move, so chasing at $0.94+ carries higher pullback risk. A retest/hold of support or a confirmed breakout is technically cleaner.
**Bias: 🟢 LONG / bullish, with confirmation.**
#SUİ
#sui
#SUI🔥
#SUIUSDT
321
·
--
Bullish
$NEAR
Aggressive LONG setup
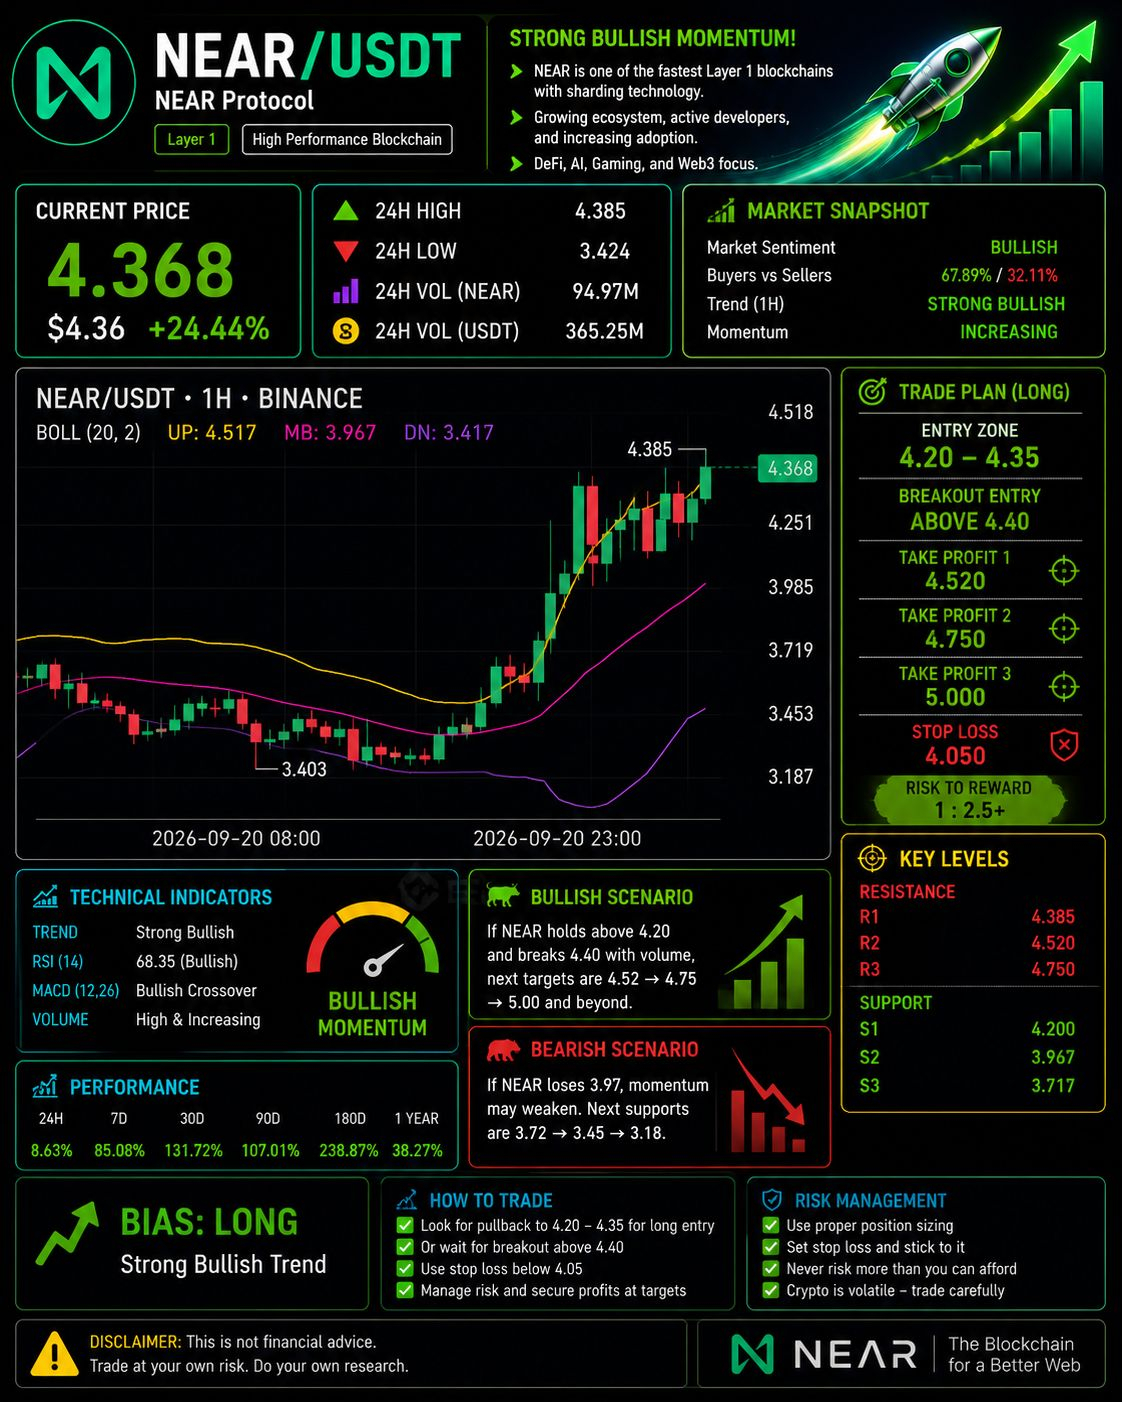
Entry: $4.20–$4.35 on pullback/hold
Breakout entry: Above $4.40 after 1H confirmation
TP1: $4.52
TP2: $4.75
TP3: $5.00
Stop Loss: $4.05
Invalidation: 1H close below ~$3.97
Key resistance: $4.385 → $4.52
Key support: $4.20 → $3.97
⚠️ Because price is already extended after a rapid rally, chasing a large green candle carries elevated pullback risk. The setup is strongest if $4.20–$4.35 holds or if $4.40 breaks with volume. This is a chart-based scenario, not a guarantee.
**Bias: LONG 🟢 — but wait for confirmation rather than chasing.**
{future}(NEARUSDT)
#NEAR🚀🚀🚀
#NearBullish
#NEARUSDT
#NEARToken
#nearprotocol
$NEAR
Aggressive LONG setup
Entry: $4.20–$4.35 on pullback/hold
Breakout entry: Above $4.40 after 1H confirmation
TP1: $4.52
TP2: $4.75
TP3: $5.00
Stop Loss: $4.05
Invalidation: 1H close below ~$3.97
Key resistance: $4.385 → $4.52
Key support: $4.20 → $3.97
⚠️ Because price is already extended after a rapid rally, chasing a large green candle carries elevated pullback risk. The setup is strongest if $4.20–$4.35 holds or if $4.40 breaks with volume. This is a chart-based scenario, not a guarantee.
**Bias: LONG 🟢 — but wait for confirmation rather than chasing.**
#NEAR🚀🚀🚀
#NearBullish
#NEARUSDT
#NEARToken
#nearprotocol
Aggressive LONG setup
Entry: $4.20–$4.35 on pullback/hold
Breakout entry: Above $4.40 after 1H confirmation
TP1: $4.52
TP2: $4.75
TP3: $5.00
Stop Loss: $4.05
Invalidation: 1H close below ~$3.97
Key resistance: $4.385 → $4.52
Key support: $4.20 → $3.97
⚠️ Because price is already extended after a rapid rally, chasing a large green candle carries elevated pullback risk. The setup is strongest if $4.20–$4.35 holds or if $4.40 breaks with volume. This is a chart-based scenario, not a guarantee.
**Bias: LONG 🟢 — but wait for confirmation rather than chasing.**
#NEAR🚀🚀🚀
#NearBullish
#NEARUSDT
#NEARToken
#nearprotocol
167
·
--
Bearish
$AKE
Short-term setup
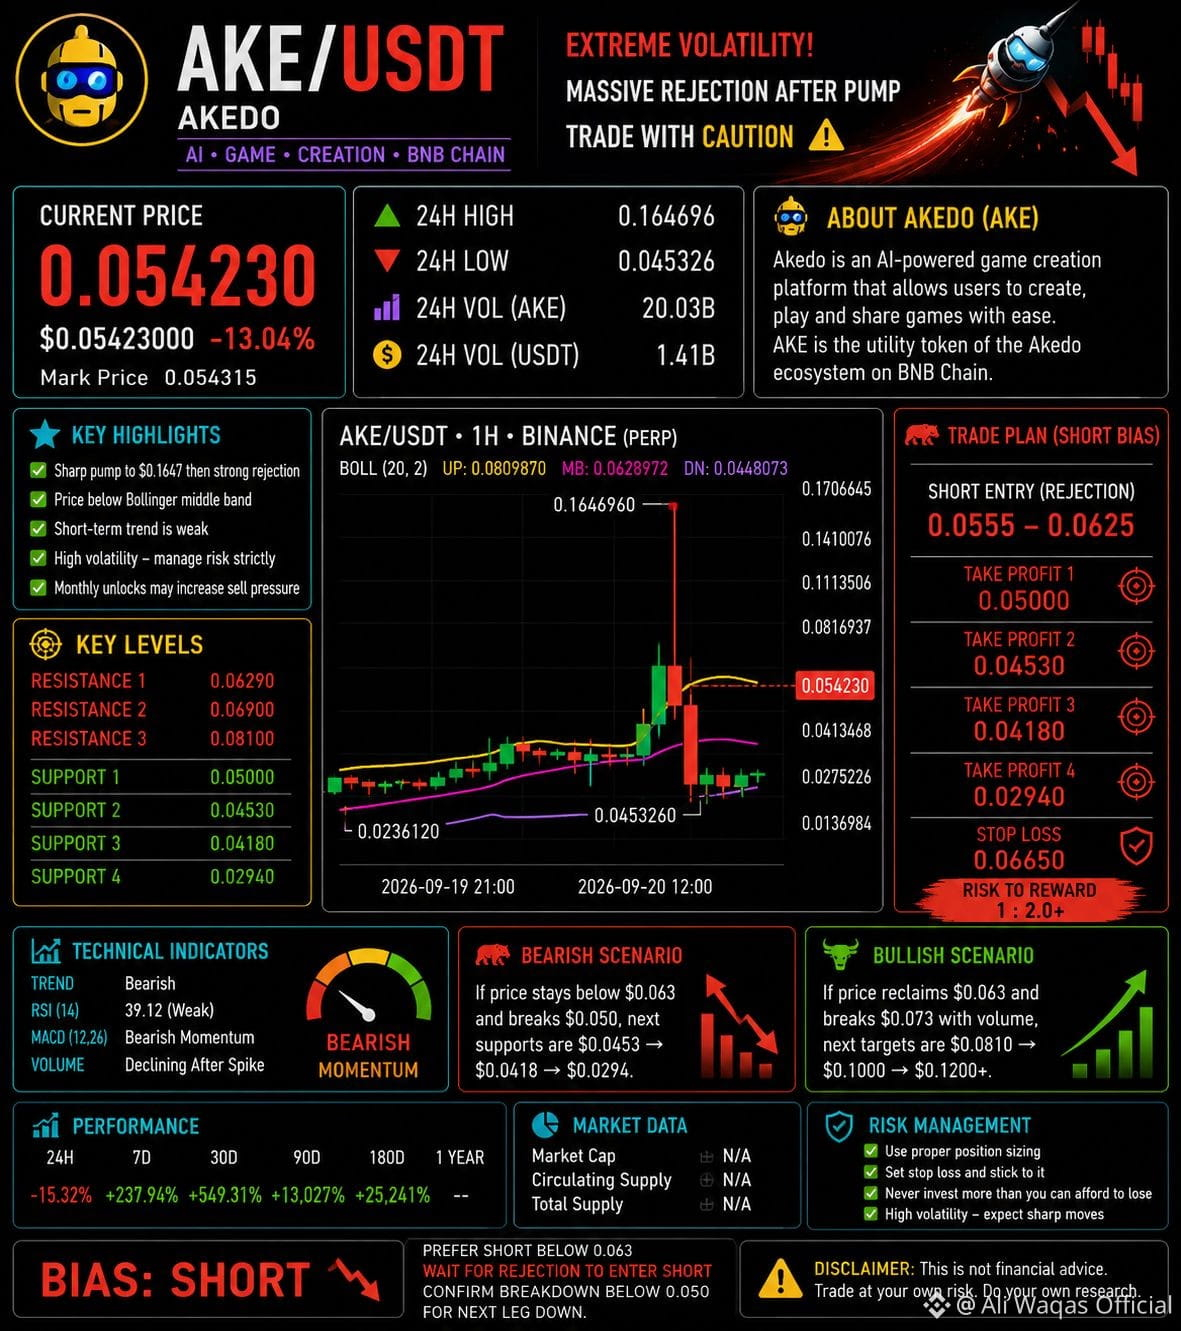
Bias: 🔴 SHORT / bearish below $0.0630
Entry zone: $0.0555–$0.0625 on rejection
TP1: $0.0500
TP2: $0.0453
TP3: $0.0418
Extended target: $0.0294
Stop loss: $0.0665
🔑 Important levels
Resistance
$0.0629 — Bollinger middle
$0.0690–$0.0730 — recovery resistance
$0.0810 — Bollinger upper area
$0.1647 — recent spike high
Support
$0.0500
$0.0453 — current chart low
$0.0418 — broader support
$0.0294 — deeper support
⚠️ Key warning
This is an extremely volatile setup. The huge wick to $0.1647 followed by the collapse means liquidation/slippage risk is unusually high. Also, Phemex reports that only roughly 22–23% of AKE's 100B total supply was circulating around mid-September, making future unlocks an important risk factor. �
Phemex +1
Bullish invalidation: A sustained 1H recovery above $0.063–$0.066 would weaken the immediate short setup; reclaiming $0.073–$0.081 would indicate substantially stronger recovery momentum.
{future}(AKEUSDT)
#AKEUSD
#AKEUpdate
#AKEUADT
#AKETRADE
$AKE
Short-term setup
Bias: 🔴 SHORT / bearish below $0.0630
Entry zone: $0.0555–$0.0625 on rejection
TP1: $0.0500
TP2: $0.0453
TP3: $0.0418
Extended target: $0.0294
Stop loss: $0.0665
🔑 Important levels
Resistance
$0.0629 — Bollinger middle
$0.0690–$0.0730 — recovery resistance
$0.0810 — Bollinger upper area
$0.1647 — recent spike high
Support
$0.0500
$0.0453 — current chart low
$0.0418 — broader support
$0.0294 — deeper support
⚠️ Key warning
This is an extremely volatile setup. The huge wick to $0.1647 followed by the collapse means liquidation/slippage risk is unusually high. Also, Phemex reports that only roughly 22–23% of AKE's 100B total supply was circulating around mid-September, making future unlocks an important risk factor. �
Phemex +1
Bullish invalidation: A sustained 1H recovery above $0.063–$0.066 would weaken the immediate short setup; reclaiming $0.073–$0.081 would indicate substantially stronger recovery momentum.
#AKEUSD
#AKEUpdate
#AKEUADT
#AKETRADE
Short-term setup
Bias: 🔴 SHORT / bearish below $0.0630
Entry zone: $0.0555–$0.0625 on rejection
TP1: $0.0500
TP2: $0.0453
TP3: $0.0418
Extended target: $0.0294
Stop loss: $0.0665
🔑 Important levels
Resistance
$0.0629 — Bollinger middle
$0.0690–$0.0730 — recovery resistance
$0.0810 — Bollinger upper area
$0.1647 — recent spike high
Support
$0.0500
$0.0453 — current chart low
$0.0418 — broader support
$0.0294 — deeper support
⚠️ Key warning
This is an extremely volatile setup. The huge wick to $0.1647 followed by the collapse means liquidation/slippage risk is unusually high. Also, Phemex reports that only roughly 22–23% of AKE's 100B total supply was circulating around mid-September, making future unlocks an important risk factor. �
Phemex +1
Bullish invalidation: A sustained 1H recovery above $0.063–$0.066 would weaken the immediate short setup; reclaiming $0.073–$0.081 would indicate substantially stronger recovery momentum.
#AKEUSD
#AKEUpdate
#AKEUADT
#AKETRADE
237
·
--
Bullish
$AKE
Trade setup — LONG
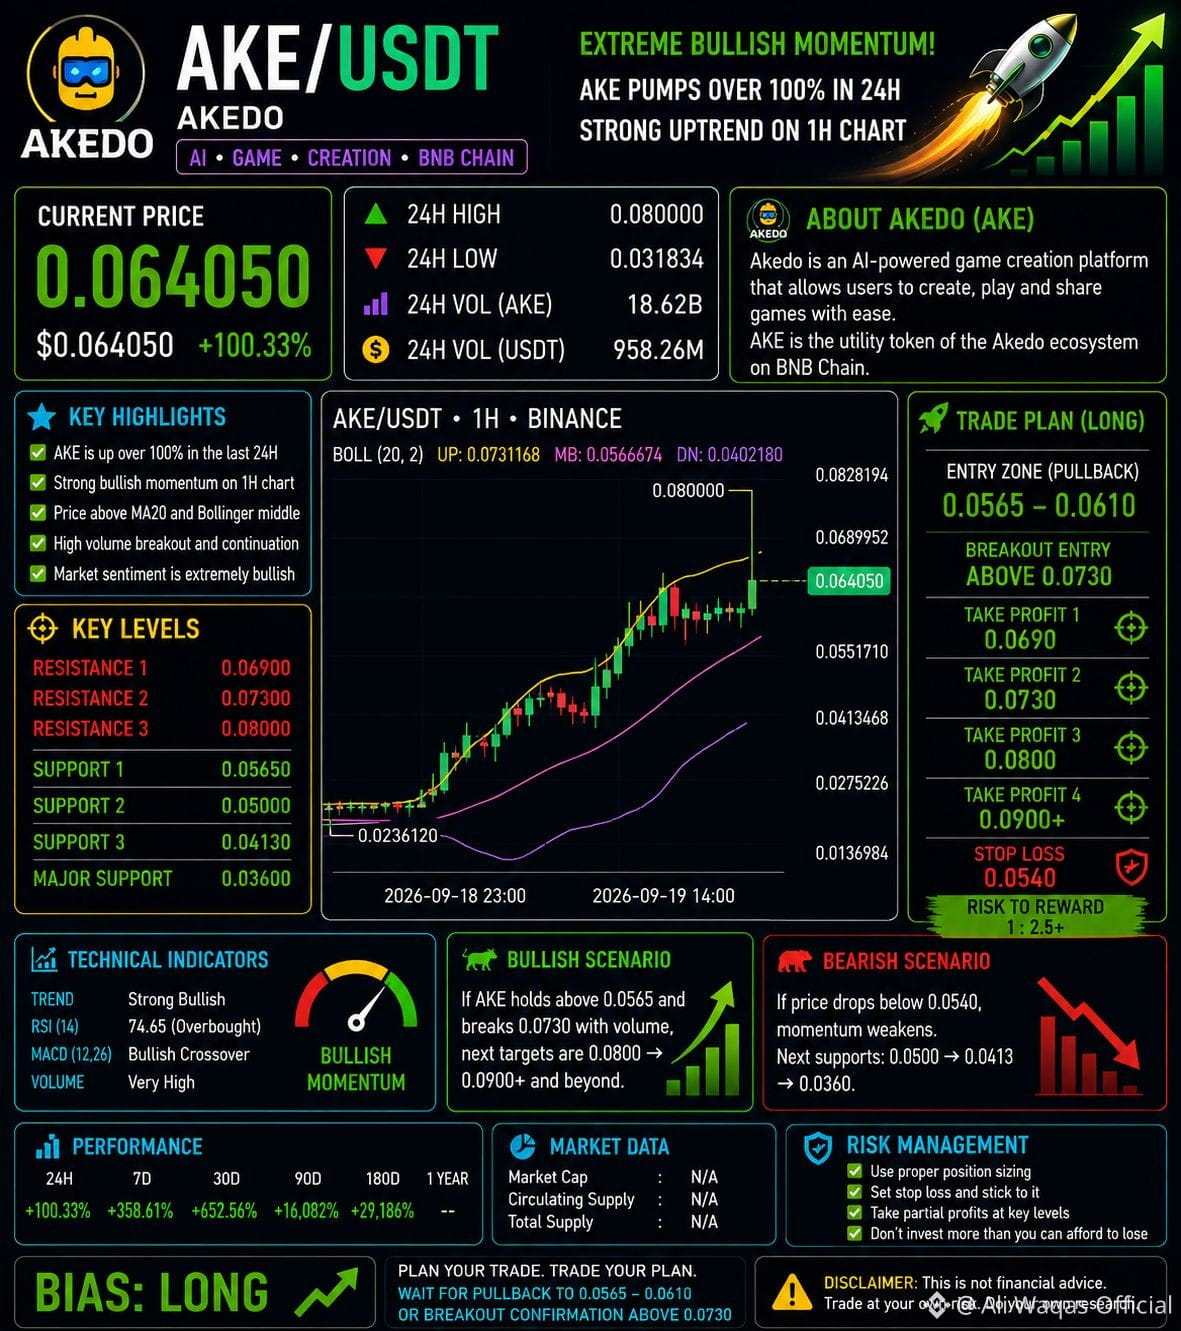
Entry: $0.0565–$0.0610 on a controlled pullback
Breakout entry: Above $0.0730 with strong volume
TP1: $0.0690
TP2: $0.0730
TP3: $0.0800
TP4: $0.0900+
Stop loss: Below $0.0540
Bias: LONG, but chasing at $0.064+ carries elevated volatility risk. A pullback/retest or confirmed breakout is technically cleaner than entering after a vertical move.
The screenshot's Bollinger Bands show the middle band around $0.0567 and upper band around $0.0731, supporting those zones. AKEDO is an AI/game-creation project on BNB Chain, with AKE used within its ecosystem. �
BitMart +1
⚠️ Risk: AKE has multiple similarly named tokens/contracts, so verify the BNB Chain contract before trading; current sources identify 0x2c3a...12f7db as the canonical contract. �
{future}(AKEUSDT)
#AKE
#AKEUpdate
#AKEUADT
#AKETRADE
$AKE
Trade setup — LONG
Entry: $0.0565–$0.0610 on a controlled pullback
Breakout entry: Above $0.0730 with strong volume
TP1: $0.0690
TP2: $0.0730
TP3: $0.0800
TP4: $0.0900+
Stop loss: Below $0.0540
Bias: LONG, but chasing at $0.064+ carries elevated volatility risk. A pullback/retest or confirmed breakout is technically cleaner than entering after a vertical move.
The screenshot's Bollinger Bands show the middle band around $0.0567 and upper band around $0.0731, supporting those zones. AKEDO is an AI/game-creation project on BNB Chain, with AKE used within its ecosystem. �
BitMart +1
⚠️ Risk: AKE has multiple similarly named tokens/contracts, so verify the BNB Chain contract before trading; current sources identify 0x2c3a...12f7db as the canonical contract. �
#AKE
#AKEUpdate
#AKEUADT
#AKETRADE
Trade setup — LONG
Entry: $0.0565–$0.0610 on a controlled pullback
Breakout entry: Above $0.0730 with strong volume
TP1: $0.0690
TP2: $0.0730
TP3: $0.0800
TP4: $0.0900+
Stop loss: Below $0.0540
Bias: LONG, but chasing at $0.064+ carries elevated volatility risk. A pullback/retest or confirmed breakout is technically cleaner than entering after a vertical move.
The screenshot's Bollinger Bands show the middle band around $0.0567 and upper band around $0.0731, supporting those zones. AKEDO is an AI/game-creation project on BNB Chain, with AKE used within its ecosystem. �
BitMart +1
⚠️ Risk: AKE has multiple similarly named tokens/contracts, so verify the BNB Chain contract before trading; current sources identify 0x2c3a...12f7db as the canonical contract. �
#AKE
#AKEUpdate
#AKEUADT
#AKETRADE
189
·
--
Bullish
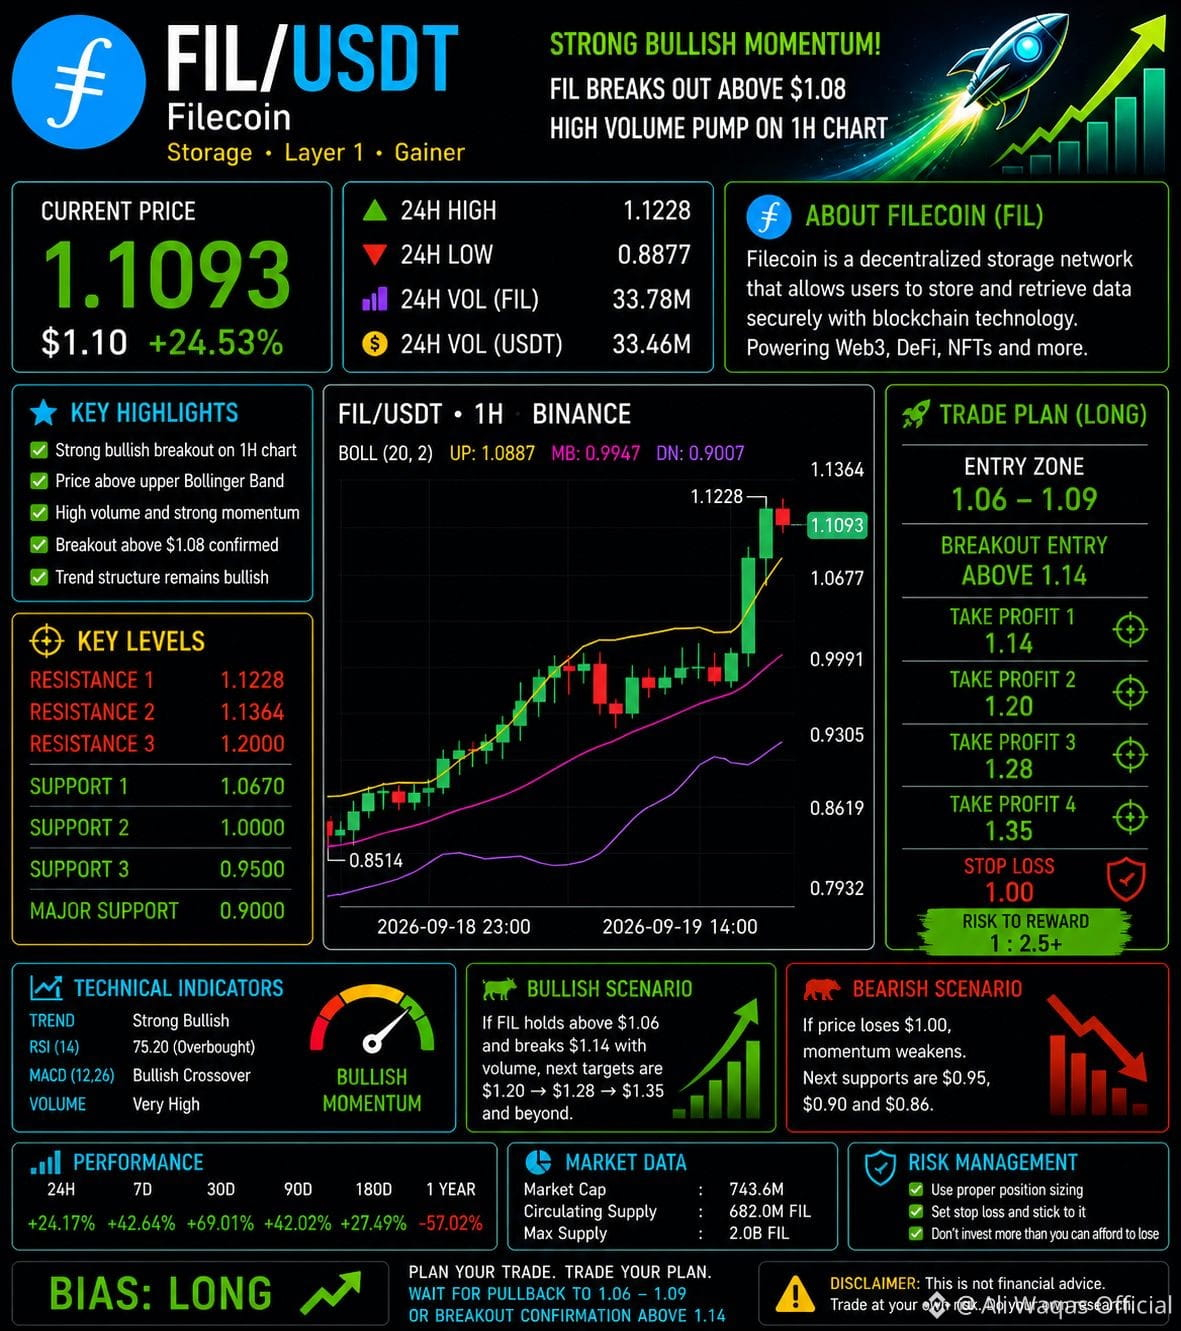
$FIL
Aggressive LONG Setup
Preferred pullback entry: $1.06–$1.09
Breakout entry: Above $1.14 after a strong 1H close
Stop Loss: $1.00
Targets:
🎯 TP1: $1.14
🎯 TP2: $1.20
🎯 TP3: $1.28
🎯 TP4: $1.35
⚠️ Bearish Invalidation
If FIL loses $1.00, the breakout structure becomes weaker.
Potential downside levels: $0.95 → $0.90 → $0.86
🎯 Aggressive Bias
BULLISH / LONG, but entering immediately at $1.1093 means buying after a sharp +24.53% move. A pullback toward $1.06–$1.09 provides a more controlled setup; alternatively, wait for a confirmed breakout above $1.14.
{future}(FILUSDT)
#fil
#FIL/USDT
#FIL.24小时交易策略
#FinancialGrowth
$FIL
Aggressive LONG Setup
Preferred pullback entry: $1.06–$1.09
Breakout entry: Above $1.14 after a strong 1H close
Stop Loss: $1.00
Targets:
🎯 TP1: $1.14
🎯 TP2: $1.20
🎯 TP3: $1.28
🎯 TP4: $1.35
⚠️ Bearish Invalidation
If FIL loses $1.00, the breakout structure becomes weaker.
Potential downside levels: $0.95 → $0.90 → $0.86
🎯 Aggressive Bias
BULLISH / LONG, but entering immediately at $1.1093 means buying after a sharp +24.53% move. A pullback toward $1.06–$1.09 provides a more controlled setup; alternatively, wait for a confirmed breakout above $1.14.
#fil
#FIL/USDT
#FIL.24小时交易策略
#FinancialGrowth
Aggressive LONG Setup
Preferred pullback entry: $1.06–$1.09
Breakout entry: Above $1.14 after a strong 1H close
Stop Loss: $1.00
Targets:
🎯 TP1: $1.14
🎯 TP2: $1.20
🎯 TP3: $1.28
🎯 TP4: $1.35
⚠️ Bearish Invalidation
If FIL loses $1.00, the breakout structure becomes weaker.
Potential downside levels: $0.95 → $0.90 → $0.86
🎯 Aggressive Bias
BULLISH / LONG, but entering immediately at $1.1093 means buying after a sharp +24.53% move. A pullback toward $1.06–$1.09 provides a more controlled setup; alternatively, wait for a confirmed breakout above $1.14.
#fil
#FIL/USDT
#FIL.24小时交易策略
#FinancialGrowth
185
·
--
Bullish
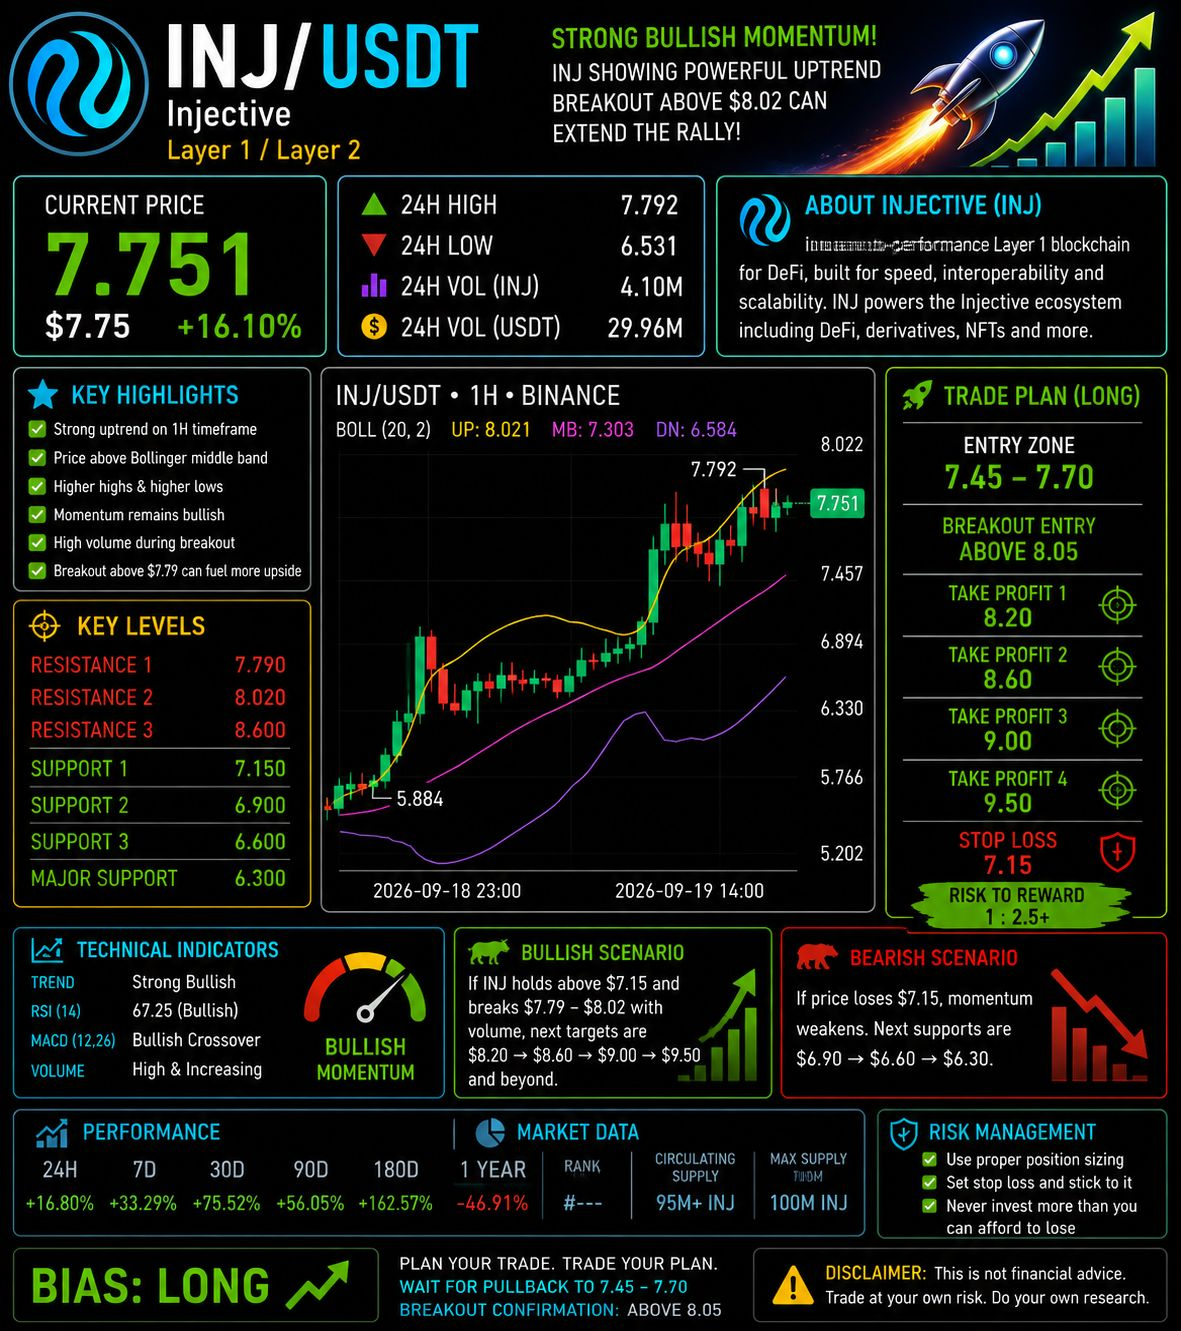
$INJ
Aggressive LONG Setup
Entry zone: $7.45–$7.70
Breakout entry: Above $8.05 after a confirmed 1H close
Stop Loss: $7.15
Take Profit:
🎯 TP1: $8.20
🎯 TP2: $8.60
🎯 TP3: $9.00
🎯 TP4: $9.50
⚠️ Bearish Invalidation
If INJ loses $7.15, momentum weakens.
Potential downside supports: $6.90 → $6.60 → $6.30
🎯 Bias
BULLISH / AGGRESSIVE LONG, but the cleaner risk/reward is a pullback toward $7.45–$7.70 rather than chasing directly into $7.79–$8.02 resistance.
Risk: High volatility. Use a defined stop and avoid excessive leverage.
{future}(INJUSDT)
#INJ
#İNJ
#InjectiveCoin
#INJUSDT
$INJ
Aggressive LONG Setup
Entry zone: $7.45–$7.70
Breakout entry: Above $8.05 after a confirmed 1H close
Stop Loss: $7.15
Take Profit:
🎯 TP1: $8.20
🎯 TP2: $8.60
🎯 TP3: $9.00
🎯 TP4: $9.50
⚠️ Bearish Invalidation
If INJ loses $7.15, momentum weakens.
Potential downside supports: $6.90 → $6.60 → $6.30
🎯 Bias
BULLISH / AGGRESSIVE LONG, but the cleaner risk/reward is a pullback toward $7.45–$7.70 rather than chasing directly into $7.79–$8.02 resistance.
Risk: High volatility. Use a defined stop and avoid excessive leverage.
#INJ
#İNJ
#InjectiveCoin
#INJUSDT
Aggressive LONG Setup
Entry zone: $7.45–$7.70
Breakout entry: Above $8.05 after a confirmed 1H close
Stop Loss: $7.15
Take Profit:
🎯 TP1: $8.20
🎯 TP2: $8.60
🎯 TP3: $9.00
🎯 TP4: $9.50
⚠️ Bearish Invalidation
If INJ loses $7.15, momentum weakens.
Potential downside supports: $6.90 → $6.60 → $6.30
🎯 Bias
BULLISH / AGGRESSIVE LONG, but the cleaner risk/reward is a pullback toward $7.45–$7.70 rather than chasing directly into $7.79–$8.02 resistance.
Risk: High volatility. Use a defined stop and avoid excessive leverage.
#INJ
#İNJ
#InjectiveCoin
#INJUSDT
20
·
--
Bullish
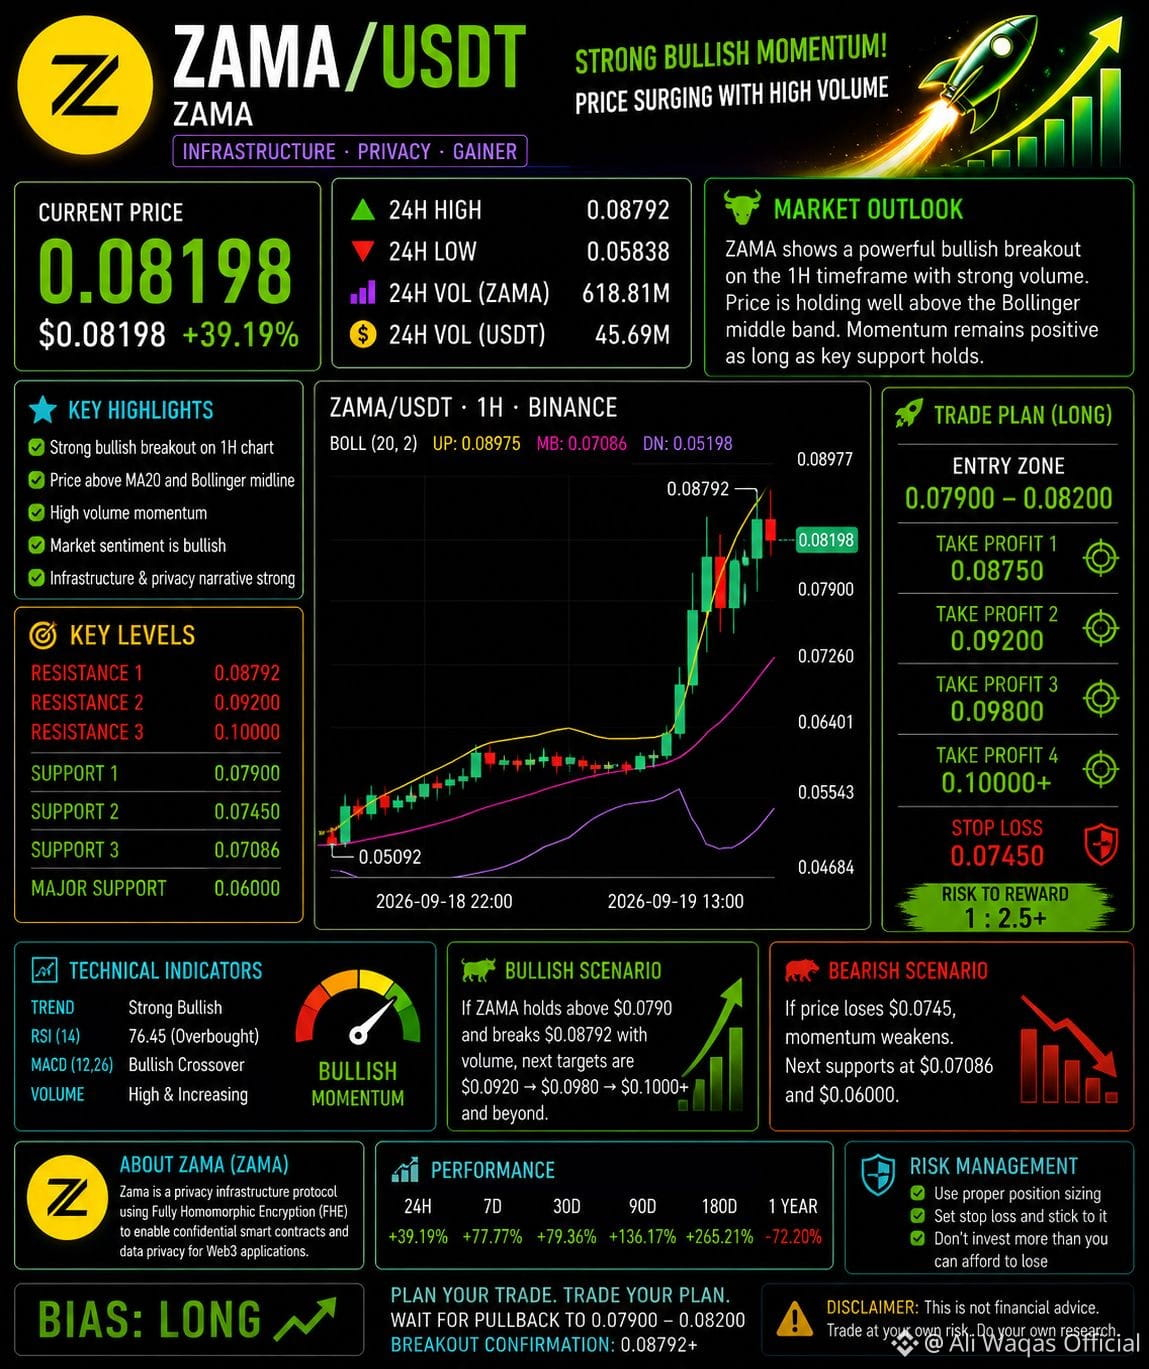
$ZAMA
Aggressive LONG Setup
Entry: $0.0790–$0.0820
Stop Loss: $0.0745
TP1: $0.0875
TP2: $0.0920
TP3: $0.0980–$0.1000
Breakout entry: Only after a strong 1H candle closes above $0.0898, with momentum confirmation.
⚠️ Invalidation / SHORT Scenario
If ZAMA loses $0.0745, bullish momentum weakens substantially.
Possible downside levels:
$0.0709
$0.0660
$0.0600
🎯 Aggressive Bias
LONG / BUY-the-dip bias, but do not blindly chase the spike. The $0.079–$0.082 area offers a better risk structure than entering directly into $0.088 resistance.
Risk: Very high — this is a highly volatile momentum setup, so use small position sizing and predefined risk.
{future}(ZAMAUSDT)
#ZAMASignals
#zamancrypto
#ZAMAUSDT
#ZamaProtocol
$ZAMA
Aggressive LONG Setup
Entry: $0.0790–$0.0820
Stop Loss: $0.0745
TP1: $0.0875
TP2: $0.0920
TP3: $0.0980–$0.1000
Breakout entry: Only after a strong 1H candle closes above $0.0898, with momentum confirmation.
⚠️ Invalidation / SHORT Scenario
If ZAMA loses $0.0745, bullish momentum weakens substantially.
Possible downside levels:
$0.0709
$0.0660
$0.0600
🎯 Aggressive Bias
LONG / BUY-the-dip bias, but do not blindly chase the spike. The $0.079–$0.082 area offers a better risk structure than entering directly into $0.088 resistance.
Risk: Very high — this is a highly volatile momentum setup, so use small position sizing and predefined risk.
#ZAMASignals
#zamancrypto
#ZAMAUSDT
#ZamaProtocol
Aggressive LONG Setup
Entry: $0.0790–$0.0820
Stop Loss: $0.0745
TP1: $0.0875
TP2: $0.0920
TP3: $0.0980–$0.1000
Breakout entry: Only after a strong 1H candle closes above $0.0898, with momentum confirmation.
⚠️ Invalidation / SHORT Scenario
If ZAMA loses $0.0745, bullish momentum weakens substantially.
Possible downside levels:
$0.0709
$0.0660
$0.0600
🎯 Aggressive Bias
LONG / BUY-the-dip bias, but do not blindly chase the spike. The $0.079–$0.082 area offers a better risk structure than entering directly into $0.088 resistance.
Risk: Very high — this is a highly volatile momentum setup, so use small position sizing and predefined risk.
#ZAMASignals
#zamancrypto
#ZAMAUSDT
#ZamaProtocol
68
·
--
Bullish
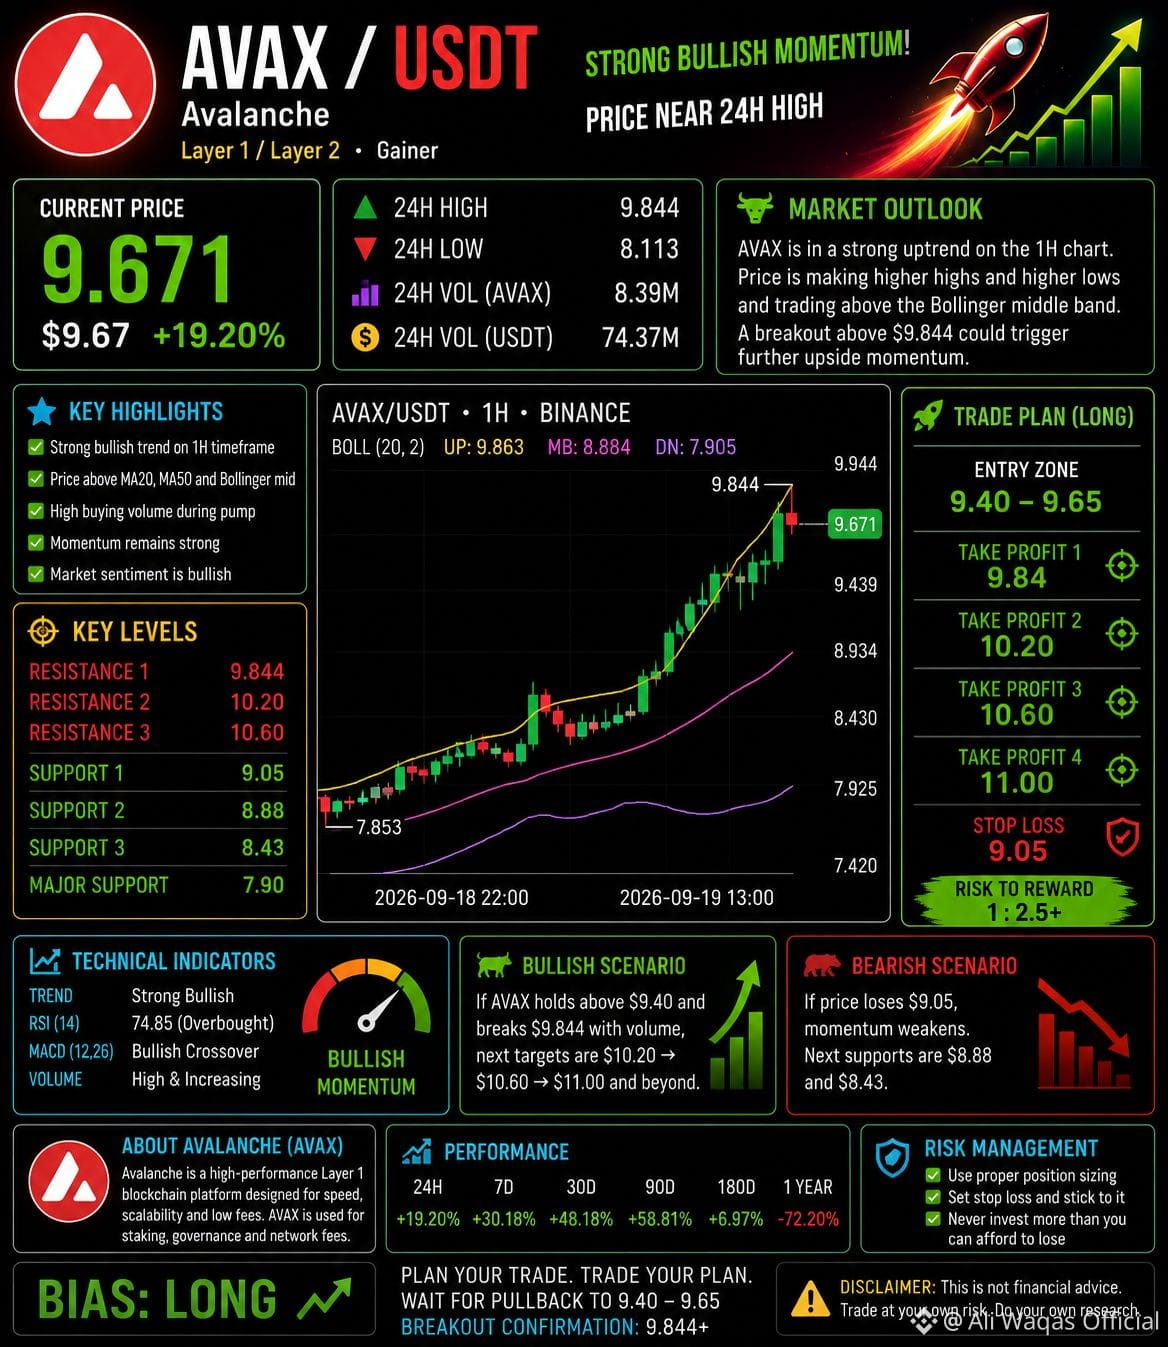
$AVAX
Aggressive LONG Setup
AVAX is showing a strong 1H bullish trend with consecutive higher highs and higher lows. Price is trading above the Bollinger middle band and is pressing toward the $9.844 resistance. The latest small red candle suggests some profit-taking, so a pullback entry is preferable to chasing.
Level
Price
🟢 Entry Zone
$9.40–$9.65
🎯 TP1
$9.84
🎯 TP2
$10.20
🚀 TP3
$10.60
🚀 TP4
$11.00
🛑 Stop Loss
$9.05
⚡ Breakout Strategy
A strong 1H close above $9.84 can signal continuation. In that case, an aggressive breakout entry can be considered above $9.90, targeting $10.20 → $10.60 → $11.00.
🔻 Invalidation
If AVAX loses $9.05, the aggressive long setup weakens. A deeper pullback could expose the $8.88 Bollinger midline and potentially the $8.43 area.
Bias from the supplied chart: 🟢 LONG / BULLISH
AVAX has also been showing recent market momentum: CoinMarketCap's current data shows AVAX around $8.50 and higher than its recent September levels, while recent reporting has linked the move to tokenization and institutional activity around Avalanche. �
CoinMarketCap +1
⚠️ High-volatility setup: the move is already extended, so aggressive trading should use controlled position size and a defined stop.
#AVAX✈️
#AVAXUSD
#AVAX
#AVAXUSDT🚀
#Avax🔥🔥
$AVAX
Aggressive LONG Setup
AVAX is showing a strong 1H bullish trend with consecutive higher highs and higher lows. Price is trading above the Bollinger middle band and is pressing toward the $9.844 resistance. The latest small red candle suggests some profit-taking, so a pullback entry is preferable to chasing.
Level
Price
🟢 Entry Zone
$9.40–$9.65
🎯 TP1
$9.84
🎯 TP2
$10.20
🚀 TP3
$10.60
🚀 TP4
$11.00
🛑 Stop Loss
$9.05
⚡ Breakout Strategy
A strong 1H close above $9.84 can signal continuation. In that case, an aggressive breakout entry can be considered above $9.90, targeting $10.20 → $10.60 → $11.00.
🔻 Invalidation
If AVAX loses $9.05, the aggressive long setup weakens. A deeper pullback could expose the $8.88 Bollinger midline and potentially the $8.43 area.
Bias from the supplied chart: 🟢 LONG / BULLISH
AVAX has also been showing recent market momentum: CoinMarketCap's current data shows AVAX around $8.50 and higher than its recent September levels, while recent reporting has linked the move to tokenization and institutional activity around Avalanche. �
CoinMarketCap +1
⚠️ High-volatility setup: the move is already extended, so aggressive trading should use controlled position size and a defined stop.
#AVAX✈️
#AVAXUSD
#AVAX
#AVAXUSDT🚀
#Avax🔥🔥
Aggressive LONG Setup
AVAX is showing a strong 1H bullish trend with consecutive higher highs and higher lows. Price is trading above the Bollinger middle band and is pressing toward the $9.844 resistance. The latest small red candle suggests some profit-taking, so a pullback entry is preferable to chasing.
Level
Price
🟢 Entry Zone
$9.40–$9.65
🎯 TP1
$9.84
🎯 TP2
$10.20
🚀 TP3
$10.60
🚀 TP4
$11.00
🛑 Stop Loss
$9.05
⚡ Breakout Strategy
A strong 1H close above $9.84 can signal continuation. In that case, an aggressive breakout entry can be considered above $9.90, targeting $10.20 → $10.60 → $11.00.
🔻 Invalidation
If AVAX loses $9.05, the aggressive long setup weakens. A deeper pullback could expose the $8.88 Bollinger midline and potentially the $8.43 area.
Bias from the supplied chart: 🟢 LONG / BULLISH
AVAX has also been showing recent market momentum: CoinMarketCap's current data shows AVAX around $8.50 and higher than its recent September levels, while recent reporting has linked the move to tokenization and institutional activity around Avalanche. �
CoinMarketCap +1
⚠️ High-volatility setup: the move is already extended, so aggressive trading should use controlled position size and a defined stop.
#AVAX✈️
#AVAXUSD
#AVAX
#AVAXUSDT🚀
#Avax🔥🔥
69
·
--
Bullish
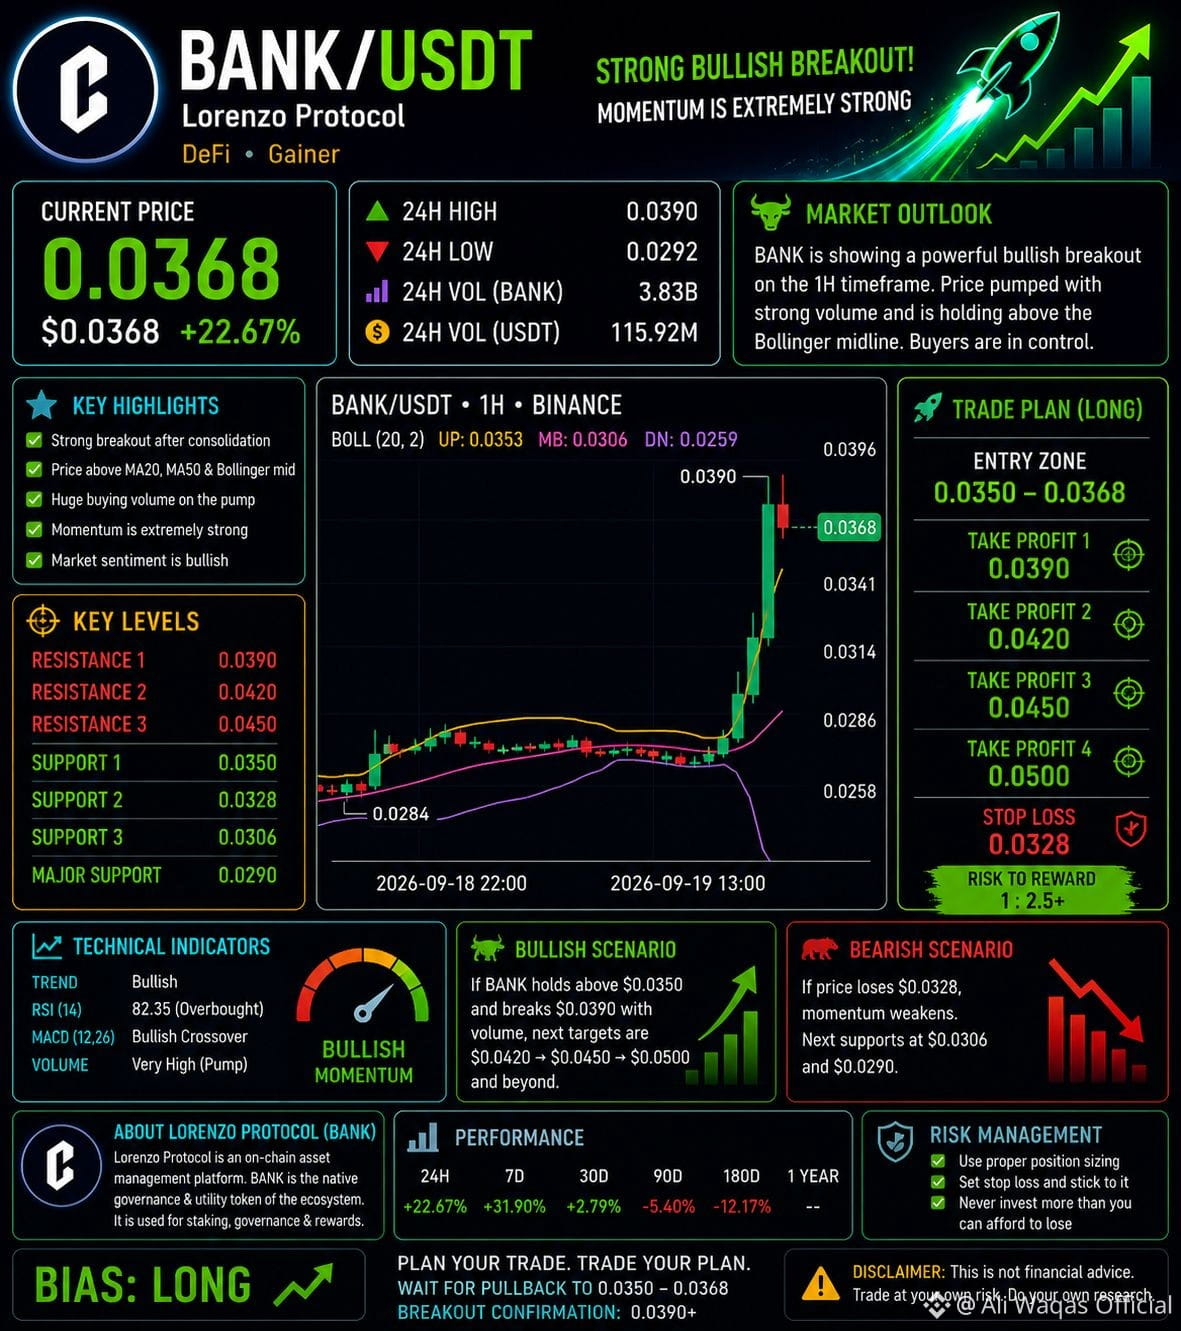
$BANK
Aggressive LONG Setup
The chart shows a very strong bullish breakout from the ~$0.029 area, followed by a sharp move to $0.0390. Price is still above the Bollinger middle band at $0.0306, but the latest red candle shows some profit-taking after the spike.
Level
Price
🟢 Entry Zone
$0.0350–$0.0368
🎯 TP1
$0.0390
🎯 TP2
$0.0420
🚀 TP3
$0.0450
🚀 TP4
$0.0500
🛑 Stop Loss
$0.0328
Breakout trigger: A strong 1H close above $0.0390 could open the way toward $0.042–$0.045.
Invalidation: Losing $0.0328 would weaken this aggressive long setup; below the Bollinger midline around $0.0306, the bullish momentum would be substantially weaker.
⚠️ Risk: This is an extremely volatile breakout. The chart shows a large single-candle expansion, so entering after a sharp pump can produce a fast pullback. Consider smaller position size and avoid excessive leverage.
BANK is the native governance/utility token of Lorenzo Protocol, an on-chain asset-management platform. Binance Academy describes staking, governance and ecosystem rewards as key BANK utilities. � Current market data also shows BANK trading with substantial recent volatility and volume. �
{future}(BANKUSDT)
#bank
#BankruptcyUpdate
#BankOfJapan
#bankusdt
$BANK
Aggressive LONG Setup
The chart shows a very strong bullish breakout from the ~$0.029 area, followed by a sharp move to $0.0390. Price is still above the Bollinger middle band at $0.0306, but the latest red candle shows some profit-taking after the spike.
Level
Price
🟢 Entry Zone
$0.0350–$0.0368
🎯 TP1
$0.0390
🎯 TP2
$0.0420
🚀 TP3
$0.0450
🚀 TP4
$0.0500
🛑 Stop Loss
$0.0328
Breakout trigger: A strong 1H close above $0.0390 could open the way toward $0.042–$0.045.
Invalidation: Losing $0.0328 would weaken this aggressive long setup; below the Bollinger midline around $0.0306, the bullish momentum would be substantially weaker.
⚠️ Risk: This is an extremely volatile breakout. The chart shows a large single-candle expansion, so entering after a sharp pump can produce a fast pullback. Consider smaller position size and avoid excessive leverage.
BANK is the native governance/utility token of Lorenzo Protocol, an on-chain asset-management platform. Binance Academy describes staking, governance and ecosystem rewards as key BANK utilities. � Current market data also shows BANK trading with substantial recent volatility and volume. �
#bank
#BankruptcyUpdate
#BankOfJapan
#bankusdt
Aggressive LONG Setup
The chart shows a very strong bullish breakout from the ~$0.029 area, followed by a sharp move to $0.0390. Price is still above the Bollinger middle band at $0.0306, but the latest red candle shows some profit-taking after the spike.
Level
Price
🟢 Entry Zone
$0.0350–$0.0368
🎯 TP1
$0.0390
🎯 TP2
$0.0420
🚀 TP3
$0.0450
🚀 TP4
$0.0500
🛑 Stop Loss
$0.0328
Breakout trigger: A strong 1H close above $0.0390 could open the way toward $0.042–$0.045.
Invalidation: Losing $0.0328 would weaken this aggressive long setup; below the Bollinger midline around $0.0306, the bullish momentum would be substantially weaker.
⚠️ Risk: This is an extremely volatile breakout. The chart shows a large single-candle expansion, so entering after a sharp pump can produce a fast pullback. Consider smaller position size and avoid excessive leverage.
BANK is the native governance/utility token of Lorenzo Protocol, an on-chain asset-management platform. Binance Academy describes staking, governance and ecosystem rewards as key BANK utilities. � Current market data also shows BANK trading with substantial recent volatility and volume. �
#bank
#BankruptcyUpdate
#BankOfJapan
#bankusdt
262
·
--
Bullish
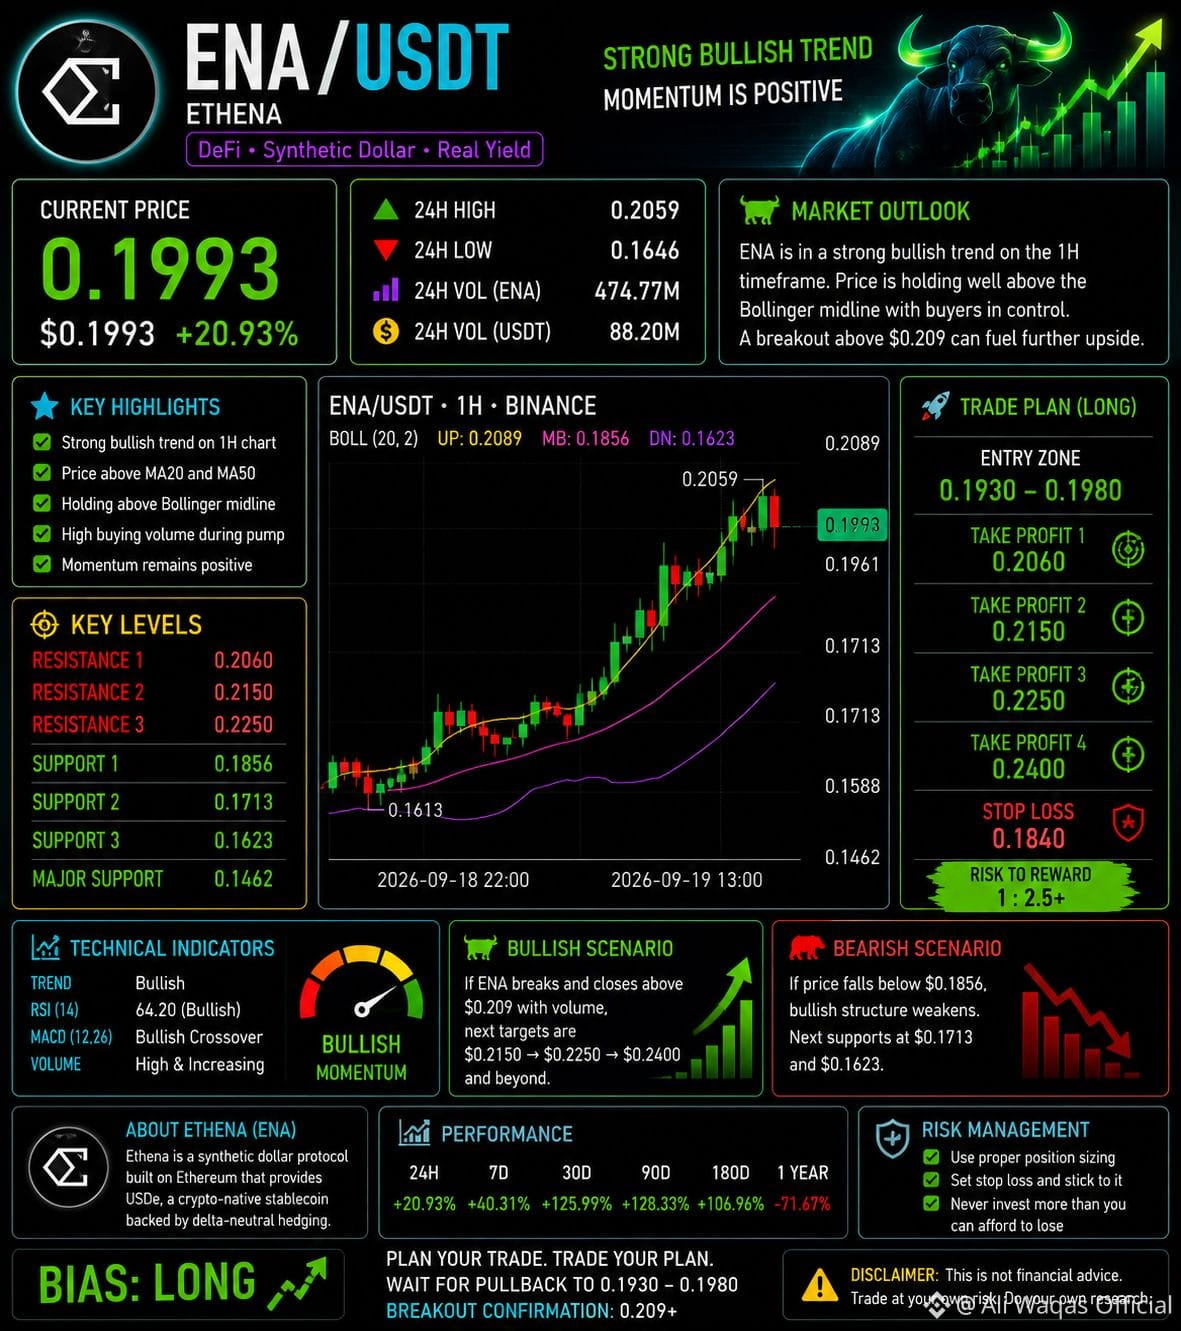
$ENA
Aggressive Trading Setup
The chart shows a strong 1H bullish trend with price holding well above the Bollinger middle band. However, ENA has just rejected $0.2059, so chasing the current price carries higher pullback risk.
Level
Price
🟢 LONG Entry Zone
$0.193–$0.198
🎯 TP1
$0.206
🎯 TP2
$0.215
🚀 TP3
$0.225
🚀 TP4
$0.240
🛑 Stop Loss
$0.184
🚀 Breakout
A strong 1H close above $0.209 could confirm continuation toward $0.215 → $0.225 → $0.240.
🔻 Bearish Invalidation
A 1H close below $0.1856 would weaken the bullish structure. The next major support visible on your chart is around $0.1713–$0.1623.
⚡ Bias
🟢 SHORT-TERM BIAS: LONG / BULLISH
Aggressive entry: $0.193–$0.198
Breakout: $0.209+
Avoid chasing: around $0.205–$0.209 without confirmation.
Ethena's official ecosystem identifies ENA as the governance token, while USDe is its synthetic dollar; Ethena also recently launched Ethena Pay in September 2026. � Current market feeds are around $0.20, broadly consistent with the price shown in your screenshot. �
Ethena +1
coinmarketcap.com +1
{future}(ENAUSDT)
#ENA
#ENAUSDT🚨
#ENA走势分析
#ENA智能策略库🥇🥇
$ENA
Aggressive Trading Setup
The chart shows a strong 1H bullish trend with price holding well above the Bollinger middle band. However, ENA has just rejected $0.2059, so chasing the current price carries higher pullback risk.
Level
Price
🟢 LONG Entry Zone
$0.193–$0.198
🎯 TP1
$0.206
🎯 TP2
$0.215
🚀 TP3
$0.225
🚀 TP4
$0.240
🛑 Stop Loss
$0.184
🚀 Breakout
A strong 1H close above $0.209 could confirm continuation toward $0.215 → $0.225 → $0.240.
🔻 Bearish Invalidation
A 1H close below $0.1856 would weaken the bullish structure. The next major support visible on your chart is around $0.1713–$0.1623.
⚡ Bias
🟢 SHORT-TERM BIAS: LONG / BULLISH
Aggressive entry: $0.193–$0.198
Breakout: $0.209+
Avoid chasing: around $0.205–$0.209 without confirmation.
Ethena's official ecosystem identifies ENA as the governance token, while USDe is its synthetic dollar; Ethena also recently launched Ethena Pay in September 2026. � Current market feeds are around $0.20, broadly consistent with the price shown in your screenshot. �
Ethena +1
coinmarketcap.com +1
#ENA
#ENAUSDT🚨
#ENA走势分析
#ENA智能策略库🥇🥇
Aggressive Trading Setup
The chart shows a strong 1H bullish trend with price holding well above the Bollinger middle band. However, ENA has just rejected $0.2059, so chasing the current price carries higher pullback risk.
Level
Price
🟢 LONG Entry Zone
$0.193–$0.198
🎯 TP1
$0.206
🎯 TP2
$0.215
🚀 TP3
$0.225
🚀 TP4
$0.240
🛑 Stop Loss
$0.184
🚀 Breakout
A strong 1H close above $0.209 could confirm continuation toward $0.215 → $0.225 → $0.240.
🔻 Bearish Invalidation
A 1H close below $0.1856 would weaken the bullish structure. The next major support visible on your chart is around $0.1713–$0.1623.
⚡ Bias
🟢 SHORT-TERM BIAS: LONG / BULLISH
Aggressive entry: $0.193–$0.198
Breakout: $0.209+
Avoid chasing: around $0.205–$0.209 without confirmation.
Ethena's official ecosystem identifies ENA as the governance token, while USDe is its synthetic dollar; Ethena also recently launched Ethena Pay in September 2026. � Current market feeds are around $0.20, broadly consistent with the price shown in your screenshot. �
Ethena +1
coinmarketcap.com +1
#ENA
#ENAUSDT🚨
#ENA走势分析
#ENA智能策略库🥇🥇
225
·
--
Bullish
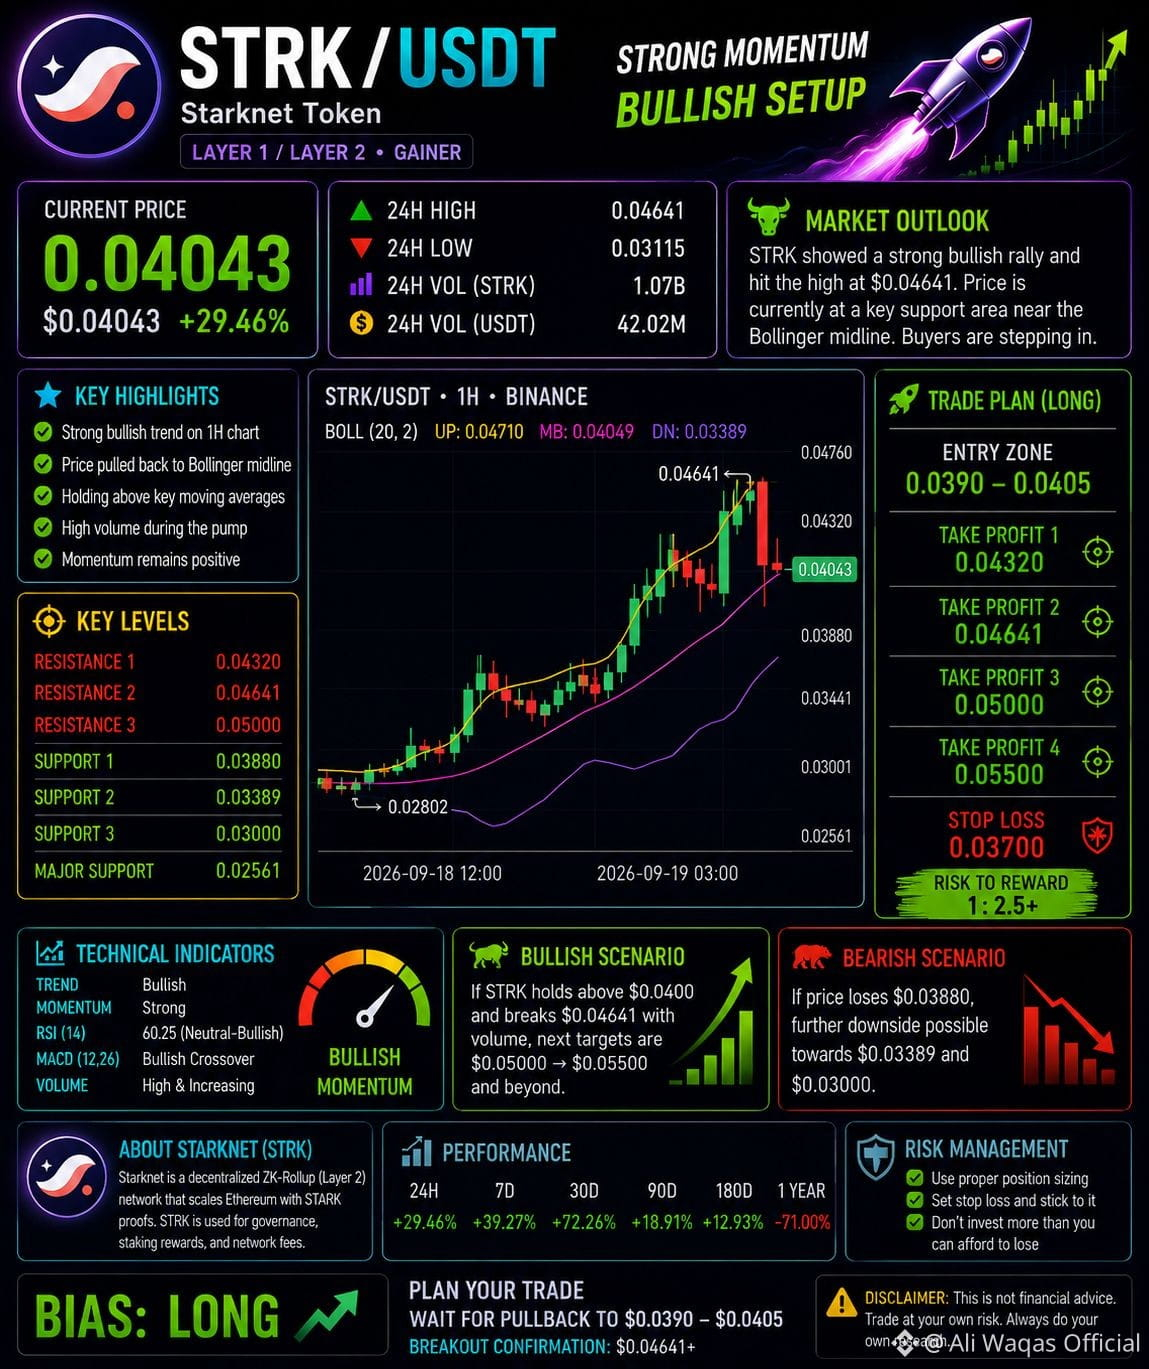
$STRK
Aggressive Trading Setup
The chart shows a strong bullish impulse, but price has pulled back sharply from $0.04641 and is now sitting almost exactly on the 1H Bollinger midline ($0.04049). That makes this a key decision zone.
Level
Price
🟢 Aggressive LONG Entry
$0.0390–$0.0405
🎯 TP1
$0.0432
🎯 TP2
$0.0464
🚀 TP3
$0.0500
🚀 TP4
$0.0550
🛑 Stop Loss
$0.0370
🚀 Breakout Trigger
A strong 1H close above $0.0464 with increasing volume would put $0.050 → $0.055 into focus.
🔻 Bearish Scenario
If STRK loses $0.0388, the aggressive long setup weakens. A break below $0.0339 would expose the lower Bollinger area and substantially change the short-term structure.
⚡ Bias
🟢 SHORT-TERM BIAS: LONG / MOMENTUM
Best entry: $0.0390–$0.0405
Breakout: $0.0464+
Do not chase: above $0.0464 without confirmation.
Starknet is an Ethereum Layer-2 validity rollup using STARK proofs, and STRK has utility for network fees, governance and staking. Starknet's official roadmap lists the 0.15 release for September 2026, including decentralized validation and additional throughput improvements. �
StarkNet +2
Current market reporting also places STRK among heavily depressed 2026 Layer-2 tokens, so the sharp percentage moves shown on your chart should be treated as high-volatility momentum trading, not a low-risk trend. �
{future}(STRKUSDT)
#strk
#STRKToken
#strkusdt
$STRK
Aggressive Trading Setup
The chart shows a strong bullish impulse, but price has pulled back sharply from $0.04641 and is now sitting almost exactly on the 1H Bollinger midline ($0.04049). That makes this a key decision zone.
Level
Price
🟢 Aggressive LONG Entry
$0.0390–$0.0405
🎯 TP1
$0.0432
🎯 TP2
$0.0464
🚀 TP3
$0.0500
🚀 TP4
$0.0550
🛑 Stop Loss
$0.0370
🚀 Breakout Trigger
A strong 1H close above $0.0464 with increasing volume would put $0.050 → $0.055 into focus.
🔻 Bearish Scenario
If STRK loses $0.0388, the aggressive long setup weakens. A break below $0.0339 would expose the lower Bollinger area and substantially change the short-term structure.
⚡ Bias
🟢 SHORT-TERM BIAS: LONG / MOMENTUM
Best entry: $0.0390–$0.0405
Breakout: $0.0464+
Do not chase: above $0.0464 without confirmation.
Starknet is an Ethereum Layer-2 validity rollup using STARK proofs, and STRK has utility for network fees, governance and staking. Starknet's official roadmap lists the 0.15 release for September 2026, including decentralized validation and additional throughput improvements. �
StarkNet +2
Current market reporting also places STRK among heavily depressed 2026 Layer-2 tokens, so the sharp percentage moves shown on your chart should be treated as high-volatility momentum trading, not a low-risk trend. �
#strk
#STRKToken
#strkusdt
Aggressive Trading Setup
The chart shows a strong bullish impulse, but price has pulled back sharply from $0.04641 and is now sitting almost exactly on the 1H Bollinger midline ($0.04049). That makes this a key decision zone.
Level
Price
🟢 Aggressive LONG Entry
$0.0390–$0.0405
🎯 TP1
$0.0432
🎯 TP2
$0.0464
🚀 TP3
$0.0500
🚀 TP4
$0.0550
🛑 Stop Loss
$0.0370
🚀 Breakout Trigger
A strong 1H close above $0.0464 with increasing volume would put $0.050 → $0.055 into focus.
🔻 Bearish Scenario
If STRK loses $0.0388, the aggressive long setup weakens. A break below $0.0339 would expose the lower Bollinger area and substantially change the short-term structure.
⚡ Bias
🟢 SHORT-TERM BIAS: LONG / MOMENTUM
Best entry: $0.0390–$0.0405
Breakout: $0.0464+
Do not chase: above $0.0464 without confirmation.
Starknet is an Ethereum Layer-2 validity rollup using STARK proofs, and STRK has utility for network fees, governance and staking. Starknet's official roadmap lists the 0.15 release for September 2026, including decentralized validation and additional throughput improvements. �
StarkNet +2
Current market reporting also places STRK among heavily depressed 2026 Layer-2 tokens, so the sharp percentage moves shown on your chart should be treated as high-volatility momentum trading, not a low-risk trend. �
#strk
#STRKToken
#strkusdt
82
·
--
Bullish
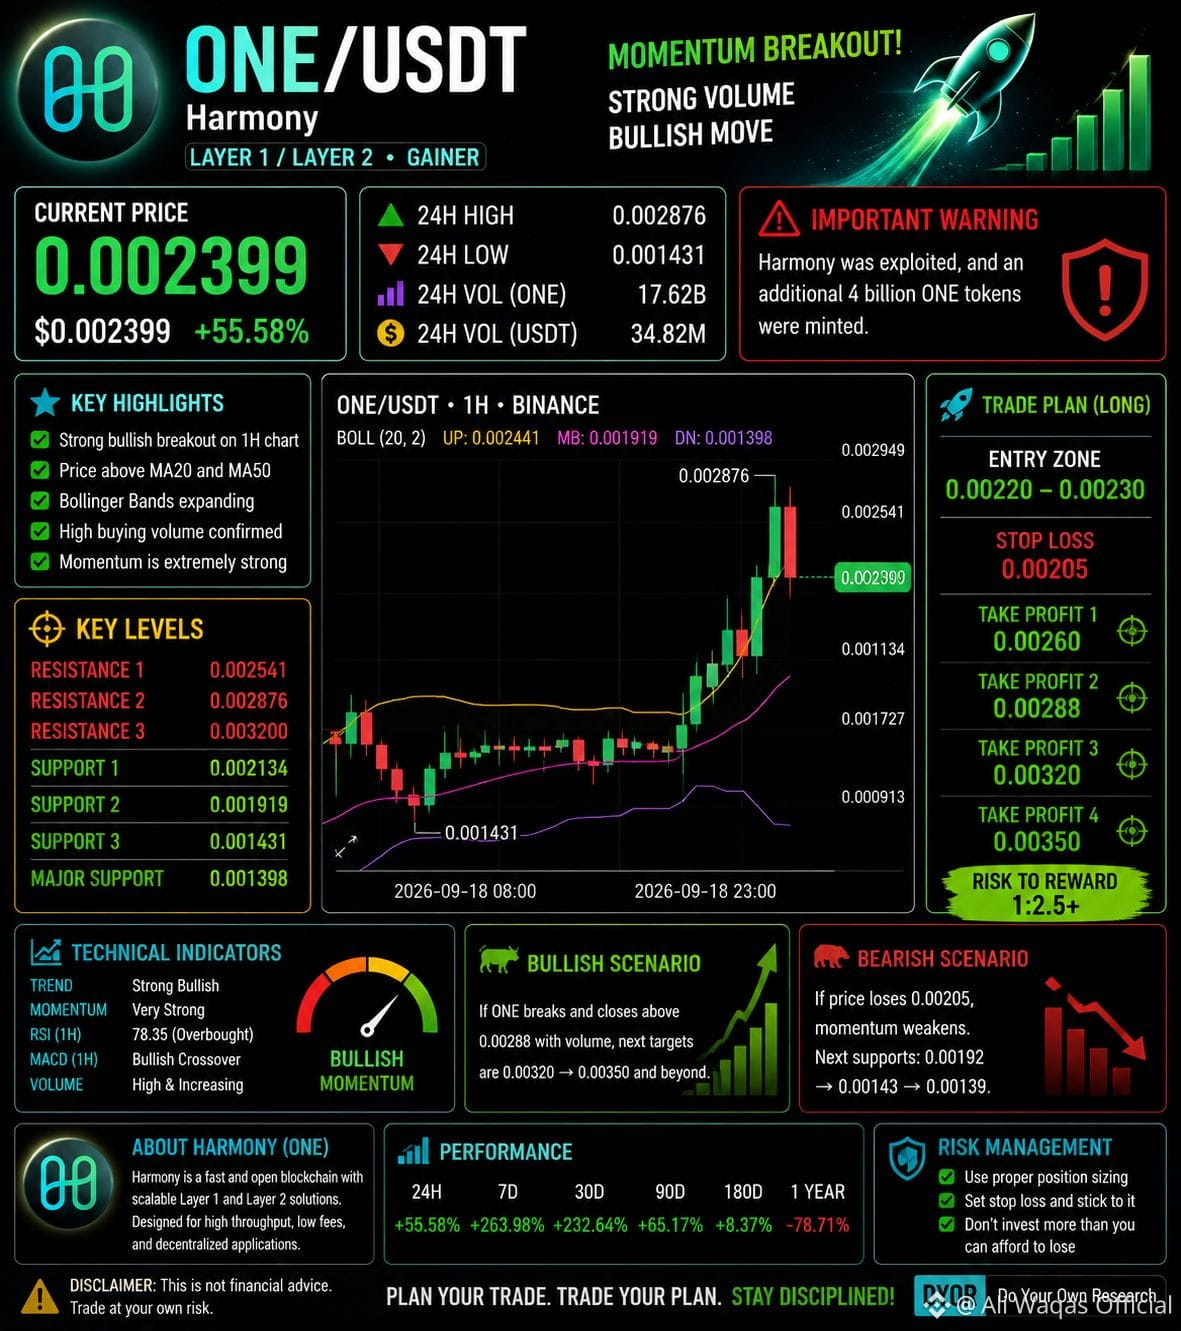
$ONE
Level
Price
🟢 Aggressive LONG Entry
$0.00220–$0.00230
🎯 TP1
$0.00260
🎯 TP2
$0.00288
🚀 TP3
$0.00320
🚀 TP4
$0.00350
🛑 Stop Loss
$0.00205
🚀 Breakout Trigger
A strong 1H close above $0.00288 could signal another momentum leg toward $0.00320 → $0.00350.
🔻 Invalidation
If ONE loses $0.00205, the aggressive long setup becomes weak. The next major chart support is around $0.00192, the Bollinger middle band.
⚠️ VERY IMPORTANT
Your screenshot itself displays a Harmony exploitation warning, and current reporting says Harmony suffered a major August exploit and has proposed shutting down its Layer-1 network and migrating ONE to Ethereum. � Current market data also differs substantially from the screenshot: OKX reported ONE around $0.001872 on September 19, 2026, so verify your exchange and contract before entering. �
CryptoSlate +1
okx.com
Bias from the screenshot: 🟢 SHORT-TERM LONG/MOMENTUM
Best aggressive approach: wait for $0.00220–$0.00230 rather than chase $0.00240+.
{future}(ONEUSDT)
#onedollar
#ONE/USDT
#OneCoin
#OnePlus
$ONE
Level
Price
🟢 Aggressive LONG Entry
$0.00220–$0.00230
🎯 TP1
$0.00260
🎯 TP2
$0.00288
🚀 TP3
$0.00320
🚀 TP4
$0.00350
🛑 Stop Loss
$0.00205
🚀 Breakout Trigger
A strong 1H close above $0.00288 could signal another momentum leg toward $0.00320 → $0.00350.
🔻 Invalidation
If ONE loses $0.00205, the aggressive long setup becomes weak. The next major chart support is around $0.00192, the Bollinger middle band.
⚠️ VERY IMPORTANT
Your screenshot itself displays a Harmony exploitation warning, and current reporting says Harmony suffered a major August exploit and has proposed shutting down its Layer-1 network and migrating ONE to Ethereum. � Current market data also differs substantially from the screenshot: OKX reported ONE around $0.001872 on September 19, 2026, so verify your exchange and contract before entering. �
CryptoSlate +1
okx.com
Bias from the screenshot: 🟢 SHORT-TERM LONG/MOMENTUM
Best aggressive approach: wait for $0.00220–$0.00230 rather than chase $0.00240+.
#onedollar
#ONE/USDT
#OneCoin
#OnePlus
Level
Price
🟢 Aggressive LONG Entry
$0.00220–$0.00230
🎯 TP1
$0.00260
🎯 TP2
$0.00288
🚀 TP3
$0.00320
🚀 TP4
$0.00350
🛑 Stop Loss
$0.00205
🚀 Breakout Trigger
A strong 1H close above $0.00288 could signal another momentum leg toward $0.00320 → $0.00350.
🔻 Invalidation
If ONE loses $0.00205, the aggressive long setup becomes weak. The next major chart support is around $0.00192, the Bollinger middle band.
⚠️ VERY IMPORTANT
Your screenshot itself displays a Harmony exploitation warning, and current reporting says Harmony suffered a major August exploit and has proposed shutting down its Layer-1 network and migrating ONE to Ethereum. � Current market data also differs substantially from the screenshot: OKX reported ONE around $0.001872 on September 19, 2026, so verify your exchange and contract before entering. �
CryptoSlate +1
okx.com
Bias from the screenshot: 🟢 SHORT-TERM LONG/MOMENTUM
Best aggressive approach: wait for $0.00220–$0.00230 rather than chase $0.00240+.
#onedollar
#ONE/USDT
#OneCoin
#OnePlus
230
·
--
Bullish
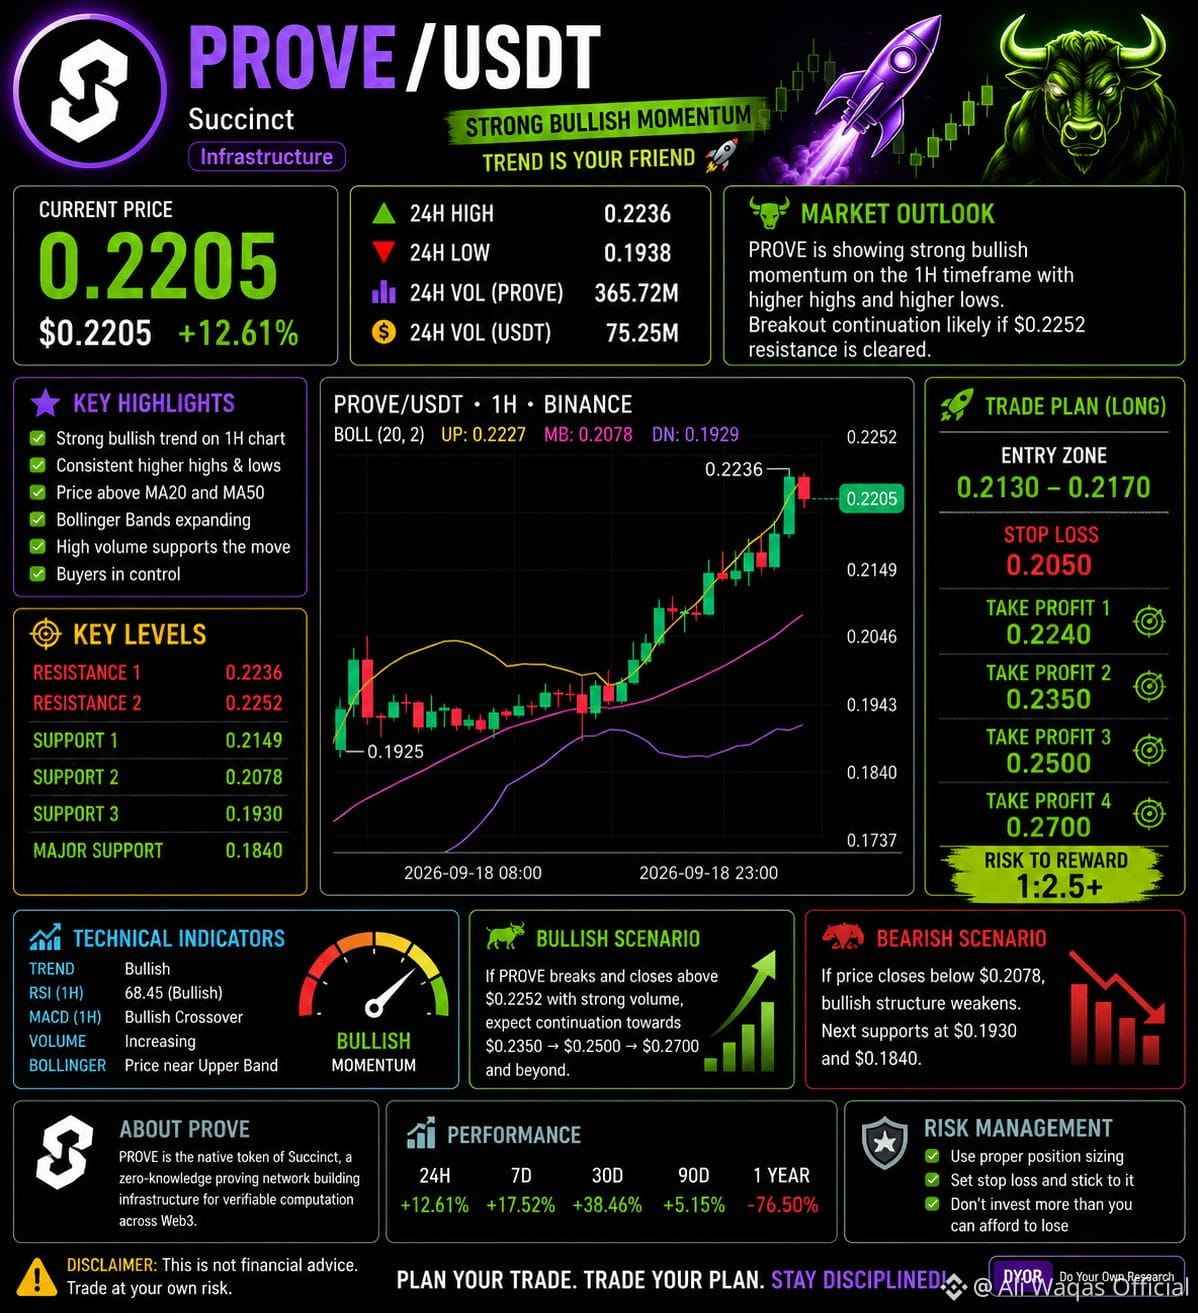
$PROVE
Aggressive LONG Setup
Level
Price
🟢 Entry Zone
$0.213–$0.217
🎯 TP1
$0.224
🎯 TP2
$0.235
🎯 TP3
$0.250
🚀 TP4
$0.270
🛑 Stop Loss
$0.205
🚀 Breakout Setup
If PROVE gets a strong 1H close above $0.2252 with volume, momentum could extend toward $0.235 → $0.250 → $0.270.
🔻 Bearish Invalidation
A 1H close below $0.2078 would weaken the bullish setup. Below that, watch $0.193–$0.195.
⚡ Final
BIAS: 🟢 LONG
Preferred: BUY THE PULLBACK around $0.213–$0.217
Breakout trigger: $0.2252+
Don't chase directly at $0.2205 after the sharp rally.
The chart-based levels above come specifically from your screenshot; live exchange prices can differ. PROVE is also a relatively new token with significant volatility and token-supply considerations, so risk management is important. �
bitcoinfoundation.org +1
{future}(PROVEUSDT)
#prove
#proveder
#Provide
$PROVE
Aggressive LONG Setup
Level
Price
🟢 Entry Zone
$0.213–$0.217
🎯 TP1
$0.224
🎯 TP2
$0.235
🎯 TP3
$0.250
🚀 TP4
$0.270
🛑 Stop Loss
$0.205
🚀 Breakout Setup
If PROVE gets a strong 1H close above $0.2252 with volume, momentum could extend toward $0.235 → $0.250 → $0.270.
🔻 Bearish Invalidation
A 1H close below $0.2078 would weaken the bullish setup. Below that, watch $0.193–$0.195.
⚡ Final
BIAS: 🟢 LONG
Preferred: BUY THE PULLBACK around $0.213–$0.217
Breakout trigger: $0.2252+
Don't chase directly at $0.2205 after the sharp rally.
The chart-based levels above come specifically from your screenshot; live exchange prices can differ. PROVE is also a relatively new token with significant volatility and token-supply considerations, so risk management is important. �
bitcoinfoundation.org +1
#prove
#proveder
#Provide
Aggressive LONG Setup
Level
Price
🟢 Entry Zone
$0.213–$0.217
🎯 TP1
$0.224
🎯 TP2
$0.235
🎯 TP3
$0.250
🚀 TP4
$0.270
🛑 Stop Loss
$0.205
🚀 Breakout Setup
If PROVE gets a strong 1H close above $0.2252 with volume, momentum could extend toward $0.235 → $0.250 → $0.270.
🔻 Bearish Invalidation
A 1H close below $0.2078 would weaken the bullish setup. Below that, watch $0.193–$0.195.
⚡ Final
BIAS: 🟢 LONG
Preferred: BUY THE PULLBACK around $0.213–$0.217
Breakout trigger: $0.2252+
Don't chase directly at $0.2205 after the sharp rally.
The chart-based levels above come specifically from your screenshot; live exchange prices can differ. PROVE is also a relatively new token with significant volatility and token-supply considerations, so risk management is important. �
bitcoinfoundation.org +1
#prove
#proveder
#Provide
67
·
--
Bullish
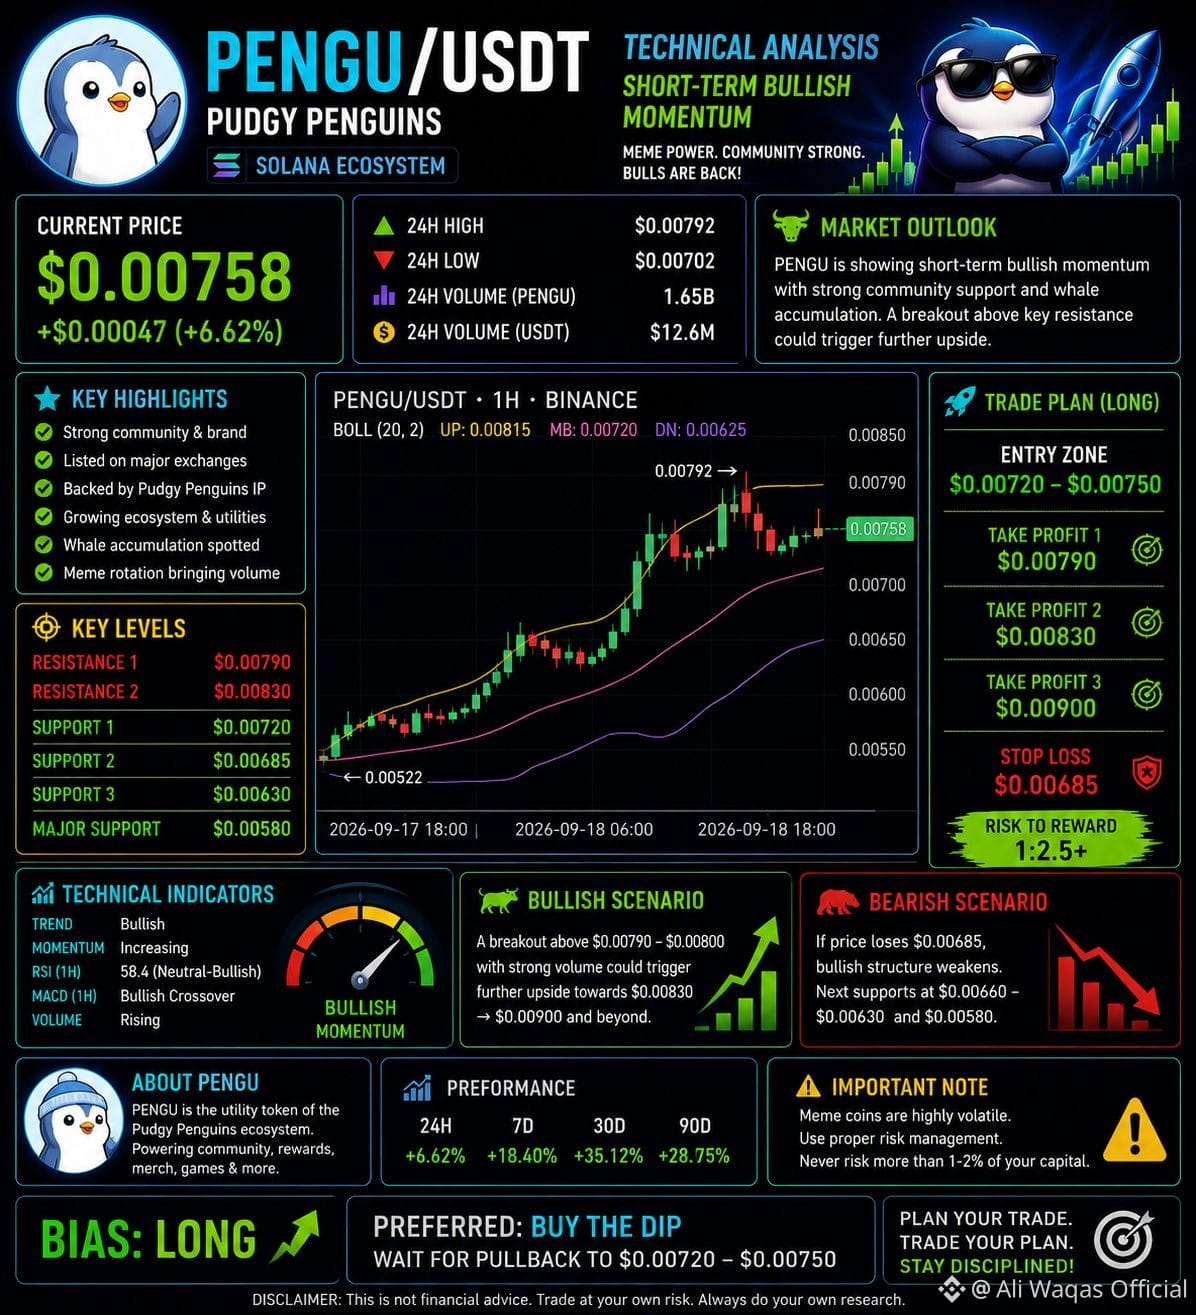
$PENGU
Trading Levels
Setup
Level
🟢 Long Entry Zone
$0.00720–$0.00750
🎯 TP1
$0.00790
🎯 TP2
$0.00830
🎯 TP3
$0.00900
🛑 Stop Loss
$0.00685
🚀 Breakout Setup
A sustained move above $0.00790–$0.00800 with increasing volume would strengthen the short-term bullish setup. The next areas to watch would be approximately $0.00830 → $0.00900.
🔻 Bearish Scenario
A loss of $0.00685 would weaken the setup. Below that, $0.00660–$0.00630 becomes an important downside zone; some current quantitative models also identify the mid-$0.006 range as a key support area. �
CoinDCX
⚡ Current Bias
🟢 SHORT-TERM: LONG / BULLISH
Preferred: wait for a pullback toward $0.00720–$0.00750 rather than chasing.
Invalidation: below $0.00685.
PENGU is currently around $0.0075–$0.0078, so the exact entry should be adjusted to your exchange's live PENGU/USDT price. �
#pengu
#PENGUUSDT
$PENGU
Trading Levels
Setup
Level
🟢 Long Entry Zone
$0.00720–$0.00750
🎯 TP1
$0.00790
🎯 TP2
$0.00830
🎯 TP3
$0.00900
🛑 Stop Loss
$0.00685
🚀 Breakout Setup
A sustained move above $0.00790–$0.00800 with increasing volume would strengthen the short-term bullish setup. The next areas to watch would be approximately $0.00830 → $0.00900.
🔻 Bearish Scenario
A loss of $0.00685 would weaken the setup. Below that, $0.00660–$0.00630 becomes an important downside zone; some current quantitative models also identify the mid-$0.006 range as a key support area. �
CoinDCX
⚡ Current Bias
🟢 SHORT-TERM: LONG / BULLISH
Preferred: wait for a pullback toward $0.00720–$0.00750 rather than chasing.
Invalidation: below $0.00685.
PENGU is currently around $0.0075–$0.0078, so the exact entry should be adjusted to your exchange's live PENGU/USDT price. �
#pengu
#PENGUUSDT
Trading Levels
Setup
Level
🟢 Long Entry Zone
$0.00720–$0.00750
🎯 TP1
$0.00790
🎯 TP2
$0.00830
🎯 TP3
$0.00900
🛑 Stop Loss
$0.00685
🚀 Breakout Setup
A sustained move above $0.00790–$0.00800 with increasing volume would strengthen the short-term bullish setup. The next areas to watch would be approximately $0.00830 → $0.00900.
🔻 Bearish Scenario
A loss of $0.00685 would weaken the setup. Below that, $0.00660–$0.00630 becomes an important downside zone; some current quantitative models also identify the mid-$0.006 range as a key support area. �
CoinDCX
⚡ Current Bias
🟢 SHORT-TERM: LONG / BULLISH
Preferred: wait for a pullback toward $0.00720–$0.00750 rather than chasing.
Invalidation: below $0.00685.
PENGU is currently around $0.0075–$0.0078, so the exact entry should be adjusted to your exchange's live PENGU/USDT price. �
#pengu
#PENGUUSDT
194
·
--
Bullish
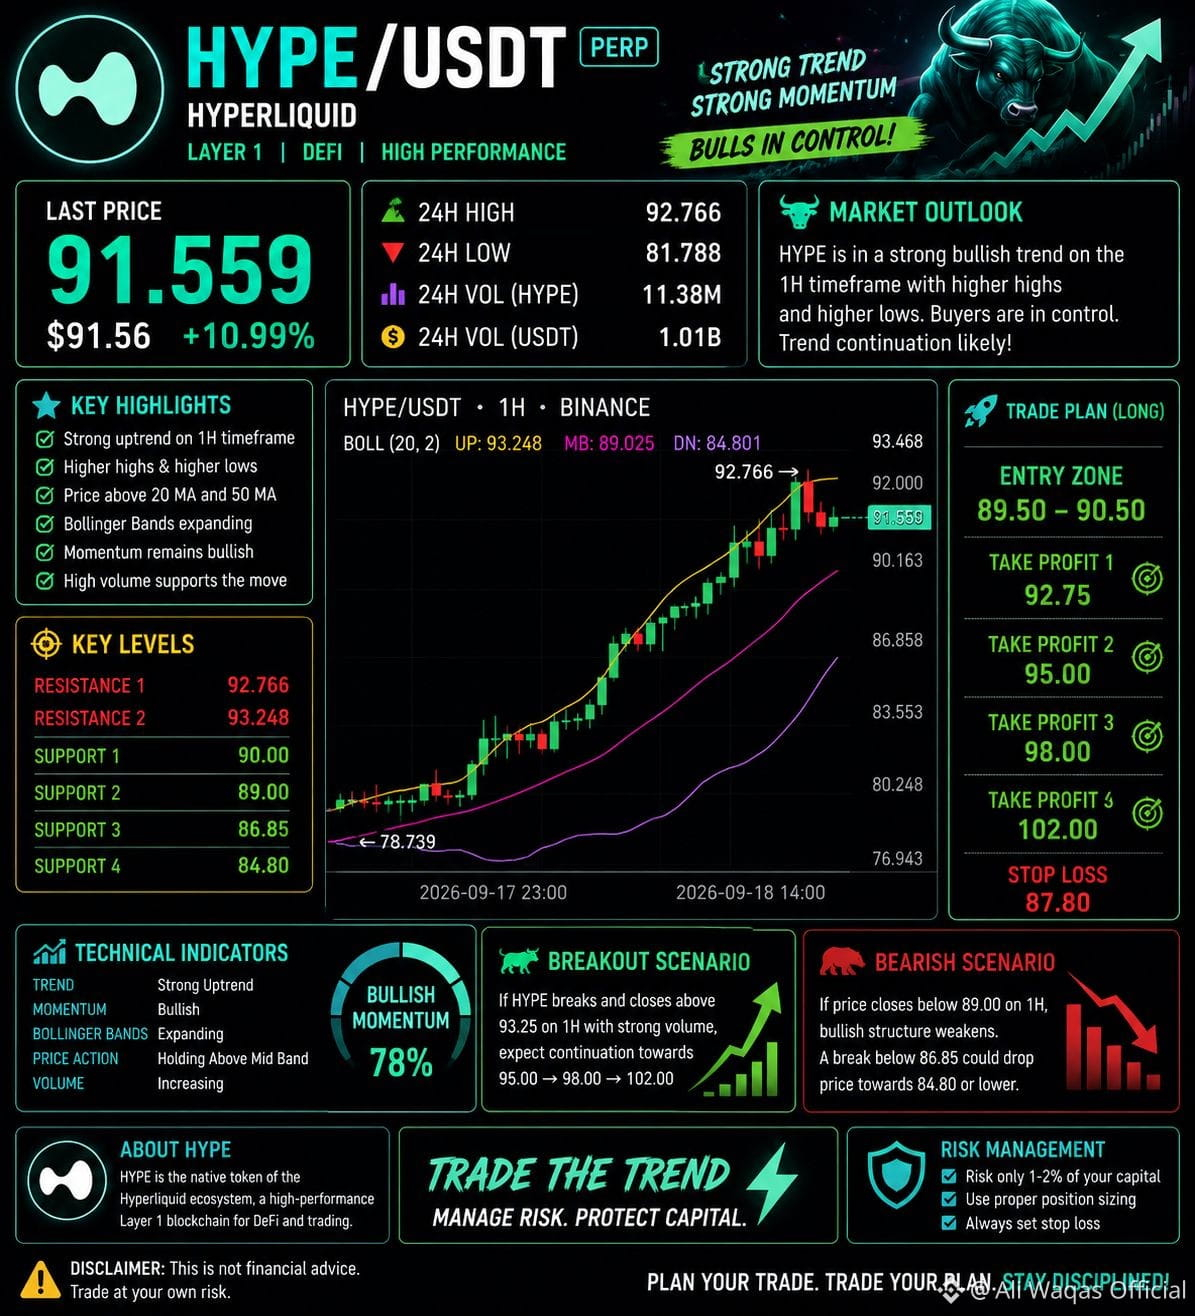
$HYPE
Aggressive LONG Setup
Level
Price
🟢 Entry Zone
$89.50–$90.50
🎯 TP1
$92.75
🎯 TP2
$95.00
🎯 TP3
$98.00
🚀 TP4
$102.00
🛑 Stop Loss
$87.80
🚀 Breakout Setup
If HYPE gets a strong 1H close above $93.25, a momentum continuation setup could target $95 → $98 → $102.
🔻 Bearish Invalidation
A confirmed 1H close below $89.00 would weaken the immediate bullish setup. A break below $86.85 would increase the probability of a deeper retracement toward $84.80.
⚡ Final Setup
BIAS: 🟢 LONG
Preferred: BUY $89.50–$90.50 PULLBACK
Breakout trigger: $93.25+
Avoid chasing aggressively at the resistance zone.
{future}(HYPEUSDT)
#Hyperliquid
#HyperFund
#Hyperdust
$HYPE
Aggressive LONG Setup
Level
Price
🟢 Entry Zone
$89.50–$90.50
🎯 TP1
$92.75
🎯 TP2
$95.00
🎯 TP3
$98.00
🚀 TP4
$102.00
🛑 Stop Loss
$87.80
🚀 Breakout Setup
If HYPE gets a strong 1H close above $93.25, a momentum continuation setup could target $95 → $98 → $102.
🔻 Bearish Invalidation
A confirmed 1H close below $89.00 would weaken the immediate bullish setup. A break below $86.85 would increase the probability of a deeper retracement toward $84.80.
⚡ Final Setup
BIAS: 🟢 LONG
Preferred: BUY $89.50–$90.50 PULLBACK
Breakout trigger: $93.25+
Avoid chasing aggressively at the resistance zone.
#Hyperliquid
#HyperFund
#Hyperdust
Aggressive LONG Setup
Level
Price
🟢 Entry Zone
$89.50–$90.50
🎯 TP1
$92.75
🎯 TP2
$95.00
🎯 TP3
$98.00
🚀 TP4
$102.00
🛑 Stop Loss
$87.80
🚀 Breakout Setup
If HYPE gets a strong 1H close above $93.25, a momentum continuation setup could target $95 → $98 → $102.
🔻 Bearish Invalidation
A confirmed 1H close below $89.00 would weaken the immediate bullish setup. A break below $86.85 would increase the probability of a deeper retracement toward $84.80.
⚡ Final Setup
BIAS: 🟢 LONG
Preferred: BUY $89.50–$90.50 PULLBACK
Breakout trigger: $93.25+
Avoid chasing aggressively at the resistance zone.
#Hyperliquid
#HyperFund
#Hyperdust
75
·
--
Bullish
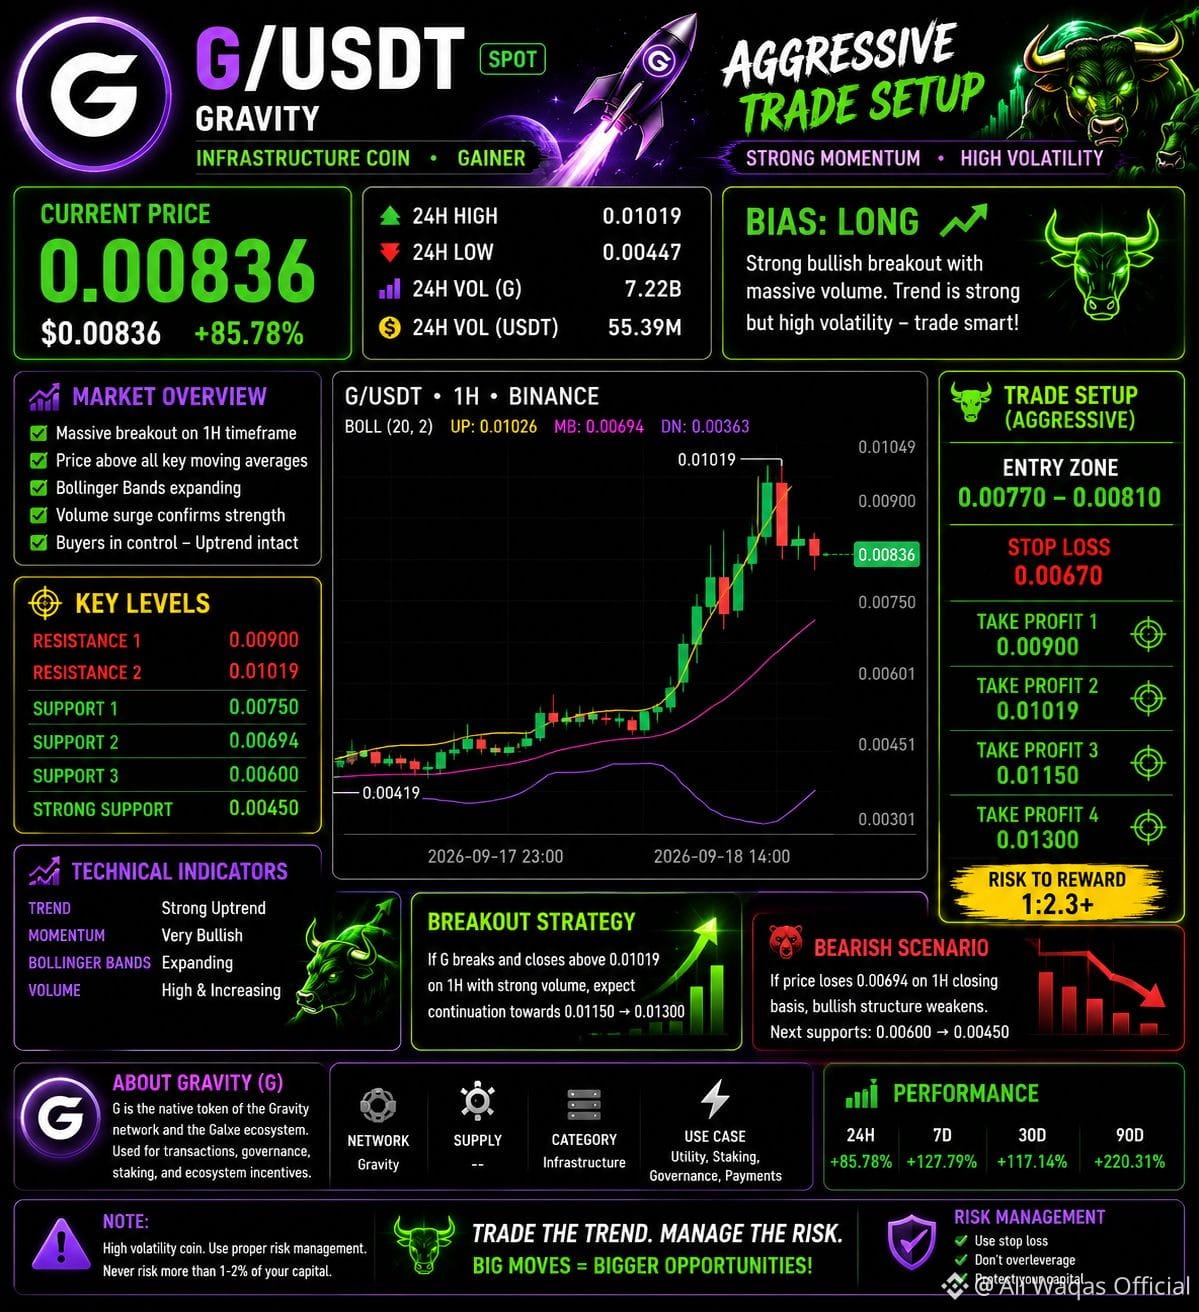
$G
Aggressive LONG Setup
Level
Price
🟢 Entry Zone
$0.00770–$0.00810
🎯 TP1
$0.00900
🎯 TP2
$0.01019
🎯 TP3
$0.01150
🚀 TP4
$0.01300
🛑 Stop Loss
$0.00670
🚀 Breakout Strategy
If G produces a strong 1H close above $0.01019 with volume, a momentum continuation could target $0.01150 → $0.01300.
🔻 Bearish Scenario
If price loses $0.00694 on a confirmed 1H close, the current bullish structure weakens. The next areas visible on your chart are approximately $0.00600 → $0.00450.
⚡ Verdict
BIAS: 🟢 LONG
Best approach: BUY THE PULLBACK — DON'T CHASE THE +86% PUMP.
G is also currently undergoing a network transition: Gravity says Gravity Alpha Mainnet is scheduled for deprecation on November 1, 2026, with users instructed to bridge G to Gravity L1 Mainnet. �
#gaming
#Grok
#Geopolitics
$G
Aggressive LONG Setup
Level
Price
🟢 Entry Zone
$0.00770–$0.00810
🎯 TP1
$0.00900
🎯 TP2
$0.01019
🎯 TP3
$0.01150
🚀 TP4
$0.01300
🛑 Stop Loss
$0.00670
🚀 Breakout Strategy
If G produces a strong 1H close above $0.01019 with volume, a momentum continuation could target $0.01150 → $0.01300.
🔻 Bearish Scenario
If price loses $0.00694 on a confirmed 1H close, the current bullish structure weakens. The next areas visible on your chart are approximately $0.00600 → $0.00450.
⚡ Verdict
BIAS: 🟢 LONG
Best approach: BUY THE PULLBACK — DON'T CHASE THE +86% PUMP.
G is also currently undergoing a network transition: Gravity says Gravity Alpha Mainnet is scheduled for deprecation on November 1, 2026, with users instructed to bridge G to Gravity L1 Mainnet. �
#gaming
#Grok
#Geopolitics
Aggressive LONG Setup
Level
Price
🟢 Entry Zone
$0.00770–$0.00810
🎯 TP1
$0.00900
🎯 TP2
$0.01019
🎯 TP3
$0.01150
🚀 TP4
$0.01300
🛑 Stop Loss
$0.00670
🚀 Breakout Strategy
If G produces a strong 1H close above $0.01019 with volume, a momentum continuation could target $0.01150 → $0.01300.
🔻 Bearish Scenario
If price loses $0.00694 on a confirmed 1H close, the current bullish structure weakens. The next areas visible on your chart are approximately $0.00600 → $0.00450.
⚡ Verdict
BIAS: 🟢 LONG
Best approach: BUY THE PULLBACK — DON'T CHASE THE +86% PUMP.
G is also currently undergoing a network transition: Gravity says Gravity Alpha Mainnet is scheduled for deprecation on November 1, 2026, with users instructed to bridge G to Gravity L1 Mainnet. �
#gaming
#Grok
#Geopolitics
190
Log in to explore more content
Join global crypto users on Binance Square
⚡️ Get latest and useful information about crypto.
💬 Trusted by the world’s largest crypto exchange.
👍 Discover real insights from verified creators.
Email / Phone number
Trending Topics
CardanoAddedToX402KitForADAPayments
1,630 views
137 Discussing
#cardanoaddedtox402kitforadapayments
🚨 CARDANO JUST ENTERED THE AI PAYMENT RACE! 🤖🔥
$ADA is now part of the official x402 SDK, opening a new payment rail for apps and AI agents.
💥 What changed?
• Apps can pay for API calls using ADA or Cardano native tokens
• Payments can happen directly through standard web requests
• No account, API key, or traditional checkout required
• Cardano joins the growing machine-to-machine payment ecosystem
• The x402 facilitator has already completed a real transaction on Cardano’s pre-production network
This could give $ADA a fresh AI + payments utility narrative as autonomous agents increasingly need to pay for data and online services.
⚠️ Mainnet adoption and real payment volume still need to develop.
🔥 Is this the beginning of a new ADA narrative?
#Cardano #ADA #AI
Faizan Crypto Learner
·0 Likes
·229 views
XRPRises8%
9,594 views
474 Discussing
AMDHits$1TrillionMarketCap
227 views
23 Discussing