

#scalper
scalper
60,081 views
132 Discussing
Hot
Latest

·
--
Bullish
$IOST #scalper #ScalperClub #IOST
Price = 0.0015130
Bias: 🟢 STRONGLY BULLISH
The latest chart shows a clear bullish structure:
Strong BOS sequence on the right. Multiple EXH → pullback → continuation moves. Buyers are defending the green demand zones. Price has now pushed into the marked Weak High. Current price is approximately 0.00152–0.00153 from the chart header.
🎯 Best scalp now
🟢 LONG — only on pullback
Do not chase the vertical move into the Weak High.
Preferred entry:
Pullback → nearest green 100% zone → bullish rejection/reclaim.
SL: Below the demand zone / latest higher low.
TP1: Retest of Weak High
TP2: Breakout above Weak High + continuation.
{future}(IOSTUSDT)
$IOST #scalper #ScalperClub #IOST
Price = 0.0015130
Bias: 🟢 STRONGLY BULLISH
The latest chart shows a clear bullish structure:
Strong BOS sequence on the right. Multiple EXH → pullback → continuation moves. Buyers are defending the green demand zones. Price has now pushed into the marked Weak High. Current price is approximately 0.00152–0.00153 from the chart header.
🎯 Best scalp now
🟢 LONG — only on pullback
Do not chase the vertical move into the Weak High.
Preferred entry:
Pullback → nearest green 100% zone → bullish rejection/reclaim.
SL: Below the demand zone / latest higher low.
TP1: Retest of Weak High
TP2: Breakout above Weak High + continuation.
Price = 0.0015130
Bias: 🟢 STRONGLY BULLISH
The latest chart shows a clear bullish structure:
Strong BOS sequence on the right. Multiple EXH → pullback → continuation moves. Buyers are defending the green demand zones. Price has now pushed into the marked Weak High. Current price is approximately 0.00152–0.00153 from the chart header.
🎯 Best scalp now
🟢 LONG — only on pullback
Do not chase the vertical move into the Weak High.
Preferred entry:
Pullback → nearest green 100% zone → bullish rejection/reclaim.
SL: Below the demand zone / latest higher low.
TP1: Retest of Weak High
TP2: Breakout above Weak High + continuation.
136
·
--
Bullish
$DASH #scalper #ScalperClub #DASH
Price = 63.30
Bias: 🟢 Bullish Structure has shifted upward with higher lows and a recent push through the prior range. Price is currently sitting near the Weak High, so chasing a long at the current candle is risky. The nearest green 100% zone below price is the main pullback/support area. The recent breakout area can also act as a retest zone.
Scalper plan
LONG setup — preferred
Wait for a pullback into the nearest green demand/100% zone. Look for rejection + bullish BOS/ChoCH on the 1M. Enter after confirmation. SL: below the most recent confirmed swing low. TP1: recent high. TP2: Weak High / liquidity above it.
{future}(DASHUSDT)
$DASH #scalper #ScalperClub #DASH
Price = 63.30
Bias: 🟢 Bullish Structure has shifted upward with higher lows and a recent push through the prior range. Price is currently sitting near the Weak High, so chasing a long at the current candle is risky. The nearest green 100% zone below price is the main pullback/support area. The recent breakout area can also act as a retest zone.
Scalper plan
LONG setup — preferred
Wait for a pullback into the nearest green demand/100% zone. Look for rejection + bullish BOS/ChoCH on the 1M. Enter after confirmation. SL: below the most recent confirmed swing low. TP1: recent high. TP2: Weak High / liquidity above it.
Price = 63.30
Bias: 🟢 Bullish Structure has shifted upward with higher lows and a recent push through the prior range. Price is currently sitting near the Weak High, so chasing a long at the current candle is risky. The nearest green 100% zone below price is the main pullback/support area. The recent breakout area can also act as a retest zone.
Scalper plan
LONG setup — preferred
Wait for a pullback into the nearest green demand/100% zone. Look for rejection + bullish BOS/ChoCH on the 1M. Enter after confirmation. SL: below the most recent confirmed swing low. TP1: recent high. TP2: Weak High / liquidity above it.
97
·
--
Bullish
$COHR #scalper #ScalperClub
Price = 301.60
🟢 BULLISH — but extremely extended
The latest move is a strong bullish displacement from the lower demand area straight into the marked Weak High.
Current structure
✅ Bullish BOS / continuation structure. ✅ Multiple green demand zones remain below. ⚠️ Price has just reached Weak High liquidity. 🔴 An ABS is visible immediately before the final expansion, so chasing the current spike is risky. The current candles show rejection/consolidation near the high.
🎯 Best scalp plan
BUY: Wait for a pullback.
Preferred entry:
Nearest newly formed green demand zone → bullish rejection → 1M BOS → BUY.
SL: Below the pullback/protected low.
TP1: Weak High / liquidity area.
TP2: Break above Weak High and continuation.
{future}(COHRUSDT)
$COHR #scalper #ScalperClub
Price = 301.60
🟢 BULLISH — but extremely extended
The latest move is a strong bullish displacement from the lower demand area straight into the marked Weak High.
Current structure
✅ Bullish BOS / continuation structure. ✅ Multiple green demand zones remain below. ⚠️ Price has just reached Weak High liquidity. 🔴 An ABS is visible immediately before the final expansion, so chasing the current spike is risky. The current candles show rejection/consolidation near the high.
🎯 Best scalp plan
BUY: Wait for a pullback.
Preferred entry:
Nearest newly formed green demand zone → bullish rejection → 1M BOS → BUY.
SL: Below the pullback/protected low.
TP1: Weak High / liquidity area.
TP2: Break above Weak High and continuation.
Price = 301.60
🟢 BULLISH — but extremely extended
The latest move is a strong bullish displacement from the lower demand area straight into the marked Weak High.
Current structure
✅ Bullish BOS / continuation structure. ✅ Multiple green demand zones remain below. ⚠️ Price has just reached Weak High liquidity. 🔴 An ABS is visible immediately before the final expansion, so chasing the current spike is risky. The current candles show rejection/consolidation near the high.
🎯 Best scalp plan
BUY: Wait for a pullback.
Preferred entry:
Nearest newly formed green demand zone → bullish rejection → 1M BOS → BUY.
SL: Below the pullback/protected low.
TP1: Weak High / liquidity area.
TP2: Break above Weak High and continuation.
140
·
--
$PIEVERSE #scalper #ScalperClub #ALPHA🔥
Price = 1.2529
Bias: 🟢 STRONGLY BULLISH
Strong BOS → expansion → higher highs. Price has broken out of the consolidation and is now testing the marked Weak High. Multiple green demand zones remain below price. The move is very extended, so chasing BUY here has poor risk/reward.
🎯 Scalper Plan
PRIMARY: BUY PULLBACK
Wait for retracement into the nearest green demand zone. Look for 1M bullish rejection / BOS before entry. SL: Below the demand zone / latest protected low. TP1: Weak High. TP2: New high after liquidity sweep.
{alpha}(560x0e63b9c287e32a05e6b9ab8ee8df88a2760225a9)
$PIEVERSE #scalper #ScalperClub #ALPHA🔥
Price = 1.2529
Bias: 🟢 STRONGLY BULLISH
Strong BOS → expansion → higher highs. Price has broken out of the consolidation and is now testing the marked Weak High. Multiple green demand zones remain below price. The move is very extended, so chasing BUY here has poor risk/reward.
🎯 Scalper Plan
PRIMARY: BUY PULLBACK
Wait for retracement into the nearest green demand zone. Look for 1M bullish rejection / BOS before entry. SL: Below the demand zone / latest protected low. TP1: Weak High. TP2: New high after liquidity sweep.
Price = 1.2529
Bias: 🟢 STRONGLY BULLISH
Strong BOS → expansion → higher highs. Price has broken out of the consolidation and is now testing the marked Weak High. Multiple green demand zones remain below price. The move is very extended, so chasing BUY here has poor risk/reward.
🎯 Scalper Plan
PRIMARY: BUY PULLBACK
Wait for retracement into the nearest green demand zone. Look for 1M bullish rejection / BOS before entry. SL: Below the demand zone / latest protected low. TP1: Weak High. TP2: New high after liquidity sweep.
100
·
--
Bullish
$PYTH #scalper #ScalperClub
Price = 0.05630
🟢 BIAS: BULLISH
This chart is showing a strong continuation structure.
Clear bullish BOS on the right. Price has broken above the previous swing high. Strong upward displacement into the Weak High. Nearest green zone below price is the first meaningful pullback support. Current price is at/very close to the Weak High, so chasing LONG is not ideal.
🟢 BEST SCALP: LONG ON RETEST
Preferred setup:
Weak High breakout → pullback → green/BOS support → bullish rejection → LONG
🎯 TP1: Weak High / recent high
🎯 TP2: New high after confirmed breakout
🛑 SL: Below the pullback low/support.
{future}(PYTHUSDT)
$PYTH #scalper #ScalperClub
Price = 0.05630
🟢 BIAS: BULLISH
This chart is showing a strong continuation structure.
Clear bullish BOS on the right. Price has broken above the previous swing high. Strong upward displacement into the Weak High. Nearest green zone below price is the first meaningful pullback support. Current price is at/very close to the Weak High, so chasing LONG is not ideal.
🟢 BEST SCALP: LONG ON RETEST
Preferred setup:
Weak High breakout → pullback → green/BOS support → bullish rejection → LONG
🎯 TP1: Weak High / recent high
🎯 TP2: New high after confirmed breakout
🛑 SL: Below the pullback low/support.
Price = 0.05630
🟢 BIAS: BULLISH
This chart is showing a strong continuation structure.
Clear bullish BOS on the right. Price has broken above the previous swing high. Strong upward displacement into the Weak High. Nearest green zone below price is the first meaningful pullback support. Current price is at/very close to the Weak High, so chasing LONG is not ideal.
🟢 BEST SCALP: LONG ON RETEST
Preferred setup:
Weak High breakout → pullback → green/BOS support → bullish rejection → LONG
🎯 TP1: Weak High / recent high
🎯 TP2: New high after confirmed breakout
🛑 SL: Below the pullback low/support.
106
·
--
Bullish
$OP #scalper #ScalperClub
Price - 11123
🟢 BIAS: BULLISH — BUT AT A CRITICAL AREA
This setup is stronger than the previous chart because the blue rising channel is clearly respected.
Strong bullish trend with repeated higher highs/higher lows. Price is still inside the rising channel. Major bullish displacement occurred from the lower green demand. Price reached the Weak High and was rejected. Current pullback is moving toward the lower channel boundary + green demand zone.
🟢 BEST SCALP: LONG ON REACTION
Do not chase the current candle.
The area I would watch most closely is:
🟩 Green demand + lower blue channel boundary
Ideal confirmation:
Pullback → channel/support holds → bullish 1M rejection → BOS → LONG
🎯 TP1: recent local high
🎯 TP2: Weak High
🎯 TP3: breakout/new high if Weak High is taken
🛑 SL: below the demand zone / confirmed swing low.
{future}(OPUSDT)
$OP #scalper #ScalperClub
Price - 11123
🟢 BIAS: BULLISH — BUT AT A CRITICAL AREA
This setup is stronger than the previous chart because the blue rising channel is clearly respected.
Strong bullish trend with repeated higher highs/higher lows. Price is still inside the rising channel. Major bullish displacement occurred from the lower green demand. Price reached the Weak High and was rejected. Current pullback is moving toward the lower channel boundary + green demand zone.
🟢 BEST SCALP: LONG ON REACTION
Do not chase the current candle.
The area I would watch most closely is:
🟩 Green demand + lower blue channel boundary
Ideal confirmation:
Pullback → channel/support holds → bullish 1M rejection → BOS → LONG
🎯 TP1: recent local high
🎯 TP2: Weak High
🎯 TP3: breakout/new high if Weak High is taken
🛑 SL: below the demand zone / confirmed swing low.
Price - 11123
🟢 BIAS: BULLISH — BUT AT A CRITICAL AREA
This setup is stronger than the previous chart because the blue rising channel is clearly respected.
Strong bullish trend with repeated higher highs/higher lows. Price is still inside the rising channel. Major bullish displacement occurred from the lower green demand. Price reached the Weak High and was rejected. Current pullback is moving toward the lower channel boundary + green demand zone.
🟢 BEST SCALP: LONG ON REACTION
Do not chase the current candle.
The area I would watch most closely is:
🟩 Green demand + lower blue channel boundary
Ideal confirmation:
Pullback → channel/support holds → bullish 1M rejection → BOS → LONG
🎯 TP1: recent local high
🎯 TP2: Weak High
🎯 TP3: breakout/new high if Weak High is taken
🛑 SL: below the demand zone / confirmed swing low.
138
·
--
Bearish
$PENDLE #scalper #ScalperClub
Price = 0.9080
BIAS: STRONGLY BEARISH
This chart shows a major bearish reversal on the far right.
Price swept the Strong High. Sharp rejection followed. Large bearish displacement broke the previous structure. Price then continued making lower highs and lower lows. Current price is sitting very close to the marked Weak Low.
🔴 BEST SCALP: SHORT ON PULLBACK
❌ Do NOT short at the current low. The selloff is already heavily extended.
Wait for:
Pullback → nearest red supply zone → bearish rejection → SHORT
SL: Above the pullback/rejection high
TP1: Recent swing low
TP2: Weak Low
TP3: New low after Weak Low breaks.
{future}(PENDLEUSDT)
$PENDLE #scalper #ScalperClub
Price = 0.9080
BIAS: STRONGLY BEARISH
This chart shows a major bearish reversal on the far right.
Price swept the Strong High. Sharp rejection followed. Large bearish displacement broke the previous structure. Price then continued making lower highs and lower lows. Current price is sitting very close to the marked Weak Low.
🔴 BEST SCALP: SHORT ON PULLBACK
❌ Do NOT short at the current low. The selloff is already heavily extended.
Wait for:
Pullback → nearest red supply zone → bearish rejection → SHORT
SL: Above the pullback/rejection high
TP1: Recent swing low
TP2: Weak Low
TP3: New low after Weak Low breaks.
Price = 0.9080
BIAS: STRONGLY BEARISH
This chart shows a major bearish reversal on the far right.
Price swept the Strong High. Sharp rejection followed. Large bearish displacement broke the previous structure. Price then continued making lower highs and lower lows. Current price is sitting very close to the marked Weak Low.
🔴 BEST SCALP: SHORT ON PULLBACK
❌ Do NOT short at the current low. The selloff is already heavily extended.
Wait for:
Pullback → nearest red supply zone → bearish rejection → SHORT
SL: Above the pullback/rejection high
TP1: Recent swing low
TP2: Weak Low
TP3: New low after Weak Low breaks.
68
·
--
Bearish
$OP #scalper #ScalperClub
Price = 0.09999
Bias: BEARISH 🔴
The latest chart shows a clear downside structure:
Bearish ChoCH → BOS. Repeated lower highs + lower lows. Price rejected the Strong High / red supply zone. The latest selloff broke the previous support structure. Price is now sitting close to the Weak Low.
🔴 BEST SCALP: SHORT ON PULLBACK
Do NOT short the current low. The move is already extended.
Wait for:
Pullback → nearest red supply/resistance → bearish rejection → SHORT
SL: Above the rejection swing high
TP1: Recent low
TP2: Weak Low
TP3: New low if Weak Low breaks with momentum
{future}(OPUSDT)
$OP #scalper #ScalperClub
Price = 0.09999
Bias: BEARISH 🔴
The latest chart shows a clear downside structure:
Bearish ChoCH → BOS. Repeated lower highs + lower lows. Price rejected the Strong High / red supply zone. The latest selloff broke the previous support structure. Price is now sitting close to the Weak Low.
🔴 BEST SCALP: SHORT ON PULLBACK
Do NOT short the current low. The move is already extended.
Wait for:
Pullback → nearest red supply/resistance → bearish rejection → SHORT
SL: Above the rejection swing high
TP1: Recent low
TP2: Weak Low
TP3: New low if Weak Low breaks with momentum
Price = 0.09999
Bias: BEARISH 🔴
The latest chart shows a clear downside structure:
Bearish ChoCH → BOS. Repeated lower highs + lower lows. Price rejected the Strong High / red supply zone. The latest selloff broke the previous support structure. Price is now sitting close to the Weak Low.
🔴 BEST SCALP: SHORT ON PULLBACK
Do NOT short the current low. The move is already extended.
Wait for:
Pullback → nearest red supply/resistance → bearish rejection → SHORT
SL: Above the rejection swing high
TP1: Recent low
TP2: Weak Low
TP3: New low if Weak Low breaks with momentum
233


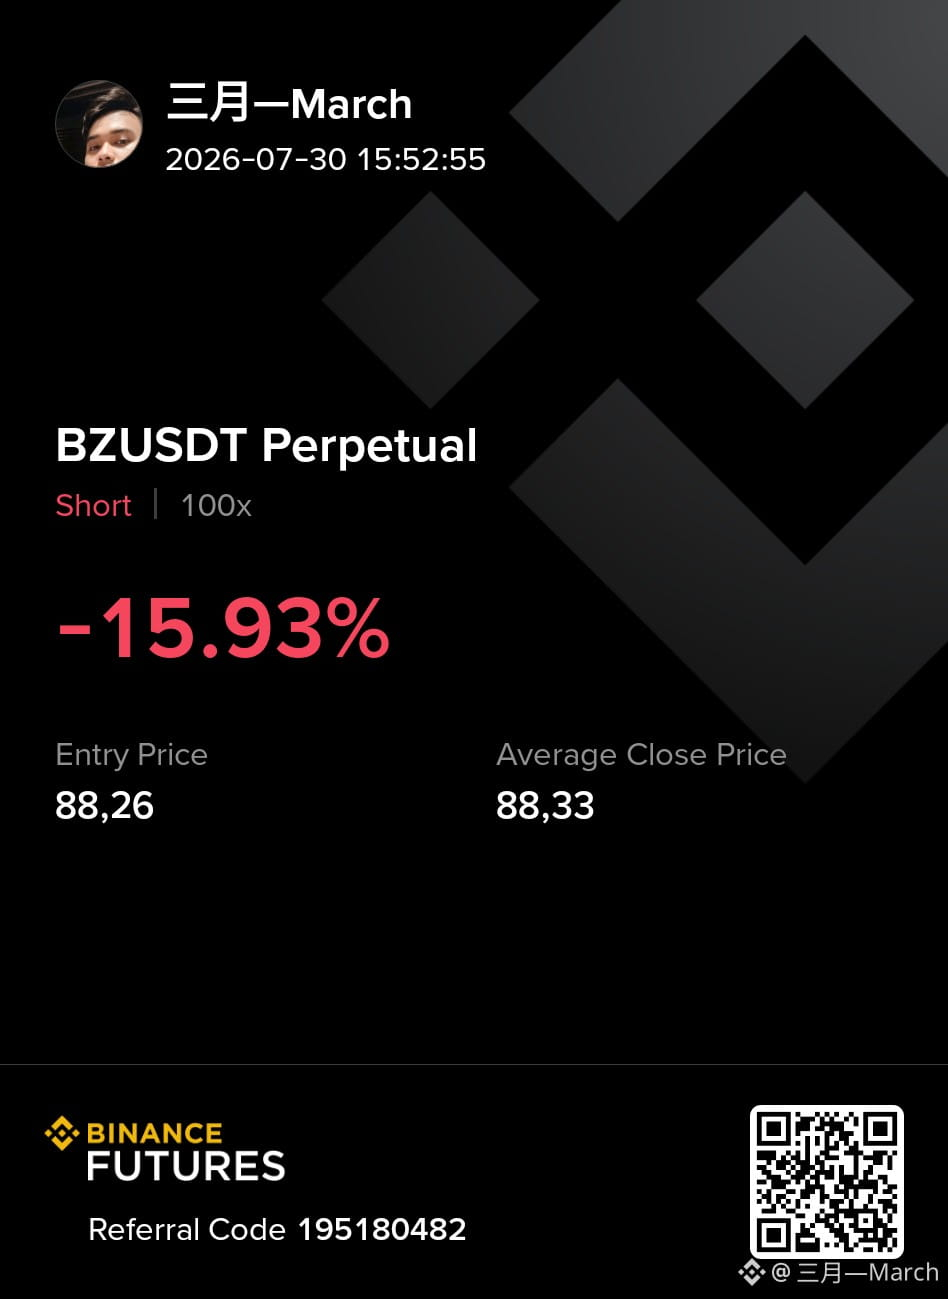
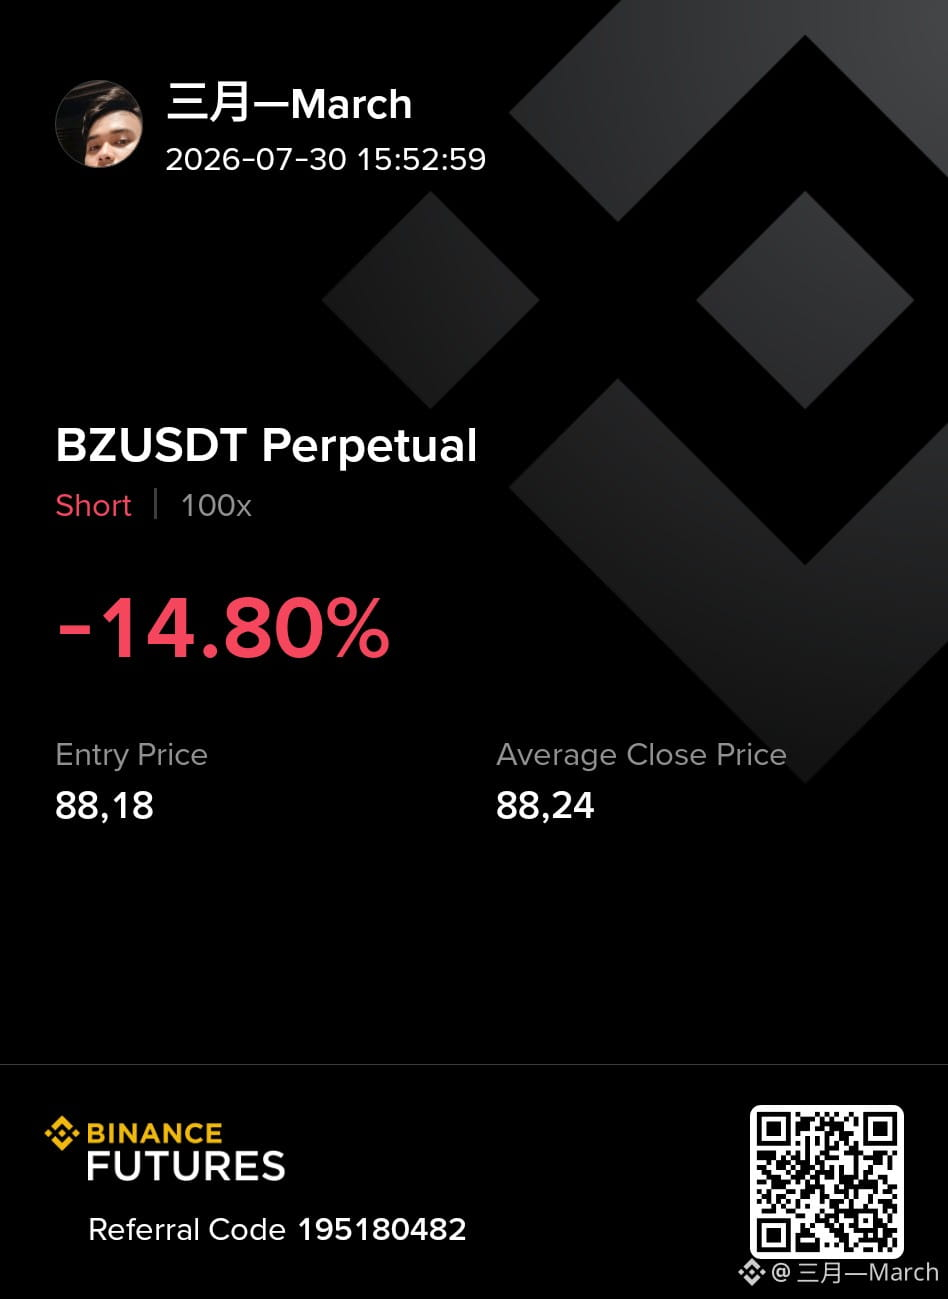
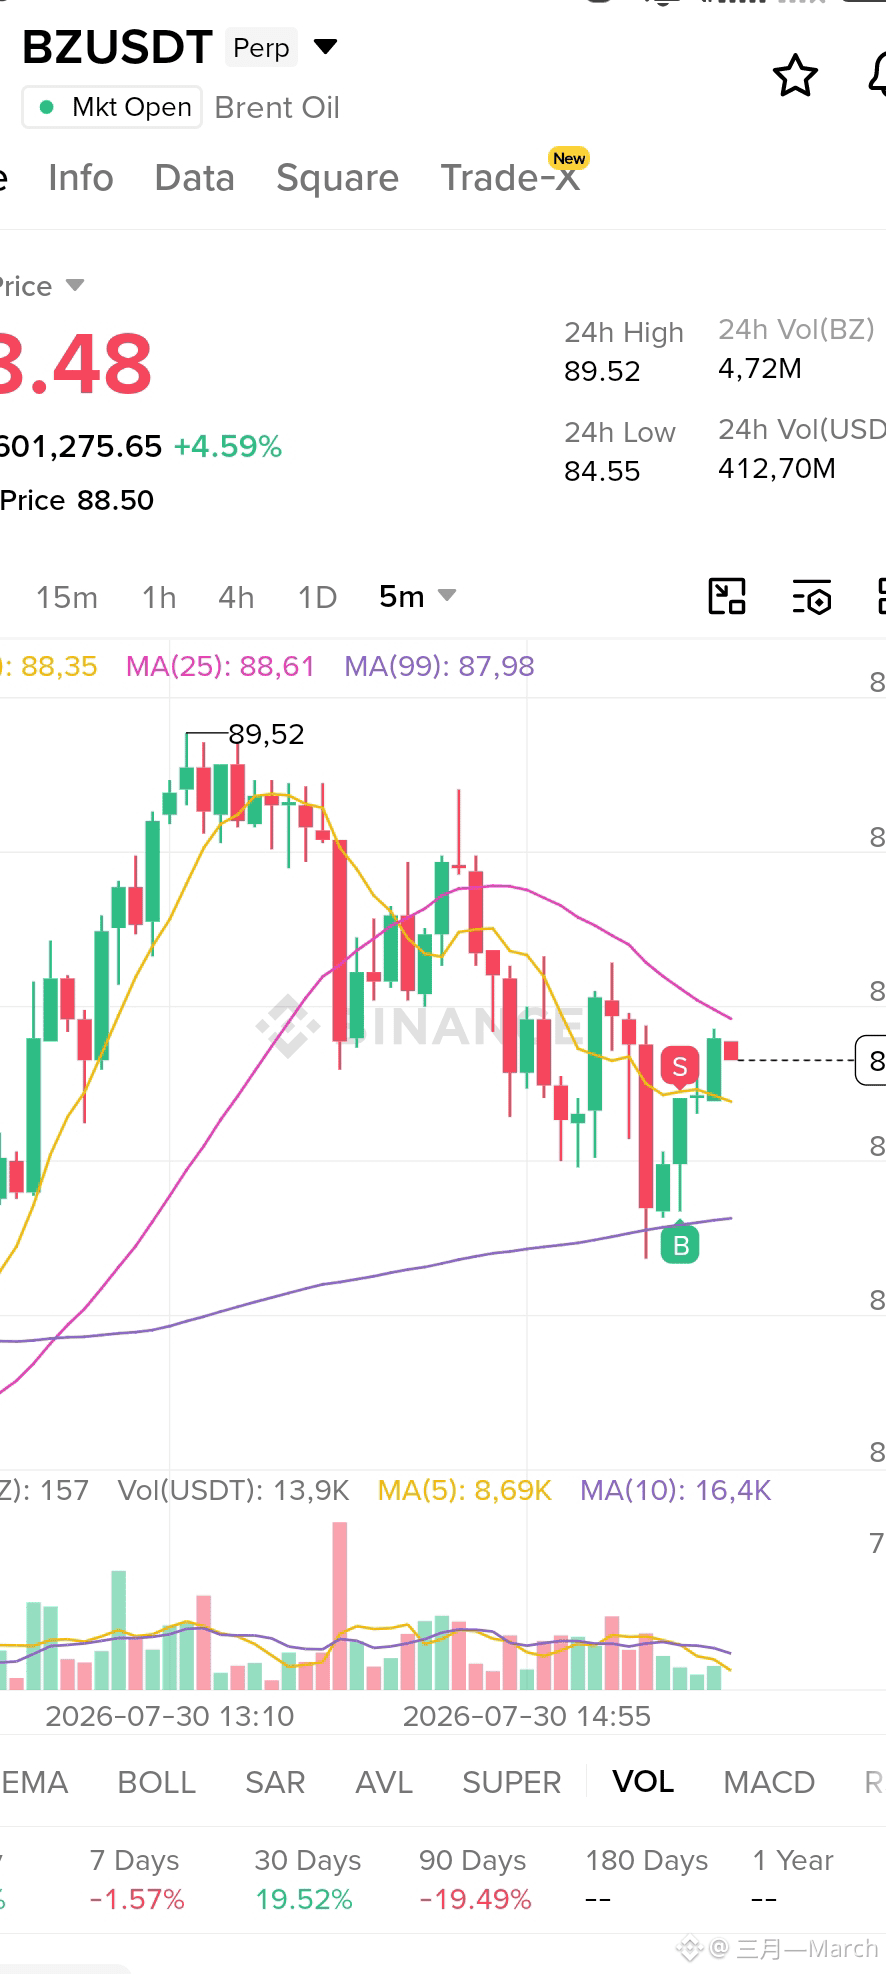
I just make one small mistake here when scalping $BZ
Not because I loss on the chart but the trading fee.
It's so expensive even with low margin there. So I went down and... Decide to close and not trades on it. for me as #scalper this is not a suitable one. Maybe for you who like to swing trades this is a good one.
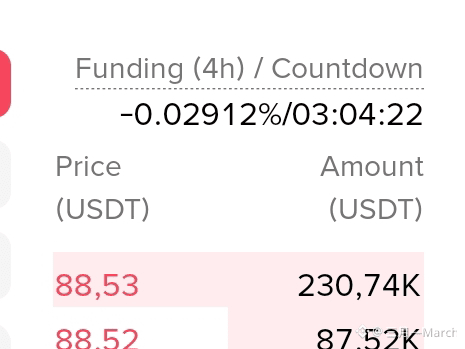
So I Decide to open short when I see the funding fee is already minus. yeah I thought this could be perfect opportunity. But the trading fee.....
Let's say I make profit on it but 20% of it is already to cover my trading fee. Even worse when I lost or my position hit SL.
I won't suggest you guys who have low capital to trade bz. Better looking for another tradfi or bstock with affordable and cheap trading fee for scalping.
or maybe you can just trade another token with high volatility like $COTI or $DEXE . Trading fee still affordable for a scalper.
#ShareMyTradFi
I just make one small mistake here when scalping $BZ
Not because I loss on the chart but the trading fee.
It's so expensive even with low margin there. So I went down and... Decide to close and not trades on it. for me as #scalper this is not a suitable one. Maybe for you who like to swing trades this is a good one.
So I Decide to open short when I see the funding fee is already minus. yeah I thought this could be perfect opportunity. But the trading fee.....
Let's say I make profit on it but 20% of it is already to cover my trading fee. Even worse when I lost or my position hit SL.
I won't suggest you guys who have low capital to trade bz. Better looking for another tradfi or bstock with affordable and cheap trading fee for scalping.
or maybe you can just trade another token with high volatility like $COTI or $DEXE . Trading fee still affordable for a scalper.
#ShareMyTradFi
Not because I loss on the chart but the trading fee.
It's so expensive even with low margin there. So I went down and... Decide to close and not trades on it. for me as #scalper this is not a suitable one. Maybe for you who like to swing trades this is a good one.
So I Decide to open short when I see the funding fee is already minus. yeah I thought this could be perfect opportunity. But the trading fee.....
Let's say I make profit on it but 20% of it is already to cover my trading fee. Even worse when I lost or my position hit SL.
I won't suggest you guys who have low capital to trade bz. Better looking for another tradfi or bstock with affordable and cheap trading fee for scalping.
or maybe you can just trade another token with high volatility like $COTI or $DEXE . Trading fee still affordable for a scalper.
#ShareMyTradFi
2
3
702
·
--
Bullish
$Q #scalper #ScalperClub #ALPHA🔥
Price = 0.025468
🟢 Bullish bias, but DON'T chase the current candle.
Structure: Higher highs + higher lows on the right side. Momentum: Strong upward expansion into the Weak High. Resistance: Current price is sitting around the Weak High, where an ABS marker has appeared. Demand: Multiple green zones are stacked below current price, giving potential pullback support. Risk: After such a sharp 1-minute move, a short-term retracement is very possible.
Best trade plan
LONG — preferred
Wait for a pullback into the nearest green demand zone. Look for bullish rejection / EXH or bullish BOS. Enter after confirmation. SL below the confirming swing low/demand zone. TP = Weak High → new high/extension.
SHORT — only if confirmed
Don't short simply because ABS + Weak High appeared. Wait for price to reject the high and produce a bearish BOS/ChoCH. Then short the retest. SL above the Weak High.
{alpha}(560xc07e1300dc138601fa6b0b59f8d0fa477e690589)
$Q #scalper #ScalperClub #ALPHA🔥
Price = 0.025468
🟢 Bullish bias, but DON'T chase the current candle.
Structure: Higher highs + higher lows on the right side. Momentum: Strong upward expansion into the Weak High. Resistance: Current price is sitting around the Weak High, where an ABS marker has appeared. Demand: Multiple green zones are stacked below current price, giving potential pullback support. Risk: After such a sharp 1-minute move, a short-term retracement is very possible.
Best trade plan
LONG — preferred
Wait for a pullback into the nearest green demand zone. Look for bullish rejection / EXH or bullish BOS. Enter after confirmation. SL below the confirming swing low/demand zone. TP = Weak High → new high/extension.
SHORT — only if confirmed
Don't short simply because ABS + Weak High appeared. Wait for price to reject the high and produce a bearish BOS/ChoCH. Then short the retest. SL above the Weak High.
Price = 0.025468
🟢 Bullish bias, but DON'T chase the current candle.
Structure: Higher highs + higher lows on the right side. Momentum: Strong upward expansion into the Weak High. Resistance: Current price is sitting around the Weak High, where an ABS marker has appeared. Demand: Multiple green zones are stacked below current price, giving potential pullback support. Risk: After such a sharp 1-minute move, a short-term retracement is very possible.
Best trade plan
LONG — preferred
Wait for a pullback into the nearest green demand zone. Look for bullish rejection / EXH or bullish BOS. Enter after confirmation. SL below the confirming swing low/demand zone. TP = Weak High → new high/extension.
SHORT — only if confirmed
Don't short simply because ABS + Weak High appeared. Wait for price to reject the high and produce a bearish BOS/ChoCH. Then short the retest. SL above the Weak High.
111
·
--
Bullish
$FOLKS #scalper #ScalperClub #FOLKSTrade
Price 2.161
🟢 Bullish structure
Price made a strong impulsive move upward. It broke above the previous BOS area. Price has now reached the marked Weak High / liquidity at the top. There is no clear bearish confirmation yet.
⚠️ Important: don't chase BUY here
Price is already at the Weak High, so this is a decision zone.
Scenario 1 — Breakout
1m candle closes clearly above Weak High Retest holds above it → 🟢 BUY continuation
Scenario 2 — Rejection
Price sweeps the Weak High and closes back below Then bearish CHoCH/BOS appears → 🔴 SELL on retest
My current call
Bias: 🟢 Bullish, but WAIT
I would not open a fresh BUY directly at the Weak High. The higher-quality trade is either:
BUY: breakout + successful retest
{alpha}(560xff7f8f301f7a706e3cfd3d2275f5dc0b9ee8009b)
$FOLKS #scalper #ScalperClub #FOLKSTrade
Price 2.161
🟢 Bullish structure
Price made a strong impulsive move upward. It broke above the previous BOS area. Price has now reached the marked Weak High / liquidity at the top. There is no clear bearish confirmation yet.
⚠️ Important: don't chase BUY here
Price is already at the Weak High, so this is a decision zone.
Scenario 1 — Breakout
1m candle closes clearly above Weak High Retest holds above it → 🟢 BUY continuation
Scenario 2 — Rejection
Price sweeps the Weak High and closes back below Then bearish CHoCH/BOS appears → 🔴 SELL on retest
My current call
Bias: 🟢 Bullish, but WAIT
I would not open a fresh BUY directly at the Weak High. The higher-quality trade is either:
BUY: breakout + successful retest
Price 2.161
🟢 Bullish structure
Price made a strong impulsive move upward. It broke above the previous BOS area. Price has now reached the marked Weak High / liquidity at the top. There is no clear bearish confirmation yet.
⚠️ Important: don't chase BUY here
Price is already at the Weak High, so this is a decision zone.
Scenario 1 — Breakout
1m candle closes clearly above Weak High Retest holds above it → 🟢 BUY continuation
Scenario 2 — Rejection
Price sweeps the Weak High and closes back below Then bearish CHoCH/BOS appears → 🔴 SELL on retest
My current call
Bias: 🟢 Bullish, but WAIT
I would not open a fresh BUY directly at the Weak High. The higher-quality trade is either:
BUY: breakout + successful retest
187
·
--
Bullish
$PRL #scalper #ScalperClub #ALPHA🔥
Price = 0.1350
Buy
SL: below the sweep low.
TP1: 66%
TP2: previous swing high
TP3: Weak High / premium zone if momentum returns.
{future}(PRLUSDT)
{alpha}(560xd20fb09a49a8e75fef536a2dbc68222900287bac)
$PRL #scalper #ScalperClub #ALPHA🔥
Price = 0.1350
Buy
SL: below the sweep low.
TP1: 66%
TP2: previous swing high
TP3: Weak High / premium zone if momentum returns.
Price = 0.1350
Buy
SL: below the sweep low.
TP1: 66%
TP2: previous swing high
TP3: Weak High / premium zone if momentum returns.
162

·
--
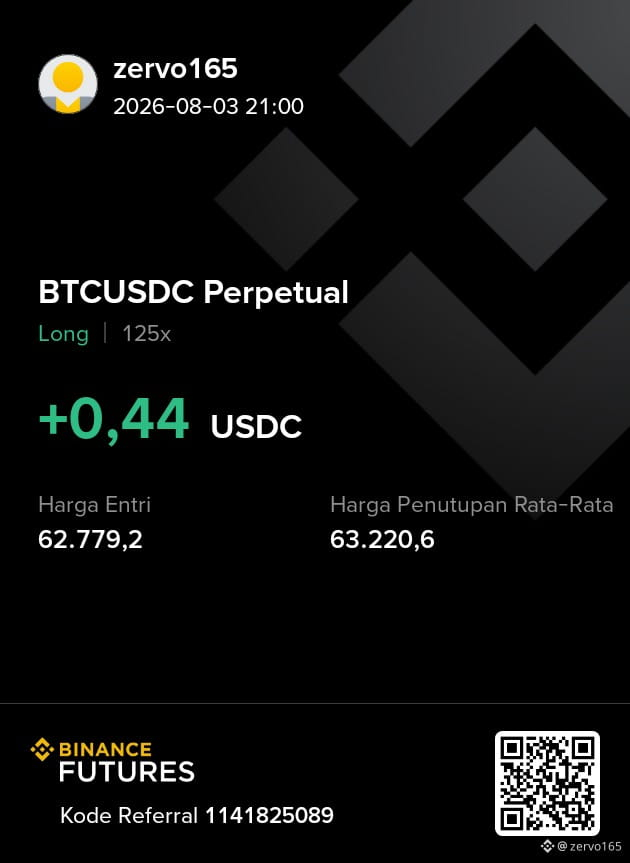
Day 1 trading Done! ✅Fast scalping BTCUSDC. Entry 62.779 -> TP 63.220. Enter, profit, immediately shut the laptop. Keep it simple, keep it green! 💚#Binance #Bitcoin #DayTrader #Scalper $BTC
Day 1 trading Done! ✅Fast scalping BTCUSDC. Entry 62.779 -> TP 63.220. Enter, profit, immediately shut the laptop. Keep it simple, keep it green! 💚#Binance #Bitcoin #DayTrader #Scalper $BTC
4
971
·
--
Bullish
$EPIC #scalper #ScalperClub #Epic
Price = 0.5020
the current setup looks bullish but extended.
Trend: Strong bullish momentum; clear impulsive move upward. Current area: Price is approaching the marked Weak High / red supply zone. Resistance: The red zone immediately above current price is the main area where rejection could occur. Support: The nearest green demand zones below are important for a pullback/retest. Best setup: I would not chase a long at the current spike. Prefer a pullback that holds the nearest demand zone, then a bullish continuation. Bearish trigger: A sharp rejection followed by a break of the recent higher-low structure would weaken the bullish setup.
Bias: 🟢 Bullish | Risk: High because price is near resistance.
{future}(EPICUSDT)
$EPIC #scalper #ScalperClub #Epic
Price = 0.5020
the current setup looks bullish but extended.
Trend: Strong bullish momentum; clear impulsive move upward. Current area: Price is approaching the marked Weak High / red supply zone. Resistance: The red zone immediately above current price is the main area where rejection could occur. Support: The nearest green demand zones below are important for a pullback/retest. Best setup: I would not chase a long at the current spike. Prefer a pullback that holds the nearest demand zone, then a bullish continuation. Bearish trigger: A sharp rejection followed by a break of the recent higher-low structure would weaken the bullish setup.
Bias: 🟢 Bullish | Risk: High because price is near resistance.
Price = 0.5020
the current setup looks bullish but extended.
Trend: Strong bullish momentum; clear impulsive move upward. Current area: Price is approaching the marked Weak High / red supply zone. Resistance: The red zone immediately above current price is the main area where rejection could occur. Support: The nearest green demand zones below are important for a pullback/retest. Best setup: I would not chase a long at the current spike. Prefer a pullback that holds the nearest demand zone, then a bullish continuation. Bearish trigger: A sharp rejection followed by a break of the recent higher-low structure would weaken the bullish setup.
Bias: 🟢 Bullish | Risk: High because price is near resistance.
196
·
--
Bullish
$G #scalper #ScalperClub #GUSDT
Price = 0.010030
Current bias: 🟢 LONG — but do NOT chase the top.
Clear sequence of higher highs + higher lows. Multiple bullish BOS confirmations on the right. Price has broken above the previous consolidation and is pushing into the marked Weak High. Green zones underneath provide potential demand/retest areas.
🟢 Best LONG setup
Wait for:
Pullback → green demand zone → bullish rejection → BOS/retest → LONG
The first nearby green zone is the initial area I'd watch. If that fails, the deeper green zones become the next support areas.
{future}(GUSDT)
$G #scalper #ScalperClub #GUSDT
Price = 0.010030
Current bias: 🟢 LONG — but do NOT chase the top.
Clear sequence of higher highs + higher lows. Multiple bullish BOS confirmations on the right. Price has broken above the previous consolidation and is pushing into the marked Weak High. Green zones underneath provide potential demand/retest areas.
🟢 Best LONG setup
Wait for:
Pullback → green demand zone → bullish rejection → BOS/retest → LONG
The first nearby green zone is the initial area I'd watch. If that fails, the deeper green zones become the next support areas.
Price = 0.010030
Current bias: 🟢 LONG — but do NOT chase the top.
Clear sequence of higher highs + higher lows. Multiple bullish BOS confirmations on the right. Price has broken above the previous consolidation and is pushing into the marked Weak High. Green zones underneath provide potential demand/retest areas.
🟢 Best LONG setup
Wait for:
Pullback → green demand zone → bullish rejection → BOS/retest → LONG
The first nearby green zone is the initial area I'd watch. If that fails, the deeper green zones become the next support areas.
190
·
--
Bullish
$CROSS #scalper #ScalperClub #CROSSUSDT
Price = 0.14601
This one is still bullish overall, but the immediate area is high-risk for chasing a long.
🟢 Structure: bullish — strong breakout from the previous consolidation. 🟢 Demand: the green zones below current price remain important. 🟡 Current price: consolidating after a sharp spike and rejection from the Weak High. 🔴 Resistance: the red zone around the Weak High is the immediate supply area.
My preferred setup
🟢 LONG:
Wait for price to pull back into the nearby green demand zone, hold it, and produce a bullish CHoCH/BOS on 1M.
🔴 SHORT:
Only consider a short if price sweeps the Weak High/red zone and then gives a bearish CHoCH/BOS. Without that confirmation, shorting is counter-trend.
Right now: 🟢 Bullish bias, 🟡 WAIT for confirmation.
I would not enter at the current candle after that spike. The better risk/reward is a confirmed pullback long.
This is chart-based analysis, not a guarantee or financial advice.
{future}(CROSSUSDT)
$CROSS #scalper #ScalperClub #CROSSUSDT
Price = 0.14601
This one is still bullish overall, but the immediate area is high-risk for chasing a long.
🟢 Structure: bullish — strong breakout from the previous consolidation. 🟢 Demand: the green zones below current price remain important. 🟡 Current price: consolidating after a sharp spike and rejection from the Weak High. 🔴 Resistance: the red zone around the Weak High is the immediate supply area.
My preferred setup
🟢 LONG:
Wait for price to pull back into the nearby green demand zone, hold it, and produce a bullish CHoCH/BOS on 1M.
🔴 SHORT:
Only consider a short if price sweeps the Weak High/red zone and then gives a bearish CHoCH/BOS. Without that confirmation, shorting is counter-trend.
Right now: 🟢 Bullish bias, 🟡 WAIT for confirmation.
I would not enter at the current candle after that spike. The better risk/reward is a confirmed pullback long.
This is chart-based analysis, not a guarantee or financial advice.
Price = 0.14601
This one is still bullish overall, but the immediate area is high-risk for chasing a long.
🟢 Structure: bullish — strong breakout from the previous consolidation. 🟢 Demand: the green zones below current price remain important. 🟡 Current price: consolidating after a sharp spike and rejection from the Weak High. 🔴 Resistance: the red zone around the Weak High is the immediate supply area.
My preferred setup
🟢 LONG:
Wait for price to pull back into the nearby green demand zone, hold it, and produce a bullish CHoCH/BOS on 1M.
🔴 SHORT:
Only consider a short if price sweeps the Weak High/red zone and then gives a bearish CHoCH/BOS. Without that confirmation, shorting is counter-trend.
Right now: 🟢 Bullish bias, 🟡 WAIT for confirmation.
I would not enter at the current candle after that spike. The better risk/reward is a confirmed pullback long.
This is chart-based analysis, not a guarantee or financial advice.
194
·
--
Bearish
$BULLA #scalper #ScalperClub #BULLASUDT
Price = 0.72758
📉 Current Structure
After the large spike, price is forming lower highs and lower lows. There are multiple red supply/resistance zones above the current price. The recent bounce appears to have been rejected from resistance. Short-term momentum is currently weak.
🔴 Sell Setup
I would not chase the current falling candle.
A better setup is:
Sell = Pullback + Rejection
Price pulls back toward the nearest resistance/supply zone. A bearish rejection or lower-high forms. Enter short after confirmation.
SL: Above the rejection swing high
TP1: Recent low
TP2: Next liquidity/support zone
TP3: Lower liquidity zone if the breakdown continues.
{future}(BULLAUSDT)
$BULLA #scalper #ScalperClub #BULLASUDT
Price = 0.72758
📉 Current Structure
After the large spike, price is forming lower highs and lower lows. There are multiple red supply/resistance zones above the current price. The recent bounce appears to have been rejected from resistance. Short-term momentum is currently weak.
🔴 Sell Setup
I would not chase the current falling candle.
A better setup is:
Sell = Pullback + Rejection
Price pulls back toward the nearest resistance/supply zone. A bearish rejection or lower-high forms. Enter short after confirmation.
SL: Above the rejection swing high
TP1: Recent low
TP2: Next liquidity/support zone
TP3: Lower liquidity zone if the breakdown continues.
Price = 0.72758
📉 Current Structure
After the large spike, price is forming lower highs and lower lows. There are multiple red supply/resistance zones above the current price. The recent bounce appears to have been rejected from resistance. Short-term momentum is currently weak.
🔴 Sell Setup
I would not chase the current falling candle.
A better setup is:
Sell = Pullback + Rejection
Price pulls back toward the nearest resistance/supply zone. A bearish rejection or lower-high forms. Enter short after confirmation.
SL: Above the rejection swing high
TP1: Recent low
TP2: Next liquidity/support zone
TP3: Lower liquidity zone if the breakdown continues.
284
·
--
Bearish
$LTC #scalper #ScalperClub #LTC📈
Price = 53.61
This chart is clearly bearish on the visible structure.
Multiple BOS breaks to the downside. Price is making lower highs + lower lows. The Strong High and several red supply zones are overhead. The latest move has pushed into a fresh low, with an EXH signal near the bottom. Because price is already extended downward, chasing SHORT here is risky.
🔴 Preferred setup: SHORT on pullback
Wait for a retracement into one of the nearby red supply/resistance zones.
SHORT: bearish rejection / bearish ChoCH or BOS after retest
SL: above the retest swing high
TP1: recent low
TP2: next lower liquidity / Strong Low.
{future}(LTCUSDT)
$LTC #scalper #ScalperClub #LTC📈
Price = 53.61
This chart is clearly bearish on the visible structure.
Multiple BOS breaks to the downside. Price is making lower highs + lower lows. The Strong High and several red supply zones are overhead. The latest move has pushed into a fresh low, with an EXH signal near the bottom. Because price is already extended downward, chasing SHORT here is risky.
🔴 Preferred setup: SHORT on pullback
Wait for a retracement into one of the nearby red supply/resistance zones.
SHORT: bearish rejection / bearish ChoCH or BOS after retest
SL: above the retest swing high
TP1: recent low
TP2: next lower liquidity / Strong Low.
Price = 53.61
This chart is clearly bearish on the visible structure.
Multiple BOS breaks to the downside. Price is making lower highs + lower lows. The Strong High and several red supply zones are overhead. The latest move has pushed into a fresh low, with an EXH signal near the bottom. Because price is already extended downward, chasing SHORT here is risky.
🔴 Preferred setup: SHORT on pullback
Wait for a retracement into one of the nearby red supply/resistance zones.
SHORT: bearish rejection / bearish ChoCH or BOS after retest
SL: above the retest swing high
TP1: recent low
TP2: next lower liquidity / Strong Low.
79
Log in to explore more content
Join global crypto users on Binance Square
⚡️ Get latest and useful information about crypto.
💬 Trusted by the world’s largest crypto exchange.
👍 Discover real insights from verified creators.
Email / Phone number
Trending Topics
1
#BitcoinSpotETFsNetInflow$191M
13 views
13 Discussing
2
#CFTCUpdatesGuidanceOnTokenizedAssets
3,944 views
222 Discussing
3
#BitgetSays$352MAffectedInHack
525 views
11 Discussing
4
#BinanceWillListHyperliquid(HYPE)
173,927 views
2,829 Discussing
5
#BrazilOrdersReportingOf$10KSelfCustodyTransfers
526 views
14 Discussing
6
#FedProposesRulesForBankIssuedStablecoins
5,851 views
219 Discussing
7
#OndoFinanceSoughtSaleAfterFoundersDeath
3,910 views
153 Discussing
8
#FedOctoberRateHikeOddsRiseTo69.7%
64,683 views
1,208 Discussing
9
#BitcoinFallsBelow$83,000
4,720 views
20 Discussing
10
#BitcoinFallsToAround$84,600ThisWeek
0 views
0 Discussing