

RONI_VOSS
1.3k Posts

RONI_VOSS
Report
Block User
📊 Binance Square Creator Sharing crypto insights, market analysis & trading education.Always DYOR. Not financial advice.
Open Trade
Occasional Trader
1.7 Years
3 Following
121 Followers
69 Liked
Posts
Portfolio
All
Live
·
--
Bullish
🇸🇻₿ EL SALVADOR CONTINUES ADDING $BITCOIN ! 🚀
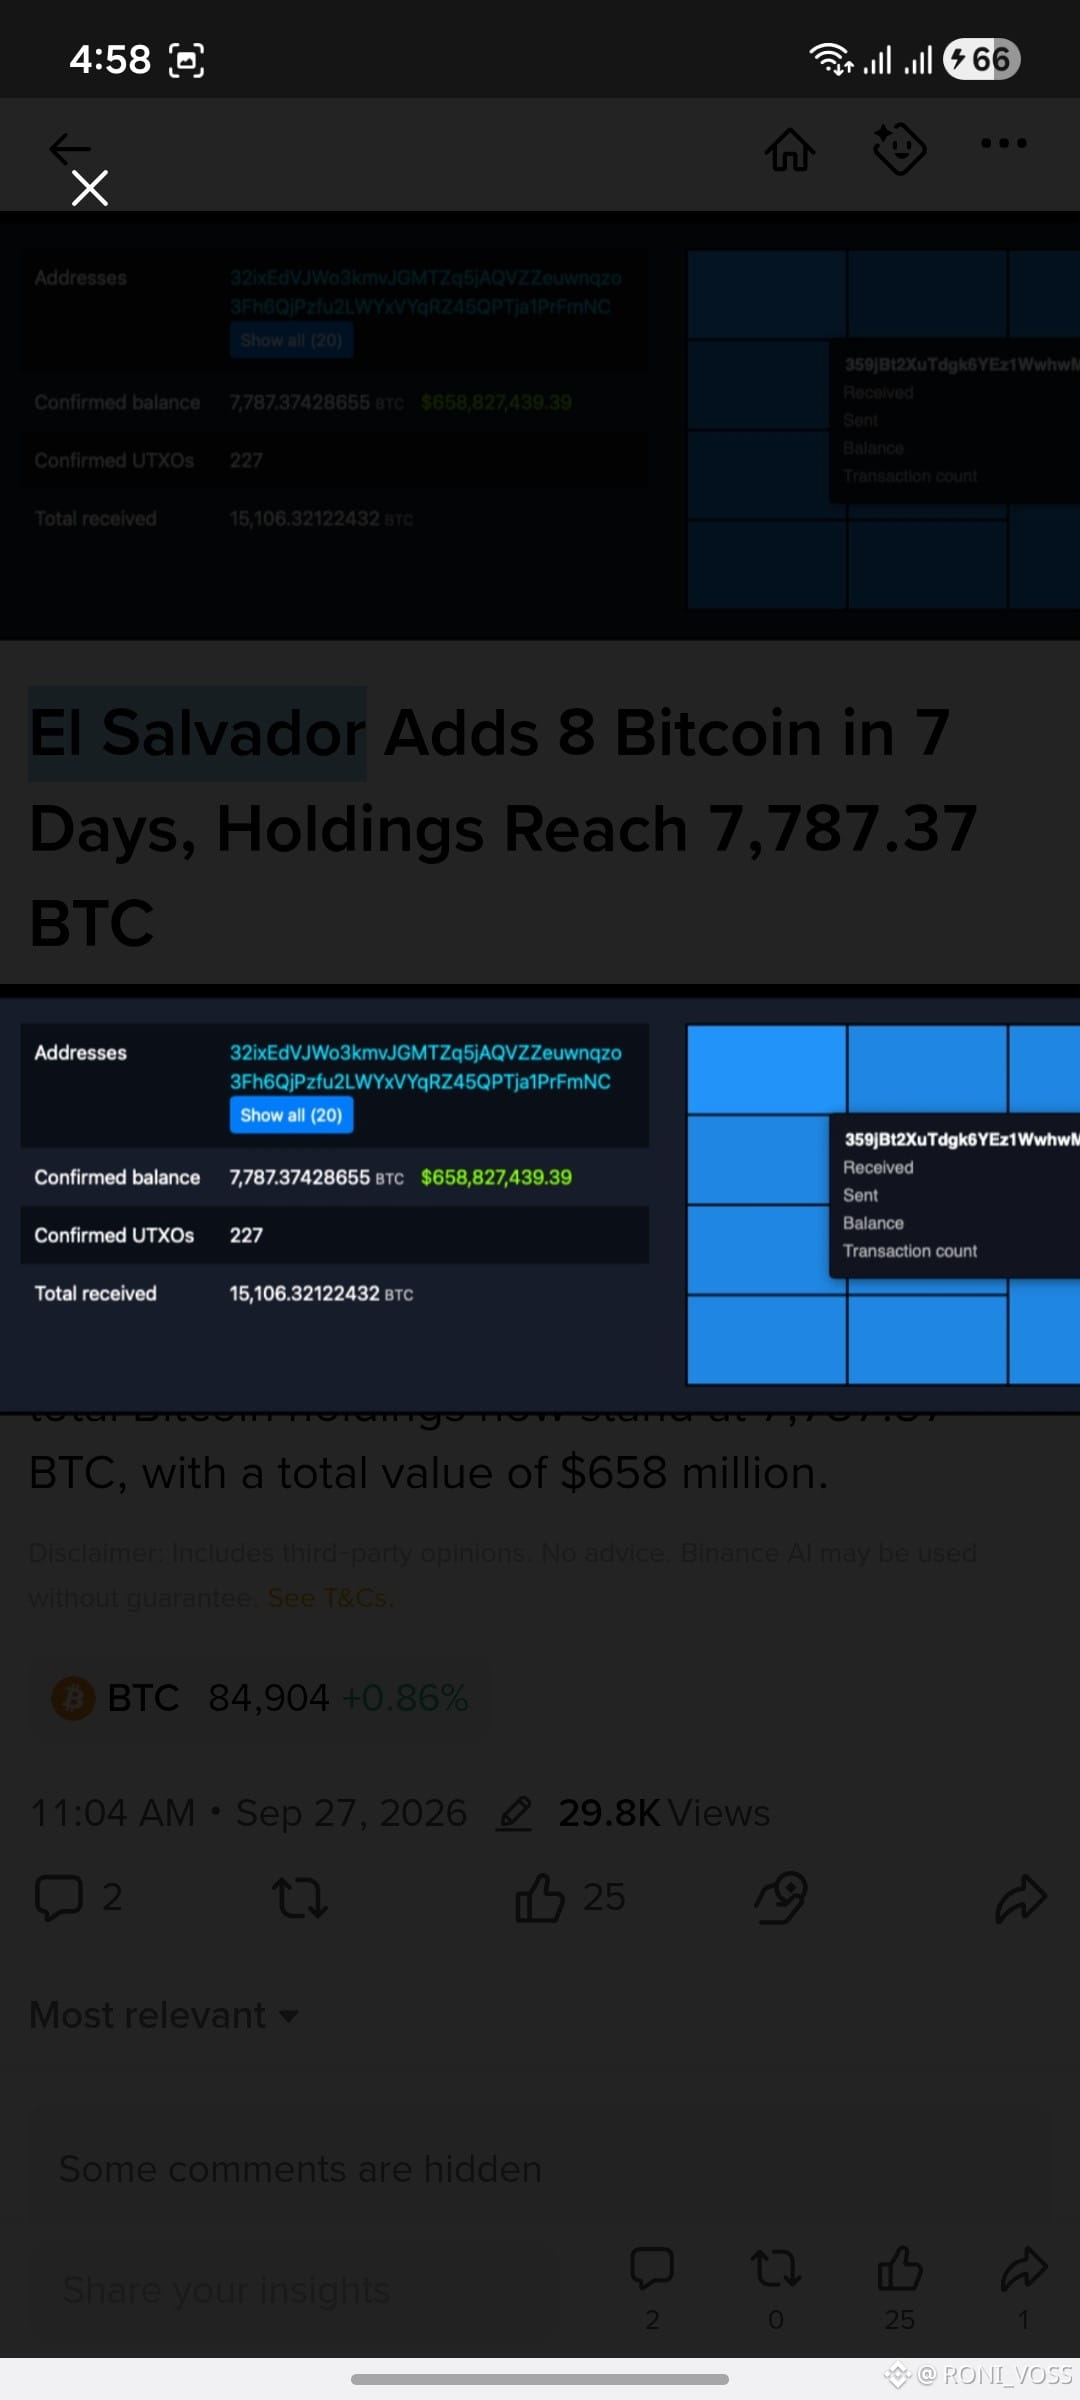
El Salvador has reportedly increased its Bitcoin holdings by 8 $BTC over the past 7 days and by 31 BTC over the past 30 days. 📈
According to ChainCatcher, the country’s total Bitcoin holdings now stand at:
₿ 7,787.37 BTC
💰 Estimated value: $658 million
The continued accumulation keeps El Salvador’s Bitcoin strategy firmly in focus as the country adds to its holdings over time. 👀🔥
Another 8 BTC added in just one week! 🇸🇻₿
{spot}(BTCUSDT)
#StrategyStriveAdd2305BitcoinThisWeek #TrumpRejectsIranHormuzReopening #CircleTetherFreezeBitgetHackerWallet #SECSaysTokenBuybacksNotAutoSecurities #CoinMarketCapCompletesCoinglassAcquisition
🇸🇻₿ EL SALVADOR CONTINUES ADDING $BITCOIN ! 🚀
El Salvador has reportedly increased its Bitcoin holdings by 8 $BTC over the past 7 days and by 31 BTC over the past 30 days. 📈
According to ChainCatcher, the country’s total Bitcoin holdings now stand at:
₿ 7,787.37 BTC
💰 Estimated value: $658 million
The continued accumulation keeps El Salvador’s Bitcoin strategy firmly in focus as the country adds to its holdings over time. 👀🔥
Another 8 BTC added in just one week! 🇸🇻₿
#StrategyStriveAdd2305BitcoinThisWeek #TrumpRejectsIranHormuzReopening #CircleTetherFreezeBitgetHackerWallet #SECSaysTokenBuybacksNotAutoSecurities #CoinMarketCapCompletesCoinglassAcquisition
El Salvador has reportedly increased its Bitcoin holdings by 8 $BTC over the past 7 days and by 31 BTC over the past 30 days. 📈
According to ChainCatcher, the country’s total Bitcoin holdings now stand at:
₿ 7,787.37 BTC
💰 Estimated value: $658 million
The continued accumulation keeps El Salvador’s Bitcoin strategy firmly in focus as the country adds to its holdings over time. 👀🔥
Another 8 BTC added in just one week! 🇸🇻₿
#StrategyStriveAdd2305BitcoinThisWeek #TrumpRejectsIranHormuzReopening #CircleTetherFreezeBitgetHackerWallet #SECSaysTokenBuybacksNotAutoSecurities #CoinMarketCapCompletesCoinglassAcquisition
7
·
--
Bullish
🚨📉 $TRX TRADE UPDATE — TP2 REACHED! 🎯💰
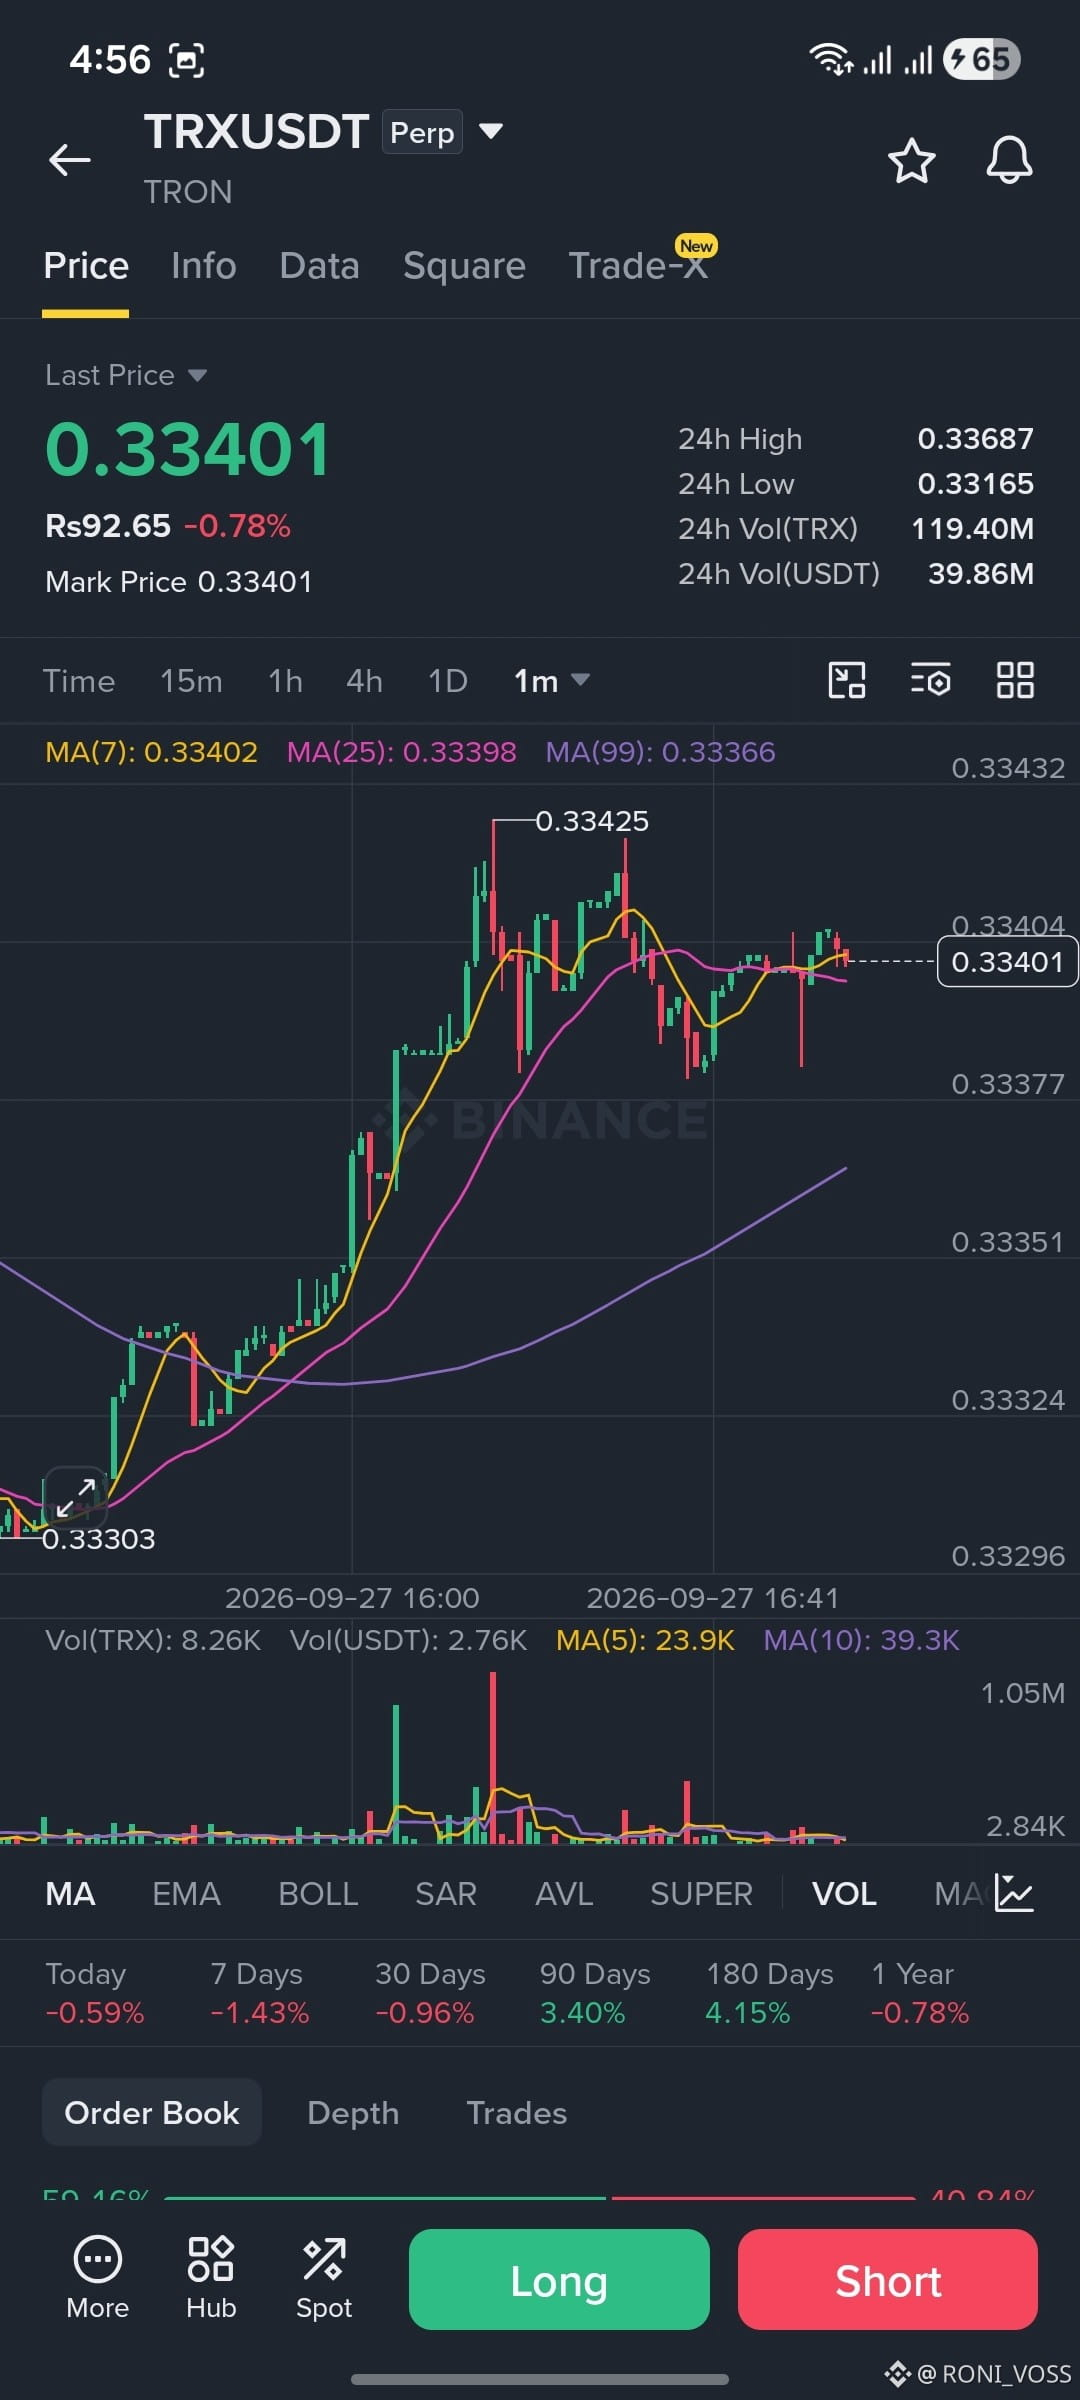
Our $TRX short setup played out strongly, with price dropping from the highlighted entry area and reaching TP2 as expected. 🔥
After the sharp decline, $TRX is now showing a small recovery from the lows, so the next price action is worth watching closely. 👀
📊 Current Update:
✅ TP1 — Reached
✅ TP2 — Reached
🔄 Small recovery from the lows
🎯 Final downside level — still in focus
Will TRX resume the downside after this small recovery? 👀🎯
{spot}(TRXUSDT)
#StrategyStriveAdd2305BitcoinThisWeek #TrumpRejectsIranHormuzReopening #CircleTetherFreezeBitgetHackerWallet #CoinMarketCapCompletesCoinglassAcquisition #SECSaysTokenBuybacksNotAutoSecurities
🚨📉 $TRX TRADE UPDATE — TP2 REACHED! 🎯💰
Our $TRX short setup played out strongly, with price dropping from the highlighted entry area and reaching TP2 as expected. 🔥
After the sharp decline, $TRX is now showing a small recovery from the lows, so the next price action is worth watching closely. 👀
📊 Current Update:
✅ TP1 — Reached
✅ TP2 — Reached
🔄 Small recovery from the lows
🎯 Final downside level — still in focus
Will TRX resume the downside after this small recovery? 👀🎯
#StrategyStriveAdd2305BitcoinThisWeek #TrumpRejectsIranHormuzReopening #CircleTetherFreezeBitgetHackerWallet #CoinMarketCapCompletesCoinglassAcquisition #SECSaysTokenBuybacksNotAutoSecurities
Our $TRX short setup played out strongly, with price dropping from the highlighted entry area and reaching TP2 as expected. 🔥
After the sharp decline, $TRX is now showing a small recovery from the lows, so the next price action is worth watching closely. 👀
📊 Current Update:
✅ TP1 — Reached
✅ TP2 — Reached
🔄 Small recovery from the lows
🎯 Final downside level — still in focus
Will TRX resume the downside after this small recovery? 👀🎯
#StrategyStriveAdd2305BitcoinThisWeek #TrumpRejectsIranHormuzReopening #CircleTetherFreezeBitgetHackerWallet #CoinMarketCapCompletesCoinglassAcquisition #SECSaysTokenBuybacksNotAutoSecurities
6
·
--
Bullish
🚨🔥 MY LOYAL FOLLOWERS ❤️ — LOOK AT $SUI ! 📈🚀
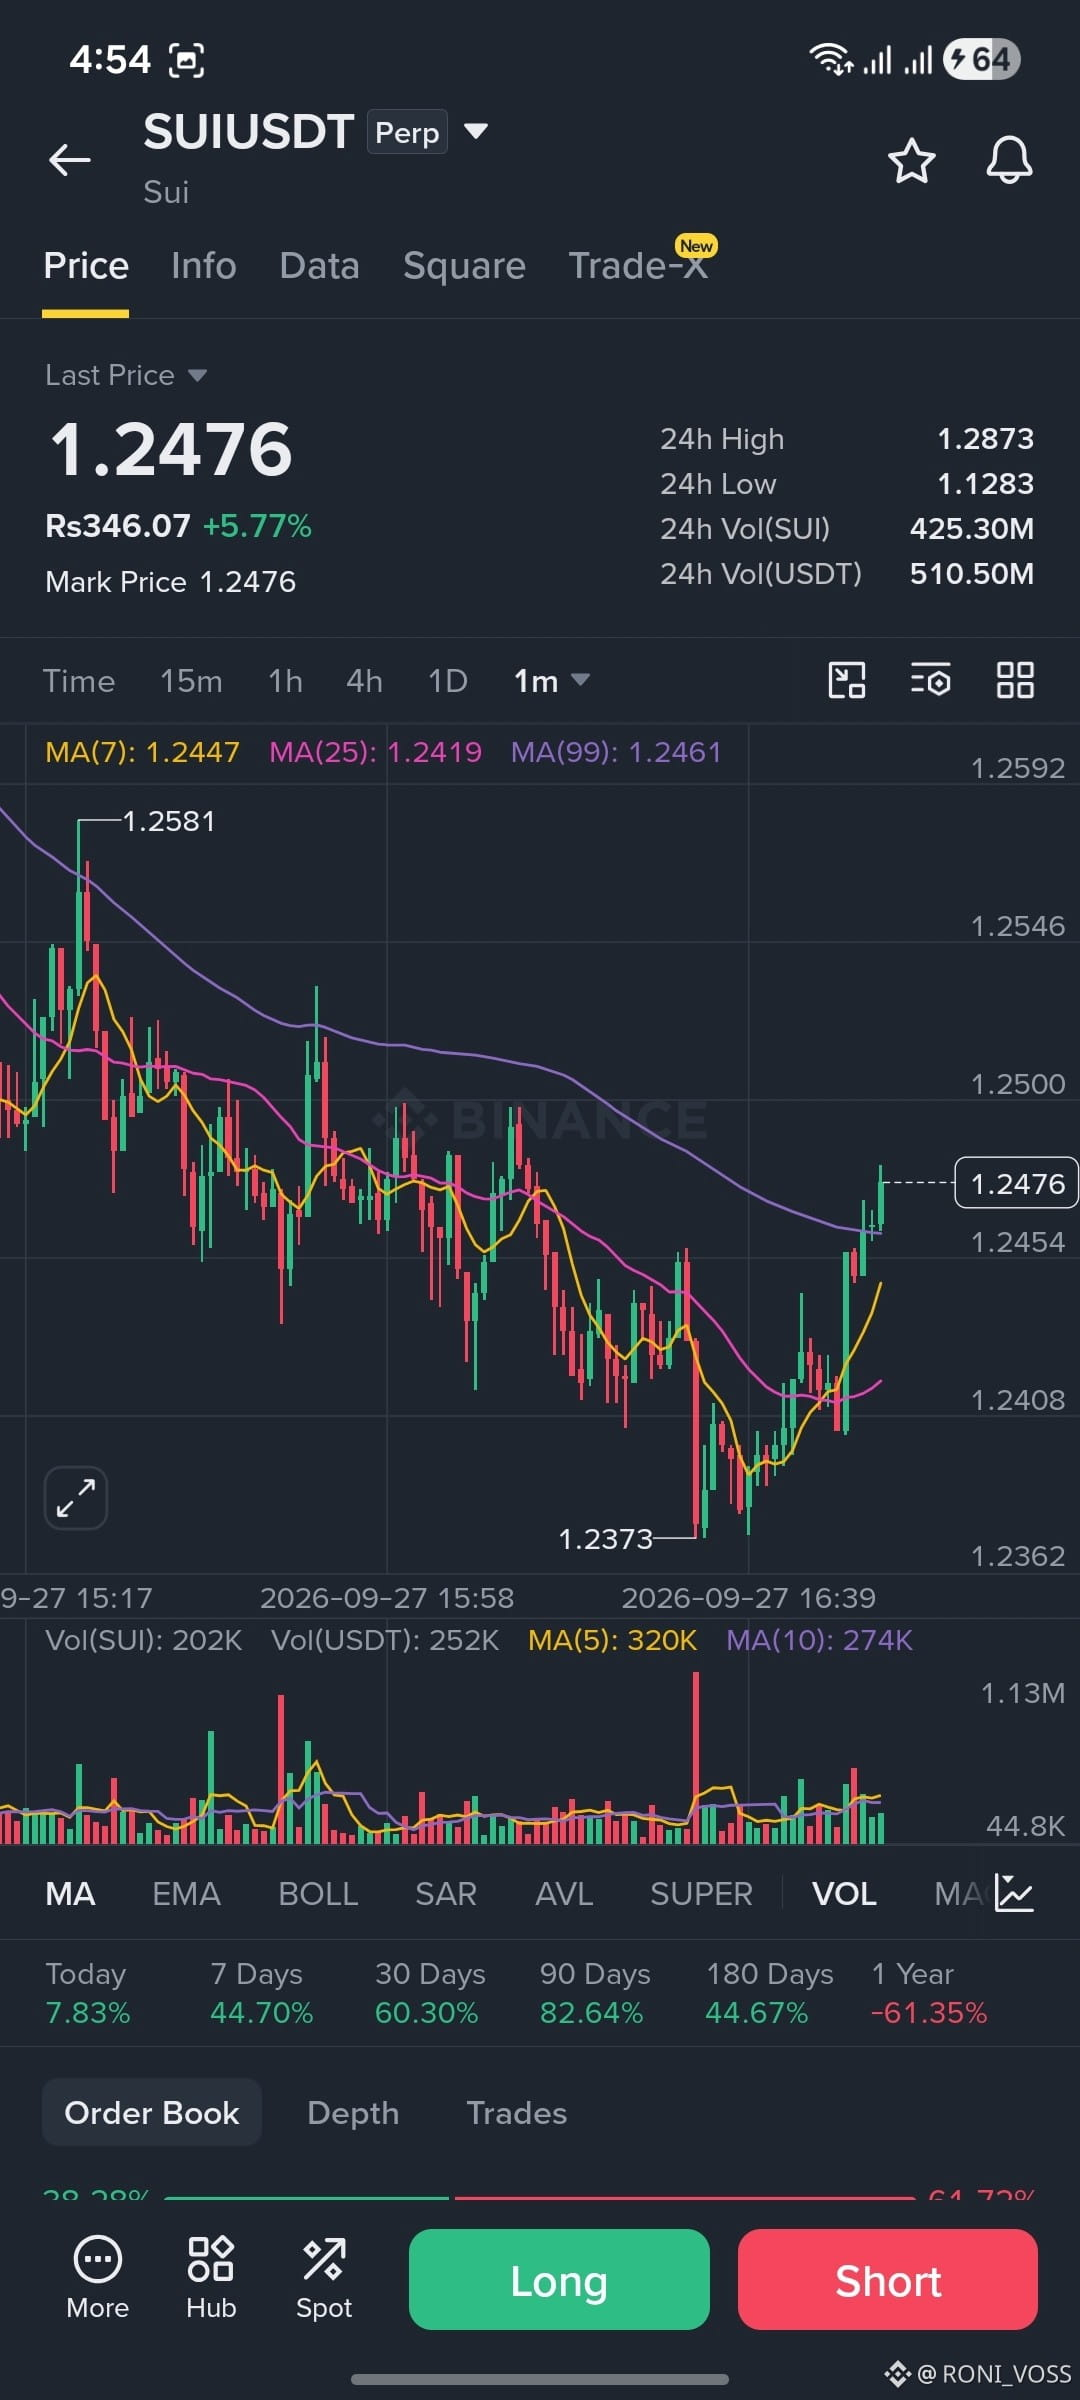
Our first $SUI setup moved strongly in the expected direction, with all the highlighted upside levels reached. 🎯🔥
Now, $SUI is back in focus as buyers look to build another move higher. 👀
📍 Key Zone: $1.274 – $1.280
🎯 Upside Levels:
• $1.300
• $1.330
• $1.360
⚠️ Key Downside Level: $1.230
📊 Setup Logic:
• The previous move reached all highlighted upside levels.
• Holding $1.274–$1.280 could keep the bullish structure active.
• A sustained move above $1.300 could bring $1.330 and $1.360 into focus.
• A break below $1.230 would weaken the current setup.👀🔥📈
{spot}(SUIUSDT)
#StrategyStriveAdd2305BitcoinThisWeek #TrumpRejectsIranHormuzReopening #CircleTetherFreezeBitgetHackerWallet #SECSaysTokenBuybacksNotAutoSecurities #CoinMarketCapCompletesCoinglassAcquisition
🚨🔥 MY LOYAL FOLLOWERS ❤️ — LOOK AT $SUI ! 📈🚀
Our first $SUI setup moved strongly in the expected direction, with all the highlighted upside levels reached. 🎯🔥
Now, $SUI is back in focus as buyers look to build another move higher. 👀
📍 Key Zone: $1.274 – $1.280
🎯 Upside Levels:
• $1.300
• $1.330
• $1.360
⚠️ Key Downside Level: $1.230
📊 Setup Logic:
• The previous move reached all highlighted upside levels.
• Holding $1.274–$1.280 could keep the bullish structure active.
• A sustained move above $1.300 could bring $1.330 and $1.360 into focus.
• A break below $1.230 would weaken the current setup.👀🔥📈
#StrategyStriveAdd2305BitcoinThisWeek #TrumpRejectsIranHormuzReopening #CircleTetherFreezeBitgetHackerWallet #SECSaysTokenBuybacksNotAutoSecurities #CoinMarketCapCompletesCoinglassAcquisition
Our first $SUI setup moved strongly in the expected direction, with all the highlighted upside levels reached. 🎯🔥
Now, $SUI is back in focus as buyers look to build another move higher. 👀
📍 Key Zone: $1.274 – $1.280
🎯 Upside Levels:
• $1.300
• $1.330
• $1.360
⚠️ Key Downside Level: $1.230
📊 Setup Logic:
• The previous move reached all highlighted upside levels.
• Holding $1.274–$1.280 could keep the bullish structure active.
• A sustained move above $1.300 could bring $1.330 and $1.360 into focus.
• A break below $1.230 would weaken the current setup.👀🔥📈
#StrategyStriveAdd2305BitcoinThisWeek #TrumpRejectsIranHormuzReopening #CircleTetherFreezeBitgetHackerWallet #SECSaysTokenBuybacksNotAutoSecurities #CoinMarketCapCompletesCoinglassAcquisition
20
·
--
Bullish
🚨🔥 $ETH CONSOLIDATING NEAR $2.7K — WHAT COMES NEXT? 👀📊
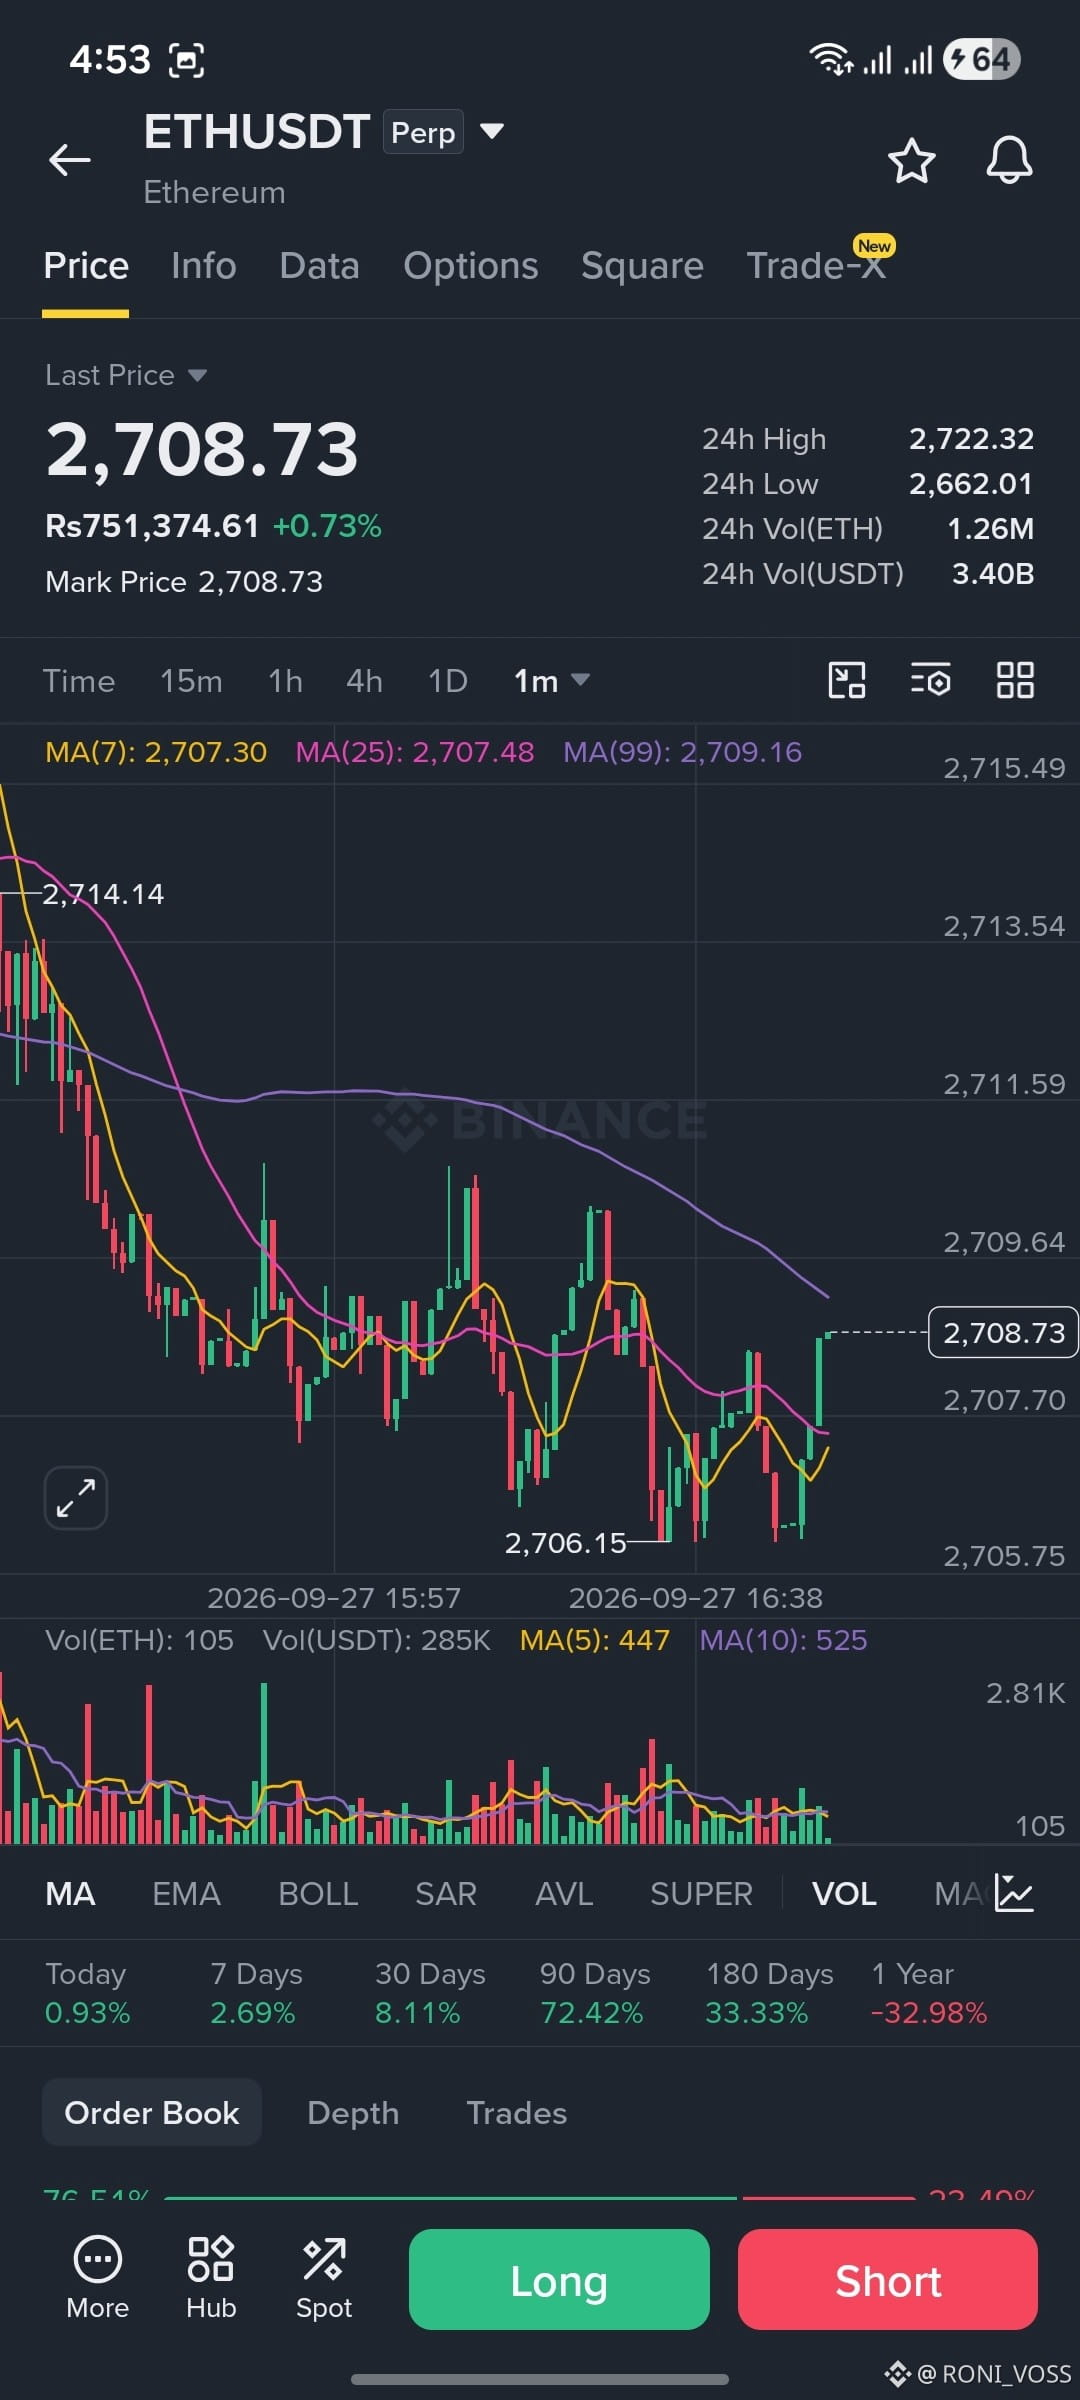
Guys, $ETH is consolidating around $2,700 after a strong recovery from the lower levels. On the 4H chart, price is holding a relatively tight range while buyers attempt to rebuild momentum. 📈
📍 Key Zone: $2,650 – $2,700
🟢 Bullish Scenario:
• Holding the $2,680–$2,700 support zone could keep the recovery structure active.
• A breakout above $2,720–$2,750 could bring $2,800 into focus.
• Continued momentum could then put $2,850–$2,900 on the radar.
🔴 Bearish Scenario:
• A loss of $2,650 could weaken the consolidation structure.
• Downside levels to watch: $2,600 and potentially $2,550.
📊 Bottom Line:
$2,650–$2,700 is the key zone right now. The next decisive breakout or breakdown from this range could determine $ETH's next major move. 👀🔥
Which side breaks first — buyers above $2,750 or sellers below $2,650? 📈📉
{spot}(ETHUSDT)
#StrategyStriveAdd2305BitcoinThisWeek #TrumpRejectsIranHormuzReopening #CircleTetherFreezeBitgetHackerWallet #SECSaysTokenBuybacksNotAutoSecurities #CoinMarketCapCompletesCoinglassAcquisition
🚨🔥 $ETH CONSOLIDATING NEAR $2.7K — WHAT COMES NEXT? 👀📊
Guys, $ETH is consolidating around $2,700 after a strong recovery from the lower levels. On the 4H chart, price is holding a relatively tight range while buyers attempt to rebuild momentum. 📈
📍 Key Zone: $2,650 – $2,700
🟢 Bullish Scenario:
• Holding the $2,680–$2,700 support zone could keep the recovery structure active.
• A breakout above $2,720–$2,750 could bring $2,800 into focus.
• Continued momentum could then put $2,850–$2,900 on the radar.
🔴 Bearish Scenario:
• A loss of $2,650 could weaken the consolidation structure.
• Downside levels to watch: $2,600 and potentially $2,550.
📊 Bottom Line:
$2,650–$2,700 is the key zone right now. The next decisive breakout or breakdown from this range could determine $ETH 's next major move. 👀🔥
Which side breaks first — buyers above $2,750 or sellers below $2,650? 📈📉
#StrategyStriveAdd2305BitcoinThisWeek #TrumpRejectsIranHormuzReopening #CircleTetherFreezeBitgetHackerWallet #SECSaysTokenBuybacksNotAutoSecurities #CoinMarketCapCompletesCoinglassAcquisition
Guys, $ETH is consolidating around $2,700 after a strong recovery from the lower levels. On the 4H chart, price is holding a relatively tight range while buyers attempt to rebuild momentum. 📈
📍 Key Zone: $2,650 – $2,700
🟢 Bullish Scenario:
• Holding the $2,680–$2,700 support zone could keep the recovery structure active.
• A breakout above $2,720–$2,750 could bring $2,800 into focus.
• Continued momentum could then put $2,850–$2,900 on the radar.
🔴 Bearish Scenario:
• A loss of $2,650 could weaken the consolidation structure.
• Downside levels to watch: $2,600 and potentially $2,550.
📊 Bottom Line:
$2,650–$2,700 is the key zone right now. The next decisive breakout or breakdown from this range could determine $ETH 's next major move. 👀🔥
Which side breaks first — buyers above $2,750 or sellers below $2,650? 📈📉
#StrategyStriveAdd2305BitcoinThisWeek #TrumpRejectsIranHormuzReopening #CircleTetherFreezeBitgetHackerWallet #SECSaysTokenBuybacksNotAutoSecurities #CoinMarketCapCompletesCoinglassAcquisition
4
·
--
Bullish
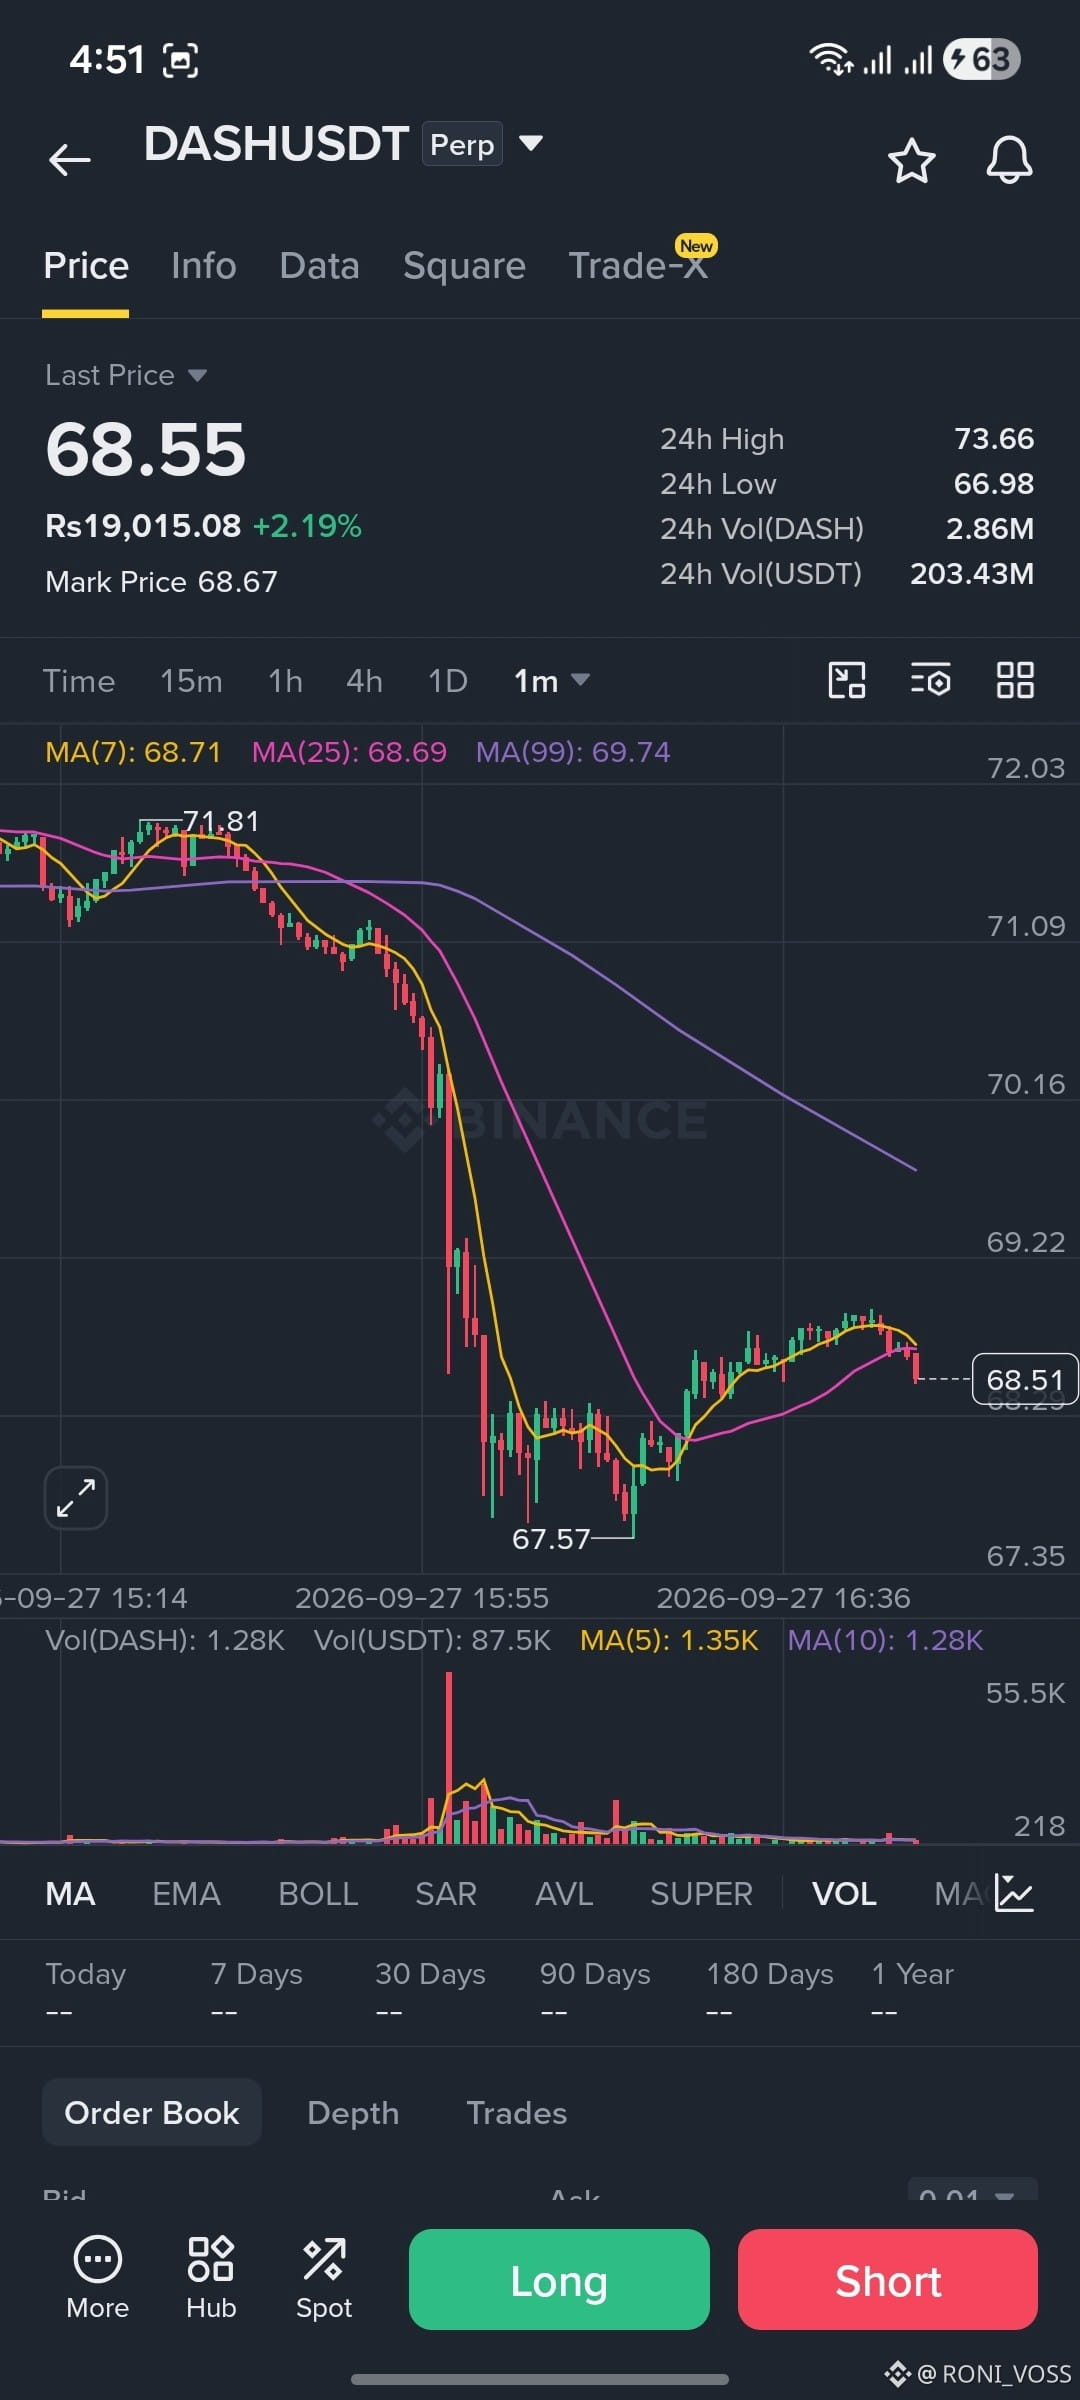
🚨🔥 ATTENTION TRADERS — $DASH SUPPORT IN FOCUS! 📈
$DASH is holding the range support and showing signs of another potential push higher. The key now is whether buyers can defend this area and maintain the bullish structure. 👀
📍 Key Support Zone: $71.70 – $72.00
🎯 Upside Levels:
• $72.80
• $73.74
• $75.50
⚠️ Key Downside Level: $70.50
📊 Setup Logic:
• $71.70–$72.00 is the key support area to watch.
• Holding this zone could keep the recovery structure active.
• A sustained move above $72.80 could bring $73.74 and $75.50 into focus.
• A break below $70.50 would weaken the current setup.
The big question: can $DASH defend range support and build momentum toward $75.50? 👀🔥📈
#StrategyStriveAdd2305BitcoinThisWeek #TrumpRejectsIranHormuzReopening #CircleTetherFreezeBitgetHackerWallet #SECSaysTokenBuybacksNotAutoSecurities #CoinMarketCapCompletesCoinglassAcquisition
🚨🔥 ATTENTION TRADERS — $DASH SUPPORT IN FOCUS! 📈
$DASH is holding the range support and showing signs of another potential push higher. The key now is whether buyers can defend this area and maintain the bullish structure. 👀
📍 Key Support Zone: $71.70 – $72.00
🎯 Upside Levels:
• $72.80
• $73.74
• $75.50
⚠️ Key Downside Level: $70.50
📊 Setup Logic:
• $71.70–$72.00 is the key support area to watch.
• Holding this zone could keep the recovery structure active.
• A sustained move above $72.80 could bring $73.74 and $75.50 into focus.
• A break below $70.50 would weaken the current setup.
The big question: can $DASH defend range support and build momentum toward $75.50? 👀🔥📈
#StrategyStriveAdd2305BitcoinThisWeek #TrumpRejectsIranHormuzReopening #CircleTetherFreezeBitgetHackerWallet #SECSaysTokenBuybacksNotAutoSecurities #CoinMarketCapCompletesCoinglassAcquisition
$DASH is holding the range support and showing signs of another potential push higher. The key now is whether buyers can defend this area and maintain the bullish structure. 👀
📍 Key Support Zone: $71.70 – $72.00
🎯 Upside Levels:
• $72.80
• $73.74
• $75.50
⚠️ Key Downside Level: $70.50
📊 Setup Logic:
• $71.70–$72.00 is the key support area to watch.
• Holding this zone could keep the recovery structure active.
• A sustained move above $72.80 could bring $73.74 and $75.50 into focus.
• A break below $70.50 would weaken the current setup.
The big question: can $DASH defend range support and build momentum toward $75.50? 👀🔥📈
#StrategyStriveAdd2305BitcoinThisWeek #TrumpRejectsIranHormuzReopening #CircleTetherFreezeBitgetHackerWallet #SECSaysTokenBuybacksNotAutoSecurities #CoinMarketCapCompletesCoinglassAcquisition
43
·
--
Bullish
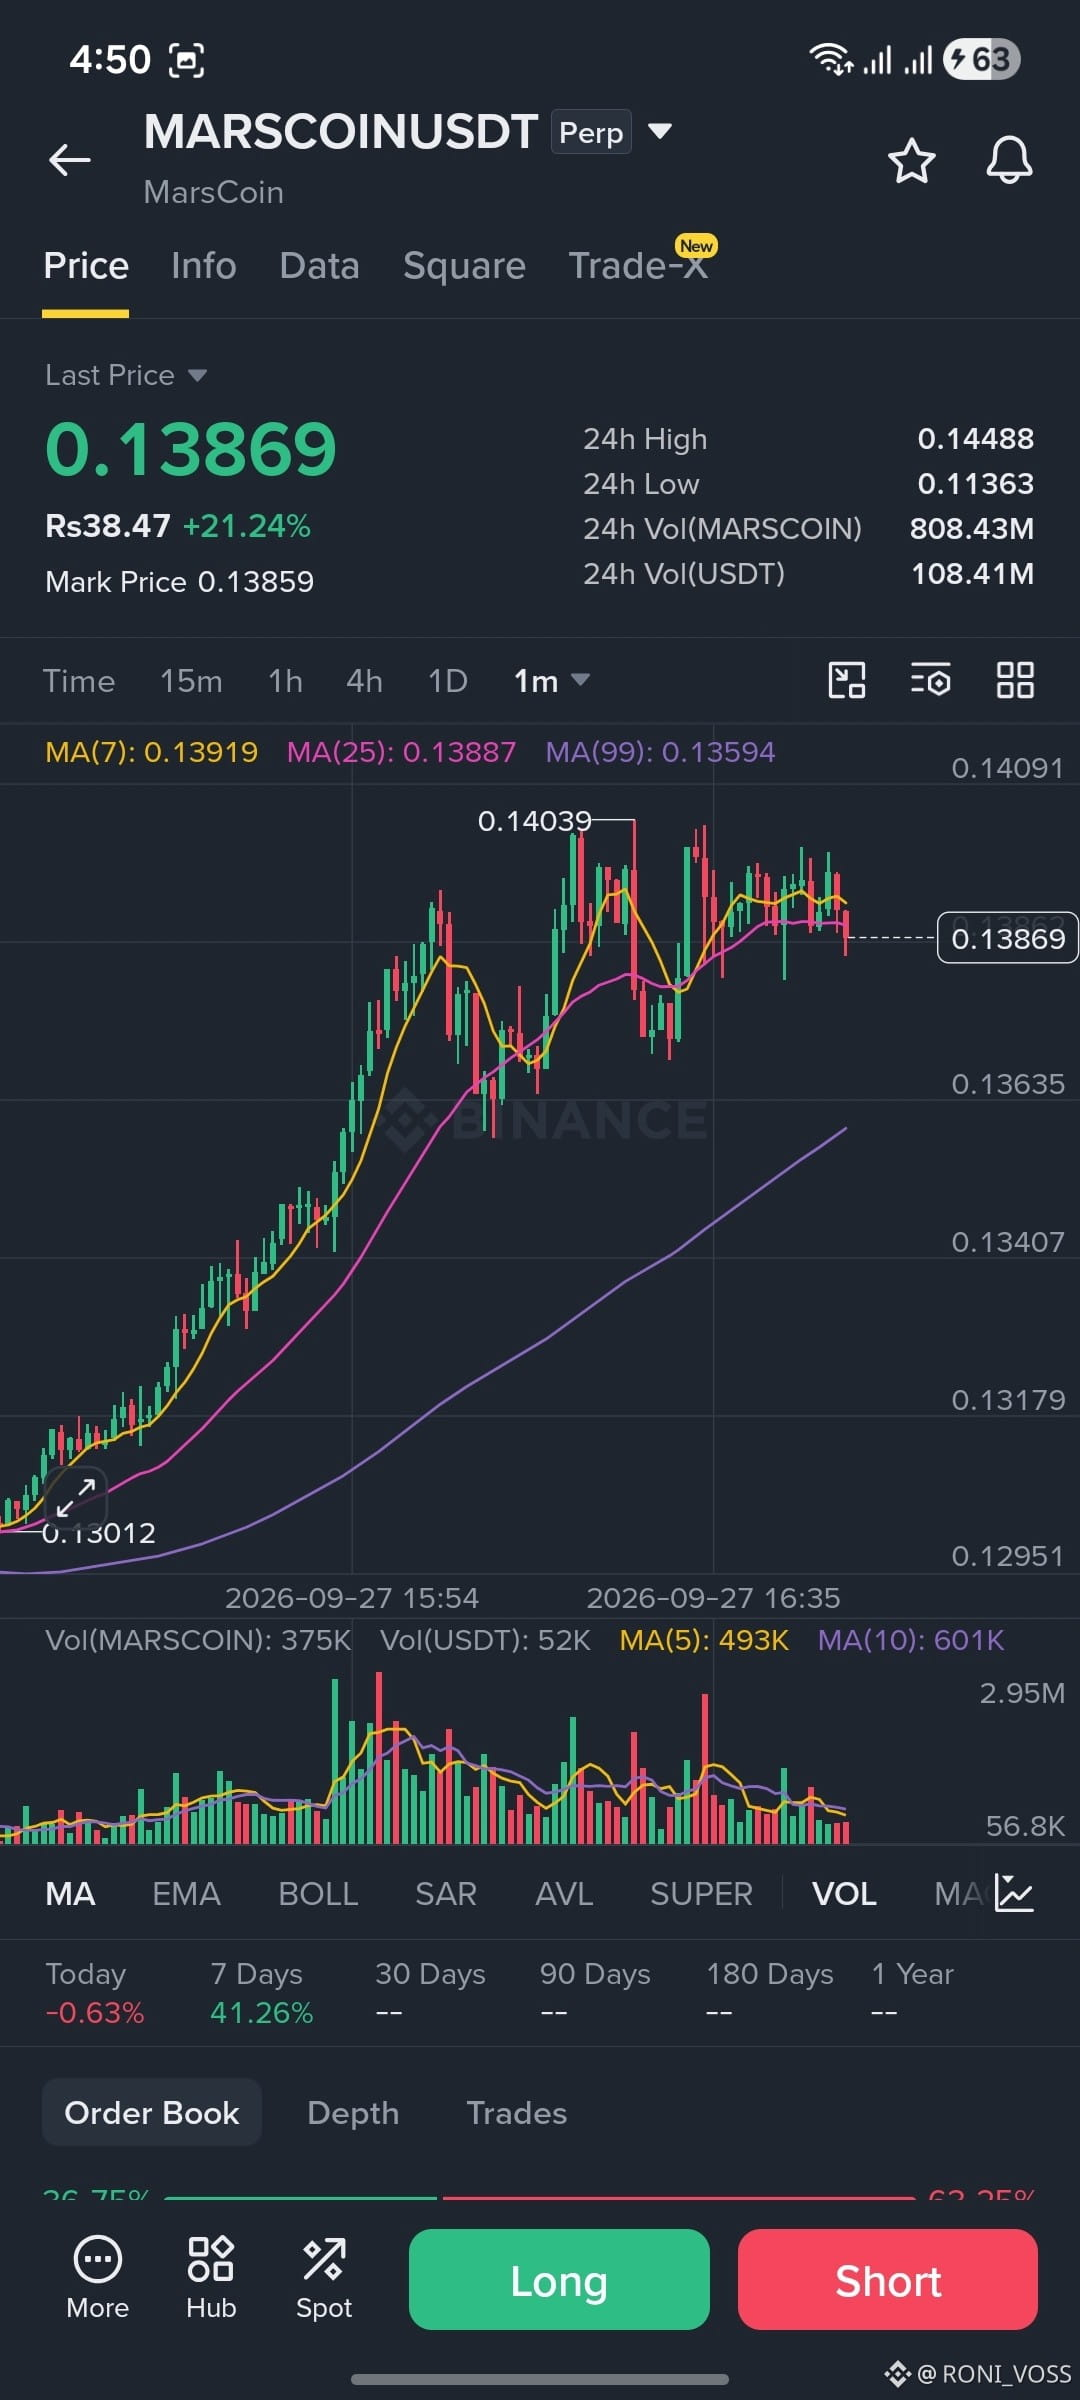
🚨🔥 LISTEN GUYS — $MARSCOIN BULLISH RECLAIM IN FOCUS! 📈🚀
$MARSCOIN is showing renewed strength after reclaiming the key level, putting another potential upside move on the radar. 👀
📍 Key Zone: $0.1354 – $0.1362
🎯 Upside Levels:
• $0.1400
• $0.1440
• $0.1466
⚠️ Key Downside Level: $0.1279
📊 Setup Logic:
• Reclaiming the key level keeps the bullish structure in focus.
• Holding $0.1354–$0.1362 could support further continuation.
• A sustained move above $0.1400 could bring $0.1440 and $0.1466 into focus.
• A break below $0.1279 would weaken the current setup.
The big question: can $MARSCOIN hold the reclaimed zone and continue toward $0.1466? 👀🔥📈
#StrategyStriveAdd2305BitcoinThisWeek #TrumpRejectsIranHormuzReopening #CircleTetherFreezeBitgetHackerWallet #SECSaysTokenBuybacksNotAutoSecurities #CoinMarketCapCompletesCoinglassAcquisition
🚨🔥 LISTEN GUYS — $MARSCOIN BULLISH RECLAIM IN FOCUS! 📈🚀
$MARSCOIN is showing renewed strength after reclaiming the key level, putting another potential upside move on the radar. 👀
📍 Key Zone: $0.1354 – $0.1362
🎯 Upside Levels:
• $0.1400
• $0.1440
• $0.1466
⚠️ Key Downside Level: $0.1279
📊 Setup Logic:
• Reclaiming the key level keeps the bullish structure in focus.
• Holding $0.1354–$0.1362 could support further continuation.
• A sustained move above $0.1400 could bring $0.1440 and $0.1466 into focus.
• A break below $0.1279 would weaken the current setup.
The big question: can $MARSCOIN hold the reclaimed zone and continue toward $0.1466? 👀🔥📈
#StrategyStriveAdd2305BitcoinThisWeek #TrumpRejectsIranHormuzReopening #CircleTetherFreezeBitgetHackerWallet #SECSaysTokenBuybacksNotAutoSecurities #CoinMarketCapCompletesCoinglassAcquisition
$MARSCOIN is showing renewed strength after reclaiming the key level, putting another potential upside move on the radar. 👀
📍 Key Zone: $0.1354 – $0.1362
🎯 Upside Levels:
• $0.1400
• $0.1440
• $0.1466
⚠️ Key Downside Level: $0.1279
📊 Setup Logic:
• Reclaiming the key level keeps the bullish structure in focus.
• Holding $0.1354–$0.1362 could support further continuation.
• A sustained move above $0.1400 could bring $0.1440 and $0.1466 into focus.
• A break below $0.1279 would weaken the current setup.
The big question: can $MARSCOIN hold the reclaimed zone and continue toward $0.1466? 👀🔥📈
#StrategyStriveAdd2305BitcoinThisWeek #TrumpRejectsIranHormuzReopening #CircleTetherFreezeBitgetHackerWallet #SECSaysTokenBuybacksNotAutoSecurities #CoinMarketCapCompletesCoinglassAcquisition
66
·
--
Bullish
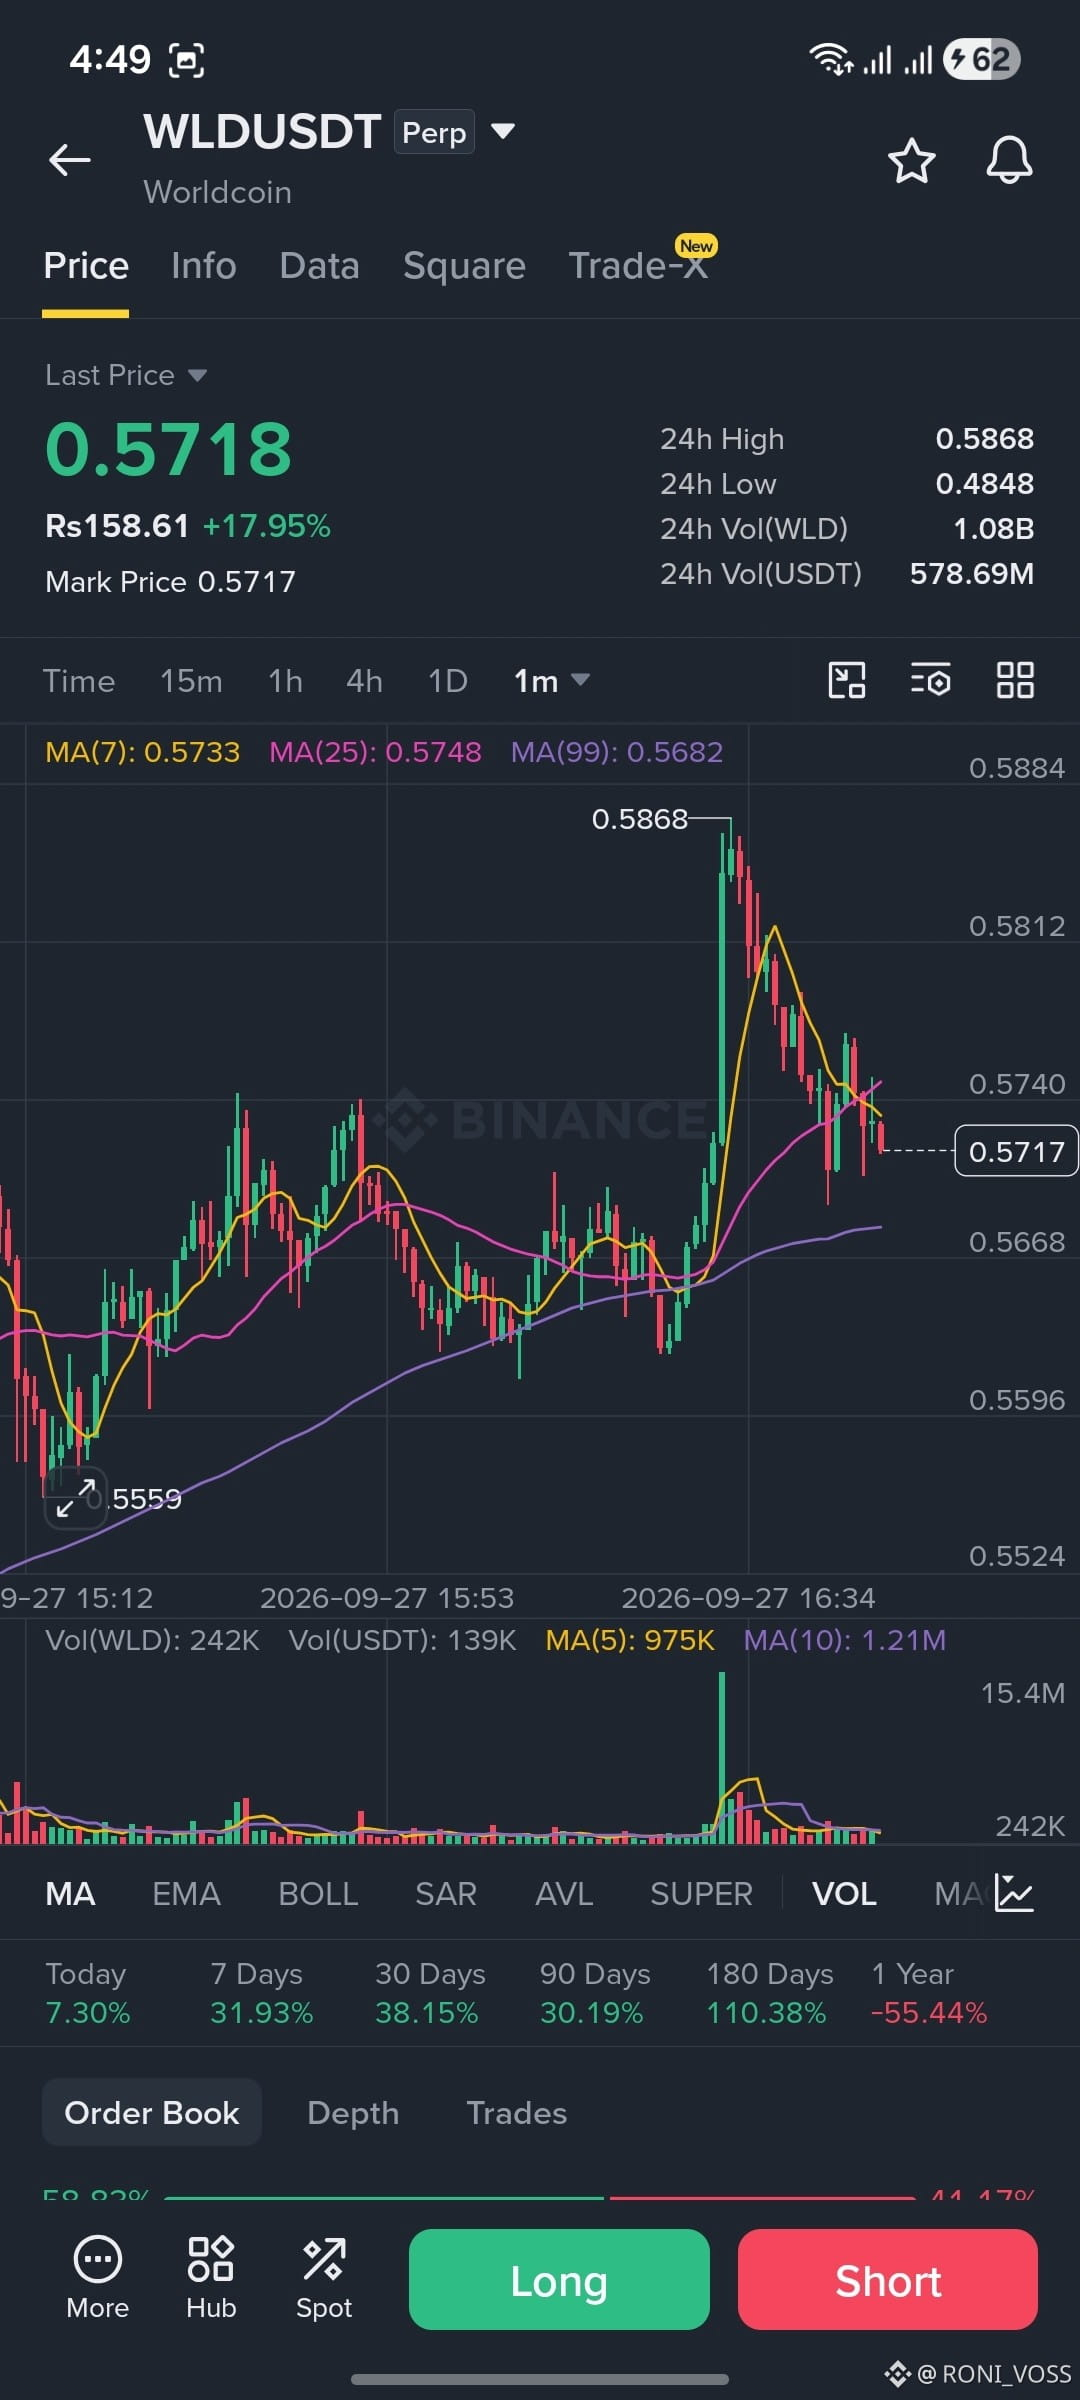
🚨🔥 $WLD — BULLISH STRUCTURE IN FOCUS! 📈
$WLD is maintaining a strong bullish structure and pushing toward the $0.57 resistance area. A controlled pullback could provide an important zone to watch for another potential continuation. 👀
📍 Key Pullback Zone: $0.552 – $0.560
🎯 Upside Levels:
• $0.575
• $0.590
• $0.610
⚠️ Key Downside Level: $0.538
📊 Setup Logic:
• $0.57 remains an important resistance area.
• A controlled pullback toward $0.552–$0.560 could keep the bullish structure in focus.
• A sustained move above $0.575 could bring $0.590 and $0.610 into focus.
• A break below $0.538 would weaken the current setup.
The big question: can $WLD hold the pullback zone and build momentum toward $0.610? 👀🔥📈
#StrategyStriveAdd2305BitcoinThisWeek #TrumpRejectsIranHormuzReopening #CircleTetherFreezeBitgetHackerWallet #SECSaysTokenBuybacksNotAutoSecurities #CoinMarketCapCompletesCoinglassAcquisition
🚨🔥 $WLD — BULLISH STRUCTURE IN FOCUS! 📈
$WLD is maintaining a strong bullish structure and pushing toward the $0.57 resistance area. A controlled pullback could provide an important zone to watch for another potential continuation. 👀
📍 Key Pullback Zone: $0.552 – $0.560
🎯 Upside Levels:
• $0.575
• $0.590
• $0.610
⚠️ Key Downside Level: $0.538
📊 Setup Logic:
• $0.57 remains an important resistance area.
• A controlled pullback toward $0.552–$0.560 could keep the bullish structure in focus.
• A sustained move above $0.575 could bring $0.590 and $0.610 into focus.
• A break below $0.538 would weaken the current setup.
The big question: can $WLD hold the pullback zone and build momentum toward $0.610? 👀🔥📈
#StrategyStriveAdd2305BitcoinThisWeek #TrumpRejectsIranHormuzReopening #CircleTetherFreezeBitgetHackerWallet #SECSaysTokenBuybacksNotAutoSecurities #CoinMarketCapCompletesCoinglassAcquisition
$WLD is maintaining a strong bullish structure and pushing toward the $0.57 resistance area. A controlled pullback could provide an important zone to watch for another potential continuation. 👀
📍 Key Pullback Zone: $0.552 – $0.560
🎯 Upside Levels:
• $0.575
• $0.590
• $0.610
⚠️ Key Downside Level: $0.538
📊 Setup Logic:
• $0.57 remains an important resistance area.
• A controlled pullback toward $0.552–$0.560 could keep the bullish structure in focus.
• A sustained move above $0.575 could bring $0.590 and $0.610 into focus.
• A break below $0.538 would weaken the current setup.
The big question: can $WLD hold the pullback zone and build momentum toward $0.610? 👀🔥📈
#StrategyStriveAdd2305BitcoinThisWeek #TrumpRejectsIranHormuzReopening #CircleTetherFreezeBitgetHackerWallet #SECSaysTokenBuybacksNotAutoSecurities #CoinMarketCapCompletesCoinglassAcquisition
74
·
--
Bullish
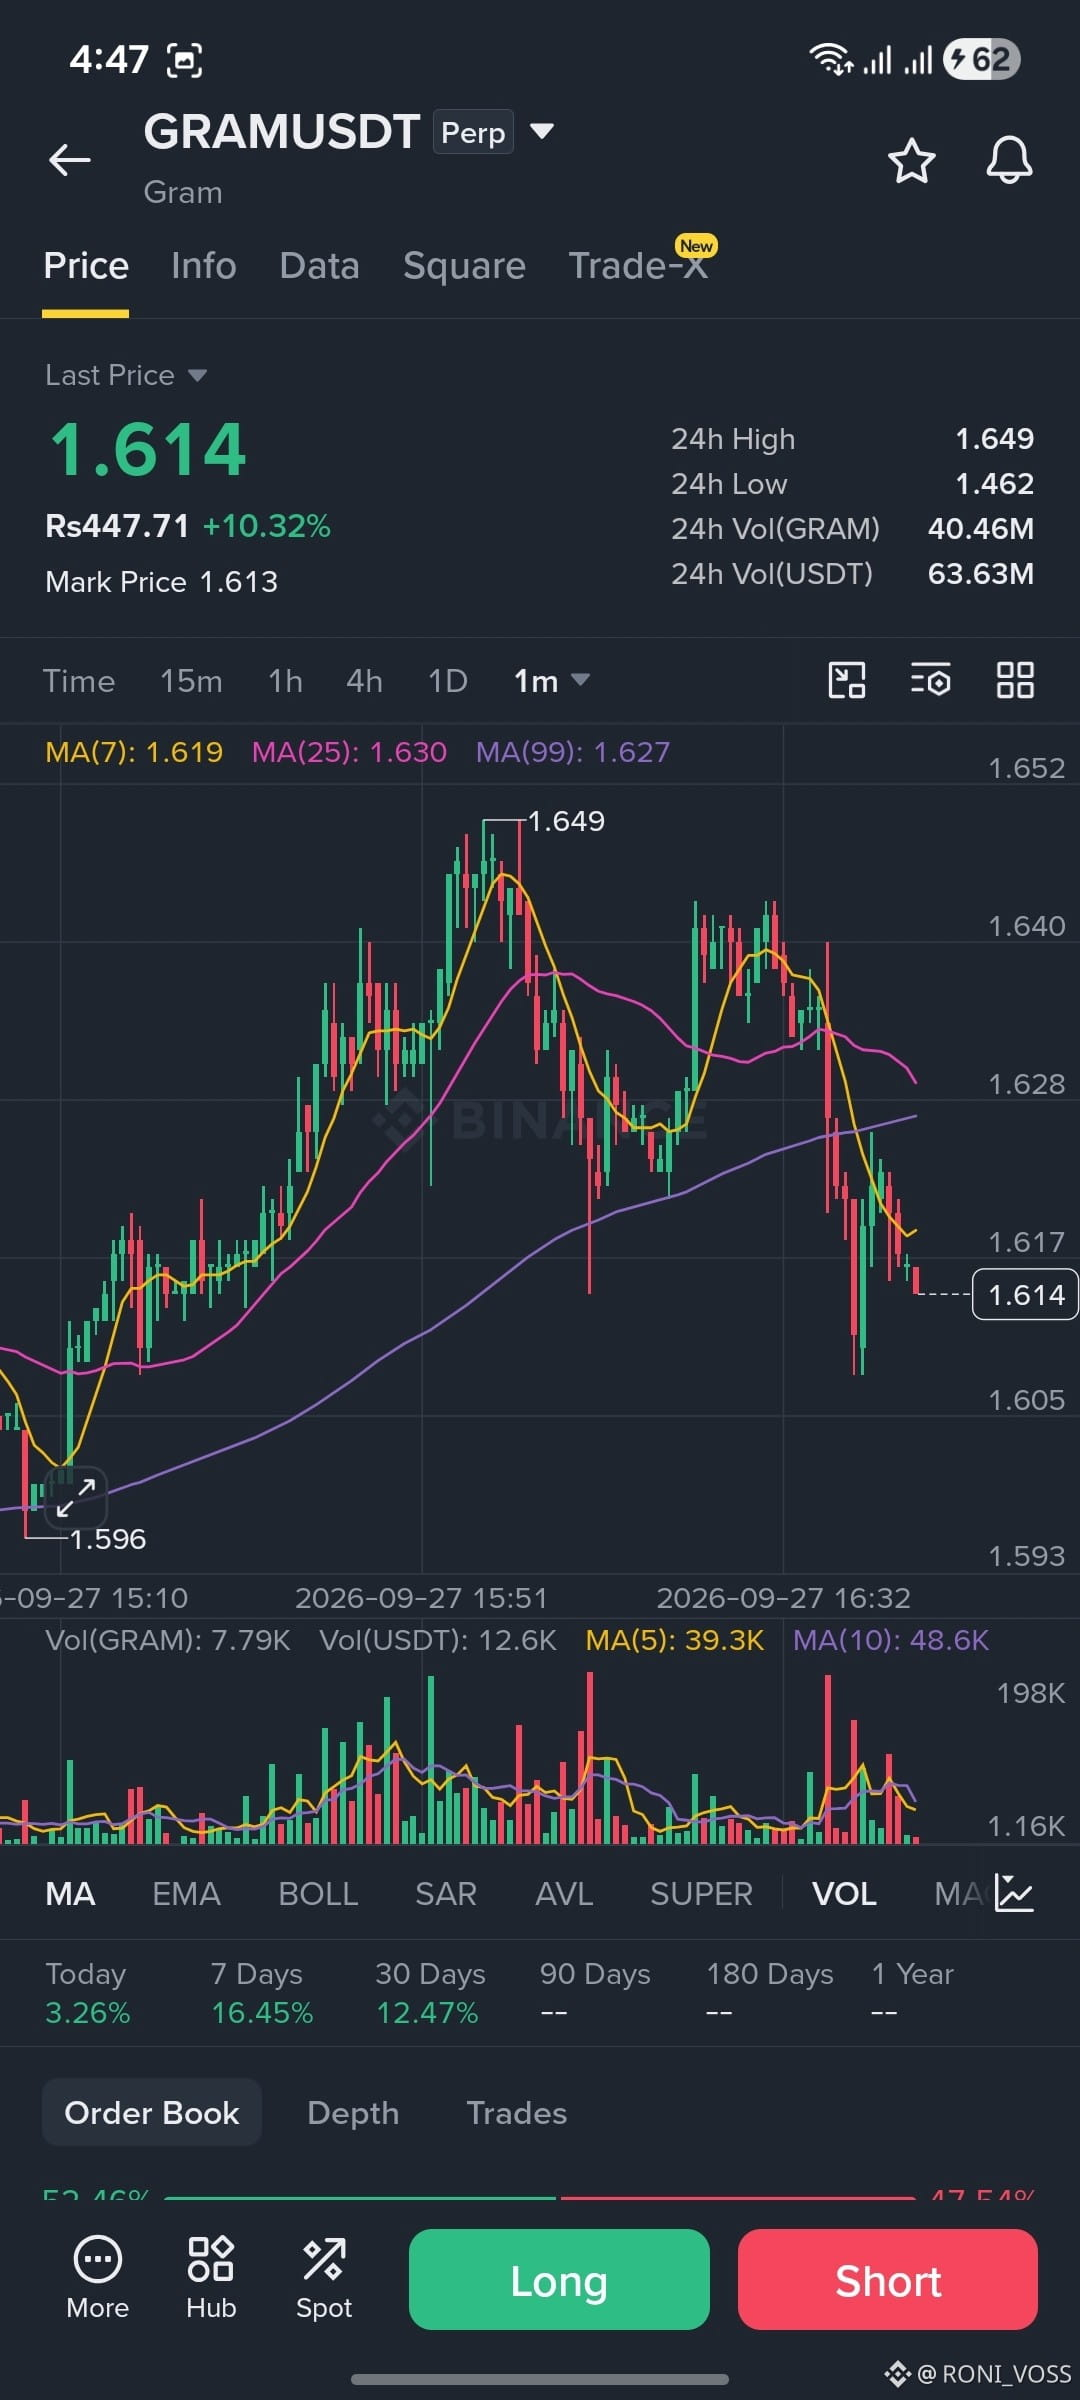
🚨🔥 LISTEN GUYS — $GRAM IS PUSHING HIGHER AGAIN! 📈🚀
$GRAM is showing renewed bullish momentum, with buyers attempting to continue the move higher. 👀
📍 Key Zone: $1.619 – $1.628
🎯 Upside Levels:
• $1.650
• $1.675
• $1.700
⚠️ Key Downside Level: $1.570
📊 Setup Logic:
• $1.619–$1.628 is the key area to watch.
• Holding this zone could keep the bullish structure active.
• A sustained move above $1.650 could bring $1.675 and $1.700 into focus.
• A break below $1.570 would weaken the current setup.
The big question: can $GRAM maintain this momentum and continue toward $1.700? 👀🔥📈
#StrategyStriveAdd2305BitcoinThisWeek #TrumpRejectsIranHormuzReopening #CircleTetherFreezeBitgetHackerWallet #SECSaysTokenBuybacksNotAutoSecurities #CoinMarketCapCompletesCoinglassAcquisition
🚨🔥 LISTEN GUYS — $GRAM IS PUSHING HIGHER AGAIN! 📈🚀
$GRAM is showing renewed bullish momentum, with buyers attempting to continue the move higher. 👀
📍 Key Zone: $1.619 – $1.628
🎯 Upside Levels:
• $1.650
• $1.675
• $1.700
⚠️ Key Downside Level: $1.570
📊 Setup Logic:
• $1.619–$1.628 is the key area to watch.
• Holding this zone could keep the bullish structure active.
• A sustained move above $1.650 could bring $1.675 and $1.700 into focus.
• A break below $1.570 would weaken the current setup.
The big question: can $GRAM maintain this momentum and continue toward $1.700? 👀🔥📈
#StrategyStriveAdd2305BitcoinThisWeek #TrumpRejectsIranHormuzReopening #CircleTetherFreezeBitgetHackerWallet #SECSaysTokenBuybacksNotAutoSecurities #CoinMarketCapCompletesCoinglassAcquisition
$GRAM is showing renewed bullish momentum, with buyers attempting to continue the move higher. 👀
📍 Key Zone: $1.619 – $1.628
🎯 Upside Levels:
• $1.650
• $1.675
• $1.700
⚠️ Key Downside Level: $1.570
📊 Setup Logic:
• $1.619–$1.628 is the key area to watch.
• Holding this zone could keep the bullish structure active.
• A sustained move above $1.650 could bring $1.675 and $1.700 into focus.
• A break below $1.570 would weaken the current setup.
The big question: can $GRAM maintain this momentum and continue toward $1.700? 👀🔥📈
#StrategyStriveAdd2305BitcoinThisWeek #TrumpRejectsIranHormuzReopening #CircleTetherFreezeBitgetHackerWallet #SECSaysTokenBuybacksNotAutoSecurities #CoinMarketCapCompletesCoinglassAcquisition
34
·
--
Bullish
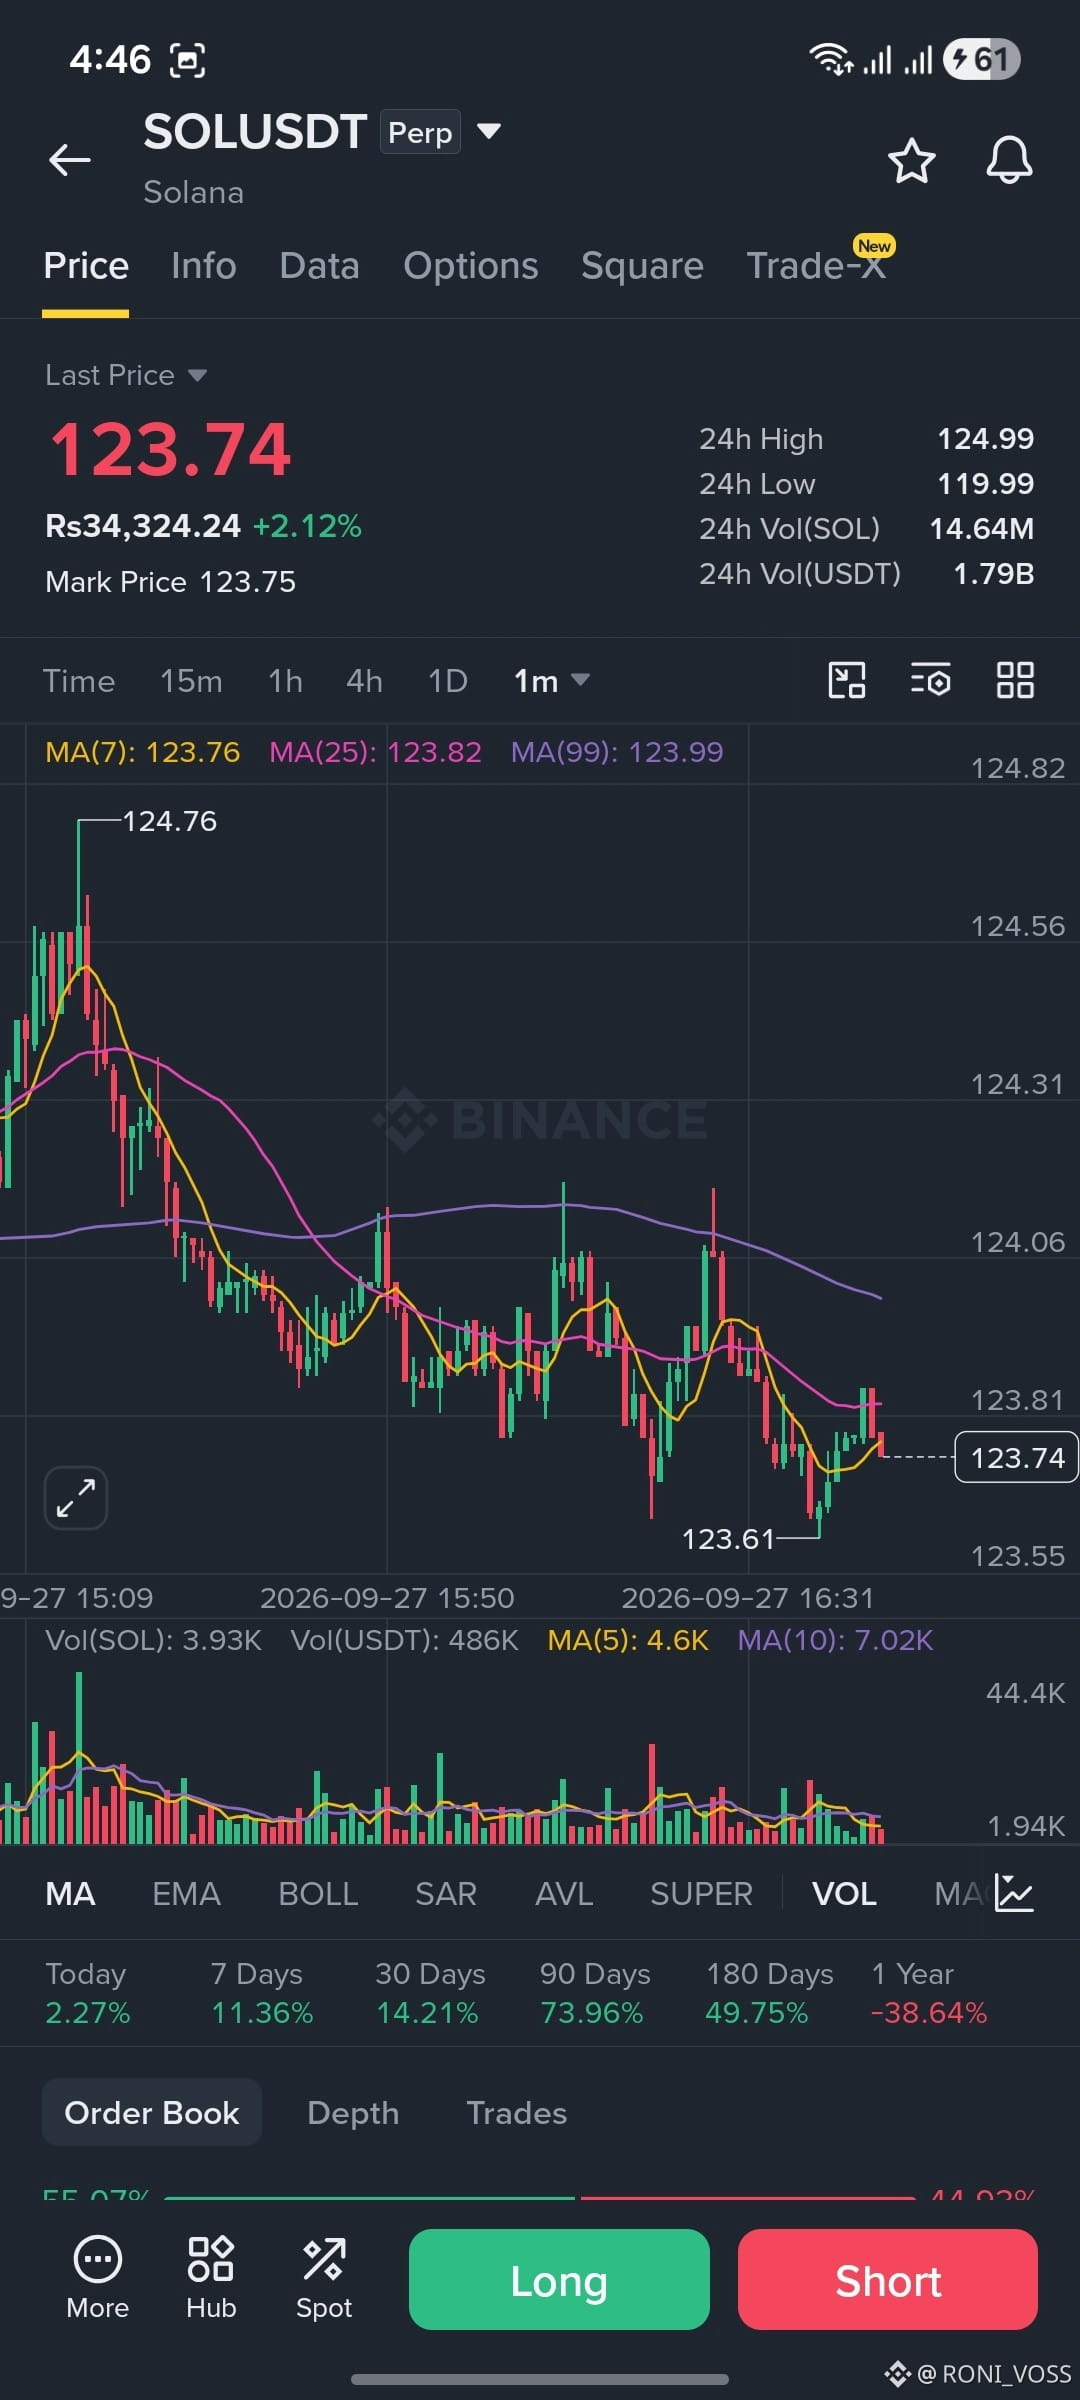
🚨🔥 COME ON GUYS — $SOL BULLISH SETUP IN FOCUS! 🚀📈
$SOL is approaching an important zone, with the current structure worth watching for a potential continuation higher. 👀
📍 Key Zone: $120.00 – $122.50
🎯 Upside Levels:
• $125.00
• $129.00
• $134.00
• $140.00
⚠️ Key Downside Level: $110.50
📊 Setup Logic:
• $120.00–$122.50 is the key area to watch.
• Holding this zone could keep the bullish structure active.
• A sustained move above $125.00 could bring $129.00 and higher levels into focus.
• A break below $110.50 would weaken the current setup.
The big question: can $SOL defend this zone and build momentum toward $134 and $140? 👀🔥🚀
#StrategyStriveAdd2305BitcoinThisWeek #TrumpRejectsIranHormuzReopening #CircleTetherFreezeBitgetHackerWallet #SECSaysTokenBuybacksNotAutoSecurities #CoinMarketCapCompletesCoinglassAcquisition
🚨🔥 COME ON GUYS — $SOL BULLISH SETUP IN FOCUS! 🚀📈
$SOL is approaching an important zone, with the current structure worth watching for a potential continuation higher. 👀
📍 Key Zone: $120.00 – $122.50
🎯 Upside Levels:
• $125.00
• $129.00
• $134.00
• $140.00
⚠️ Key Downside Level: $110.50
📊 Setup Logic:
• $120.00–$122.50 is the key area to watch.
• Holding this zone could keep the bullish structure active.
• A sustained move above $125.00 could bring $129.00 and higher levels into focus.
• A break below $110.50 would weaken the current setup.
The big question: can $SOL defend this zone and build momentum toward $134 and $140? 👀🔥🚀
#StrategyStriveAdd2305BitcoinThisWeek #TrumpRejectsIranHormuzReopening #CircleTetherFreezeBitgetHackerWallet #SECSaysTokenBuybacksNotAutoSecurities #CoinMarketCapCompletesCoinglassAcquisition
$SOL is approaching an important zone, with the current structure worth watching for a potential continuation higher. 👀
📍 Key Zone: $120.00 – $122.50
🎯 Upside Levels:
• $125.00
• $129.00
• $134.00
• $140.00
⚠️ Key Downside Level: $110.50
📊 Setup Logic:
• $120.00–$122.50 is the key area to watch.
• Holding this zone could keep the bullish structure active.
• A sustained move above $125.00 could bring $129.00 and higher levels into focus.
• A break below $110.50 would weaken the current setup.
The big question: can $SOL defend this zone and build momentum toward $134 and $140? 👀🔥🚀
#StrategyStriveAdd2305BitcoinThisWeek #TrumpRejectsIranHormuzReopening #CircleTetherFreezeBitgetHackerWallet #SECSaysTokenBuybacksNotAutoSecurities #CoinMarketCapCompletesCoinglassAcquisition
14
·
--
Bullish
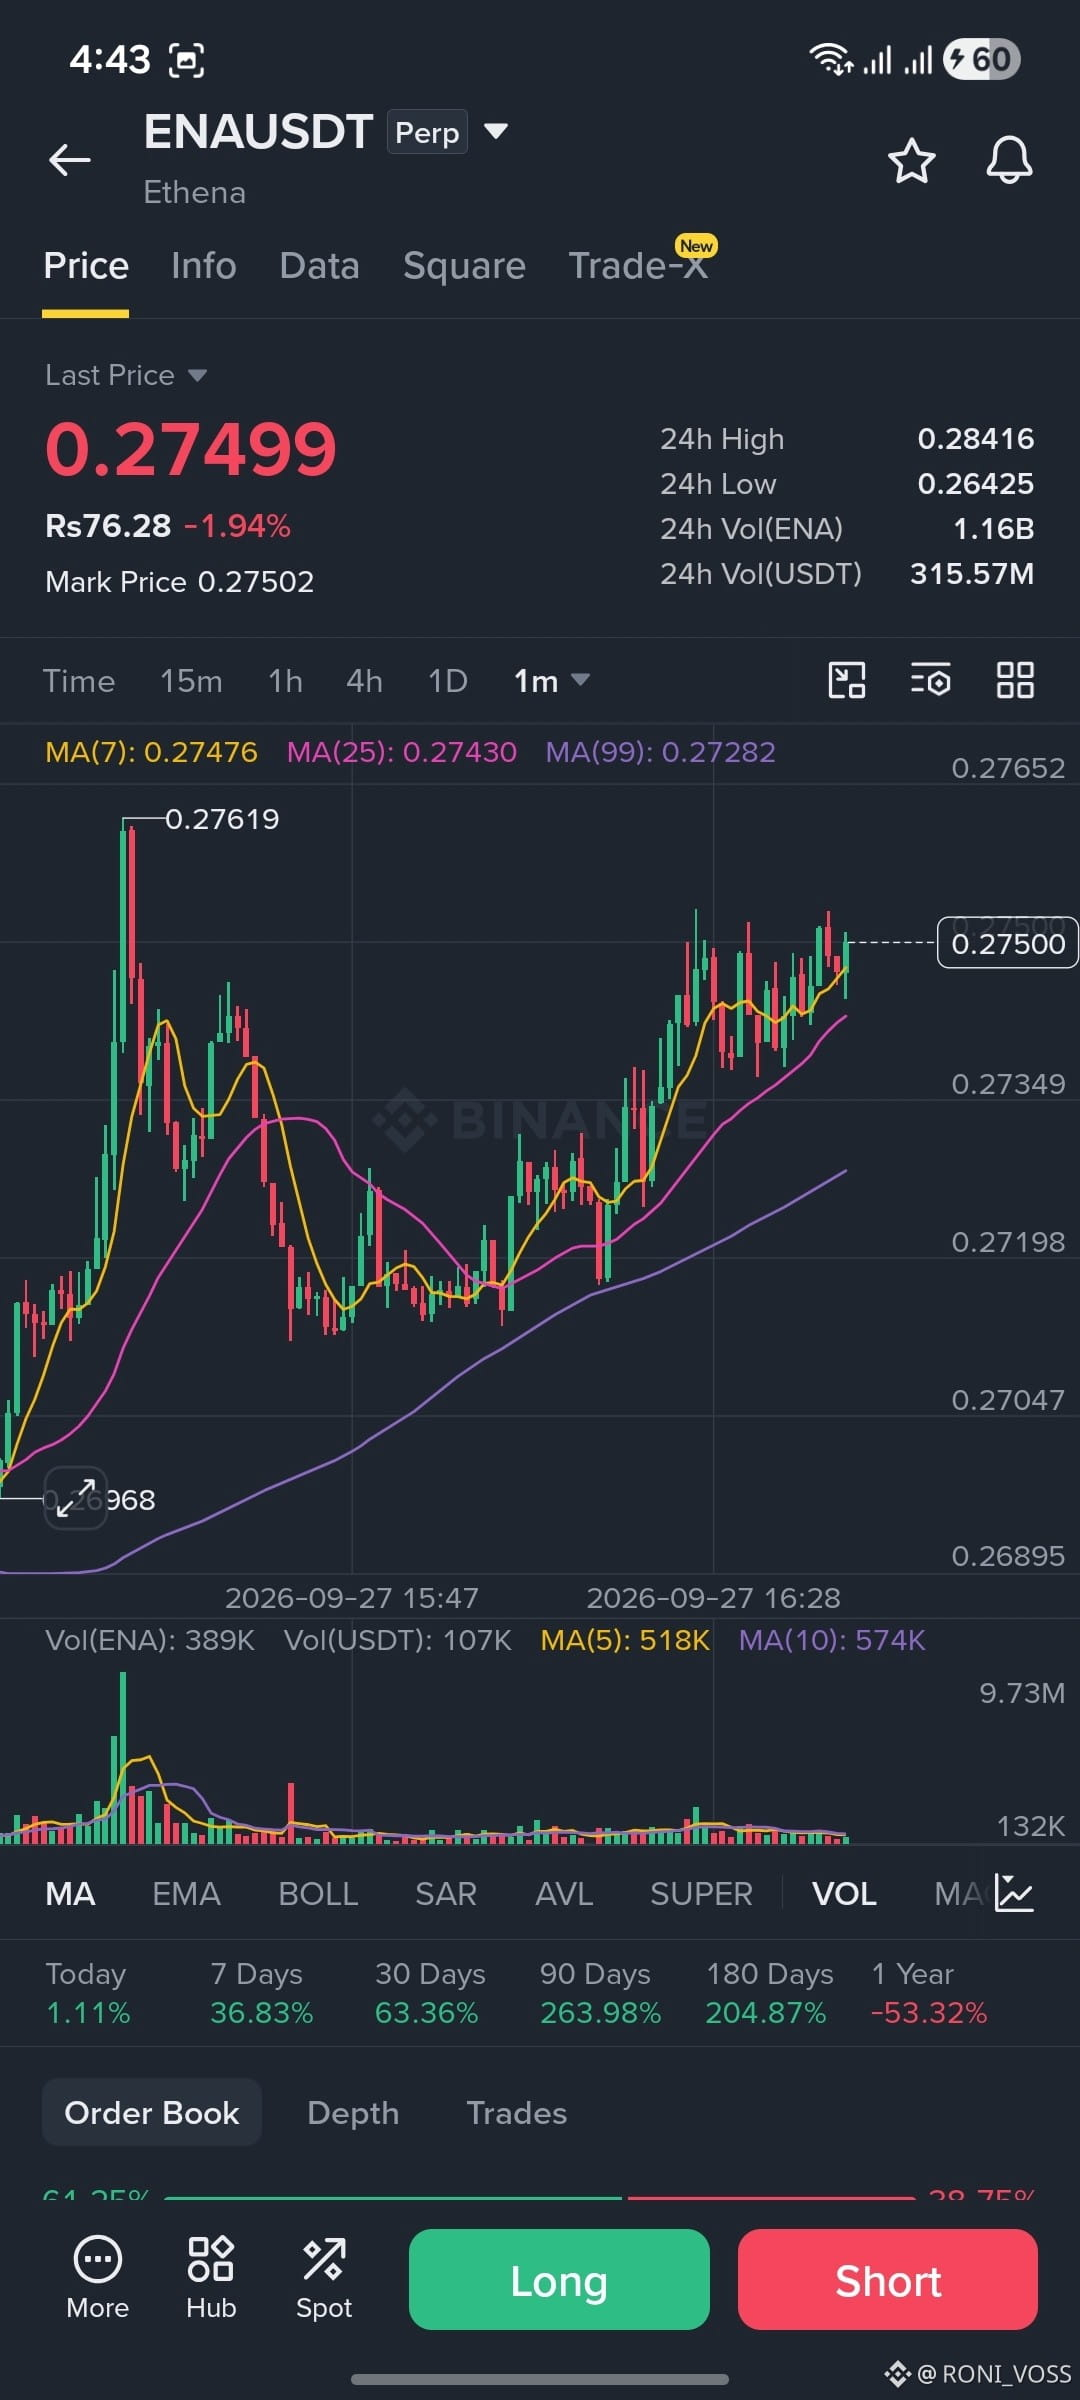
🚨🔥 DEAR FOLLOWERS — $ENA REVERSAL IN FOCUS! 📈
$ENA is holding the key support area and showing signs of recovery after the recent downside move. The previous bearish setup is now facing a shift in momentum. 👀
📍 Key Recovery Zone: $0.2706 – $0.2715
🎯 Upside Levels:
• $0.2760
• $0.2820
• $0.2903
⚠️ Key Downside Level: $0.2598
📊 Setup Logic:
• Support around the current zone is keeping the recovery scenario in focus.
• Holding $0.2706–$0.2715 could support further upside.
• A sustained move above $0.2760 could bring $0.2820 and $0.2903 into focus.
• A break below $0.2598 would weaken the current recovery structure.
The key question: can $ENA defend support and build another recovery toward $0.2903? 👀🔥📈
#StrategyStriveAdd2305BitcoinThisWeek #TrumpRejectsIranHormuzReopening #CircleTetherFreezeBitgetHackerWallet #SECSaysTokenBuybacksNotAutoSecurities #CoinMarketCapCompletesCoinglassAcquisition
🚨🔥 DEAR FOLLOWERS — $ENA REVERSAL IN FOCUS! 📈
$ENA is holding the key support area and showing signs of recovery after the recent downside move. The previous bearish setup is now facing a shift in momentum. 👀
📍 Key Recovery Zone: $0.2706 – $0.2715
🎯 Upside Levels:
• $0.2760
• $0.2820
• $0.2903
⚠️ Key Downside Level: $0.2598
📊 Setup Logic:
• Support around the current zone is keeping the recovery scenario in focus.
• Holding $0.2706–$0.2715 could support further upside.
• A sustained move above $0.2760 could bring $0.2820 and $0.2903 into focus.
• A break below $0.2598 would weaken the current recovery structure.
The key question: can $ENA defend support and build another recovery toward $0.2903? 👀🔥📈
#StrategyStriveAdd2305BitcoinThisWeek #TrumpRejectsIranHormuzReopening #CircleTetherFreezeBitgetHackerWallet #SECSaysTokenBuybacksNotAutoSecurities #CoinMarketCapCompletesCoinglassAcquisition
$ENA is holding the key support area and showing signs of recovery after the recent downside move. The previous bearish setup is now facing a shift in momentum. 👀
📍 Key Recovery Zone: $0.2706 – $0.2715
🎯 Upside Levels:
• $0.2760
• $0.2820
• $0.2903
⚠️ Key Downside Level: $0.2598
📊 Setup Logic:
• Support around the current zone is keeping the recovery scenario in focus.
• Holding $0.2706–$0.2715 could support further upside.
• A sustained move above $0.2760 could bring $0.2820 and $0.2903 into focus.
• A break below $0.2598 would weaken the current recovery structure.
The key question: can $ENA defend support and build another recovery toward $0.2903? 👀🔥📈
#StrategyStriveAdd2305BitcoinThisWeek #TrumpRejectsIranHormuzReopening #CircleTetherFreezeBitgetHackerWallet #SECSaysTokenBuybacksNotAutoSecurities #CoinMarketCapCompletesCoinglassAcquisition
39
·
--
Bullish
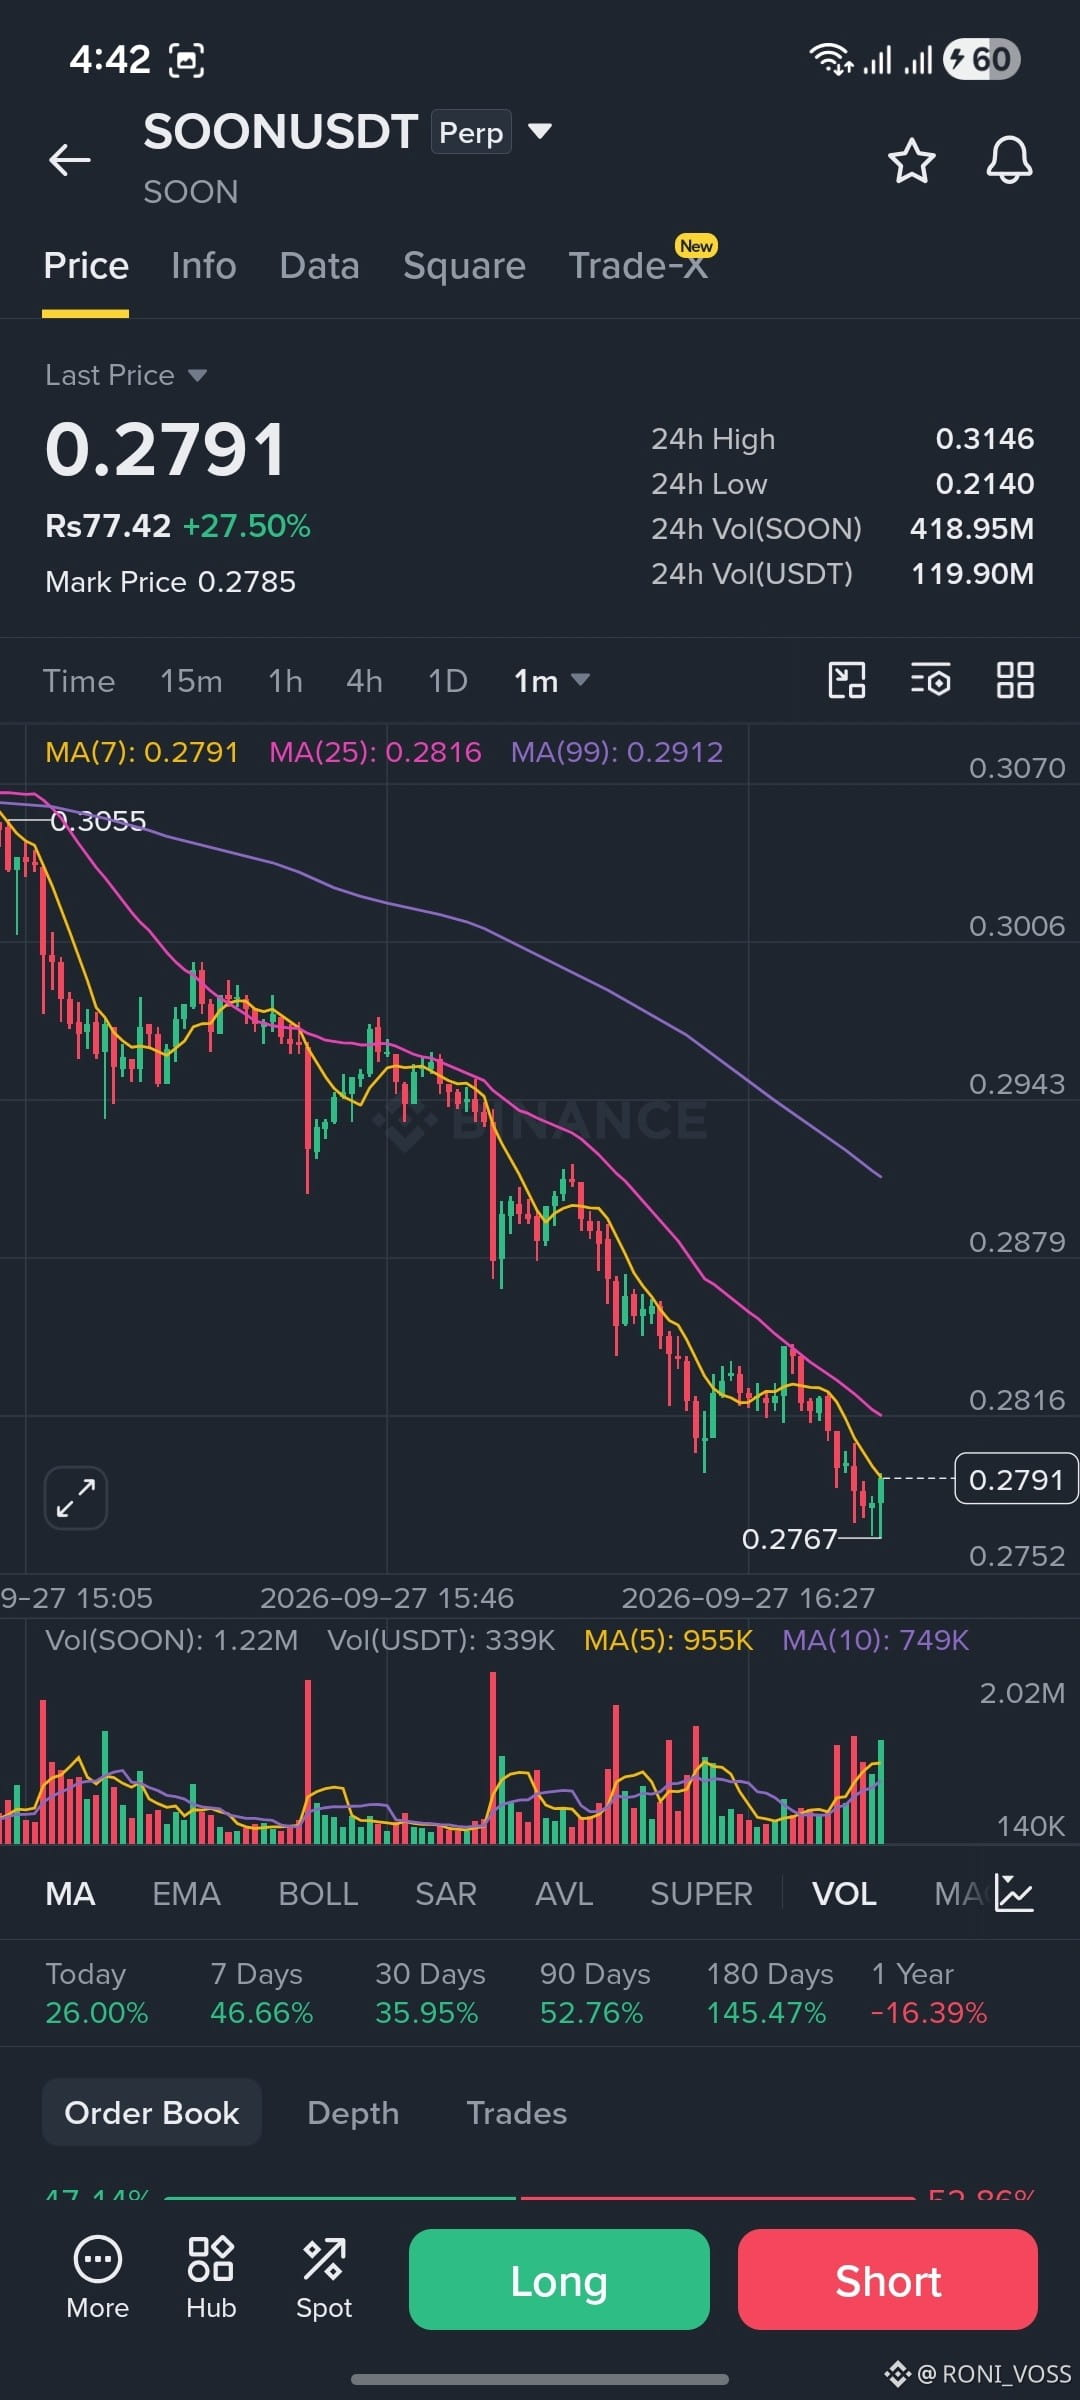
🚨📉 $SOON — BEARISH MOMENTUM IN FOCUS!
$SOON is losing strength after repeated rejection from the upper zone, with selling pressure now becoming more noticeable. 👀
📍 Key Resistance Zone: $0.2895 – $0.2935
🎯 Downside Levels:
• $0.2800
• $0.2650
• $0.2500
⚠️ Key Invalidation Level: $0.3187
📊 Setup Logic:
• Repeated rejection from the upper zone keeps the bearish structure in focus.
• A sustained move below $0.2800 could bring $0.2650 into focus.
• Continued selling pressure could extend toward $0.2500.
• A break above $0.3187 would weaken the current bearish structure.
The key question: can $SOON maintain the rejection and continue toward the lower levels? 👀📉🔥
#StrategyStriveAdd2305BitcoinThisWeek #TrumpRejectsIranHormuzReopening #CircleTetherFreezeBitgetHackerWallet #SECSaysTokenBuybacksNotAutoSecurities #CoinMarketCapCompletesCoinglassAcquisition
🚨📉 $SOON — BEARISH MOMENTUM IN FOCUS!
$SOON is losing strength after repeated rejection from the upper zone, with selling pressure now becoming more noticeable. 👀
📍 Key Resistance Zone: $0.2895 – $0.2935
🎯 Downside Levels:
• $0.2800
• $0.2650
• $0.2500
⚠️ Key Invalidation Level: $0.3187
📊 Setup Logic:
• Repeated rejection from the upper zone keeps the bearish structure in focus.
• A sustained move below $0.2800 could bring $0.2650 into focus.
• Continued selling pressure could extend toward $0.2500.
• A break above $0.3187 would weaken the current bearish structure.
The key question: can $SOON maintain the rejection and continue toward the lower levels? 👀📉🔥
#StrategyStriveAdd2305BitcoinThisWeek #TrumpRejectsIranHormuzReopening #CircleTetherFreezeBitgetHackerWallet #SECSaysTokenBuybacksNotAutoSecurities #CoinMarketCapCompletesCoinglassAcquisition
$SOON is losing strength after repeated rejection from the upper zone, with selling pressure now becoming more noticeable. 👀
📍 Key Resistance Zone: $0.2895 – $0.2935
🎯 Downside Levels:
• $0.2800
• $0.2650
• $0.2500
⚠️ Key Invalidation Level: $0.3187
📊 Setup Logic:
• Repeated rejection from the upper zone keeps the bearish structure in focus.
• A sustained move below $0.2800 could bring $0.2650 into focus.
• Continued selling pressure could extend toward $0.2500.
• A break above $0.3187 would weaken the current bearish structure.
The key question: can $SOON maintain the rejection and continue toward the lower levels? 👀📉🔥
#StrategyStriveAdd2305BitcoinThisWeek #TrumpRejectsIranHormuzReopening #CircleTetherFreezeBitgetHackerWallet #SECSaysTokenBuybacksNotAutoSecurities #CoinMarketCapCompletesCoinglassAcquisition
38
·
--
Bullish
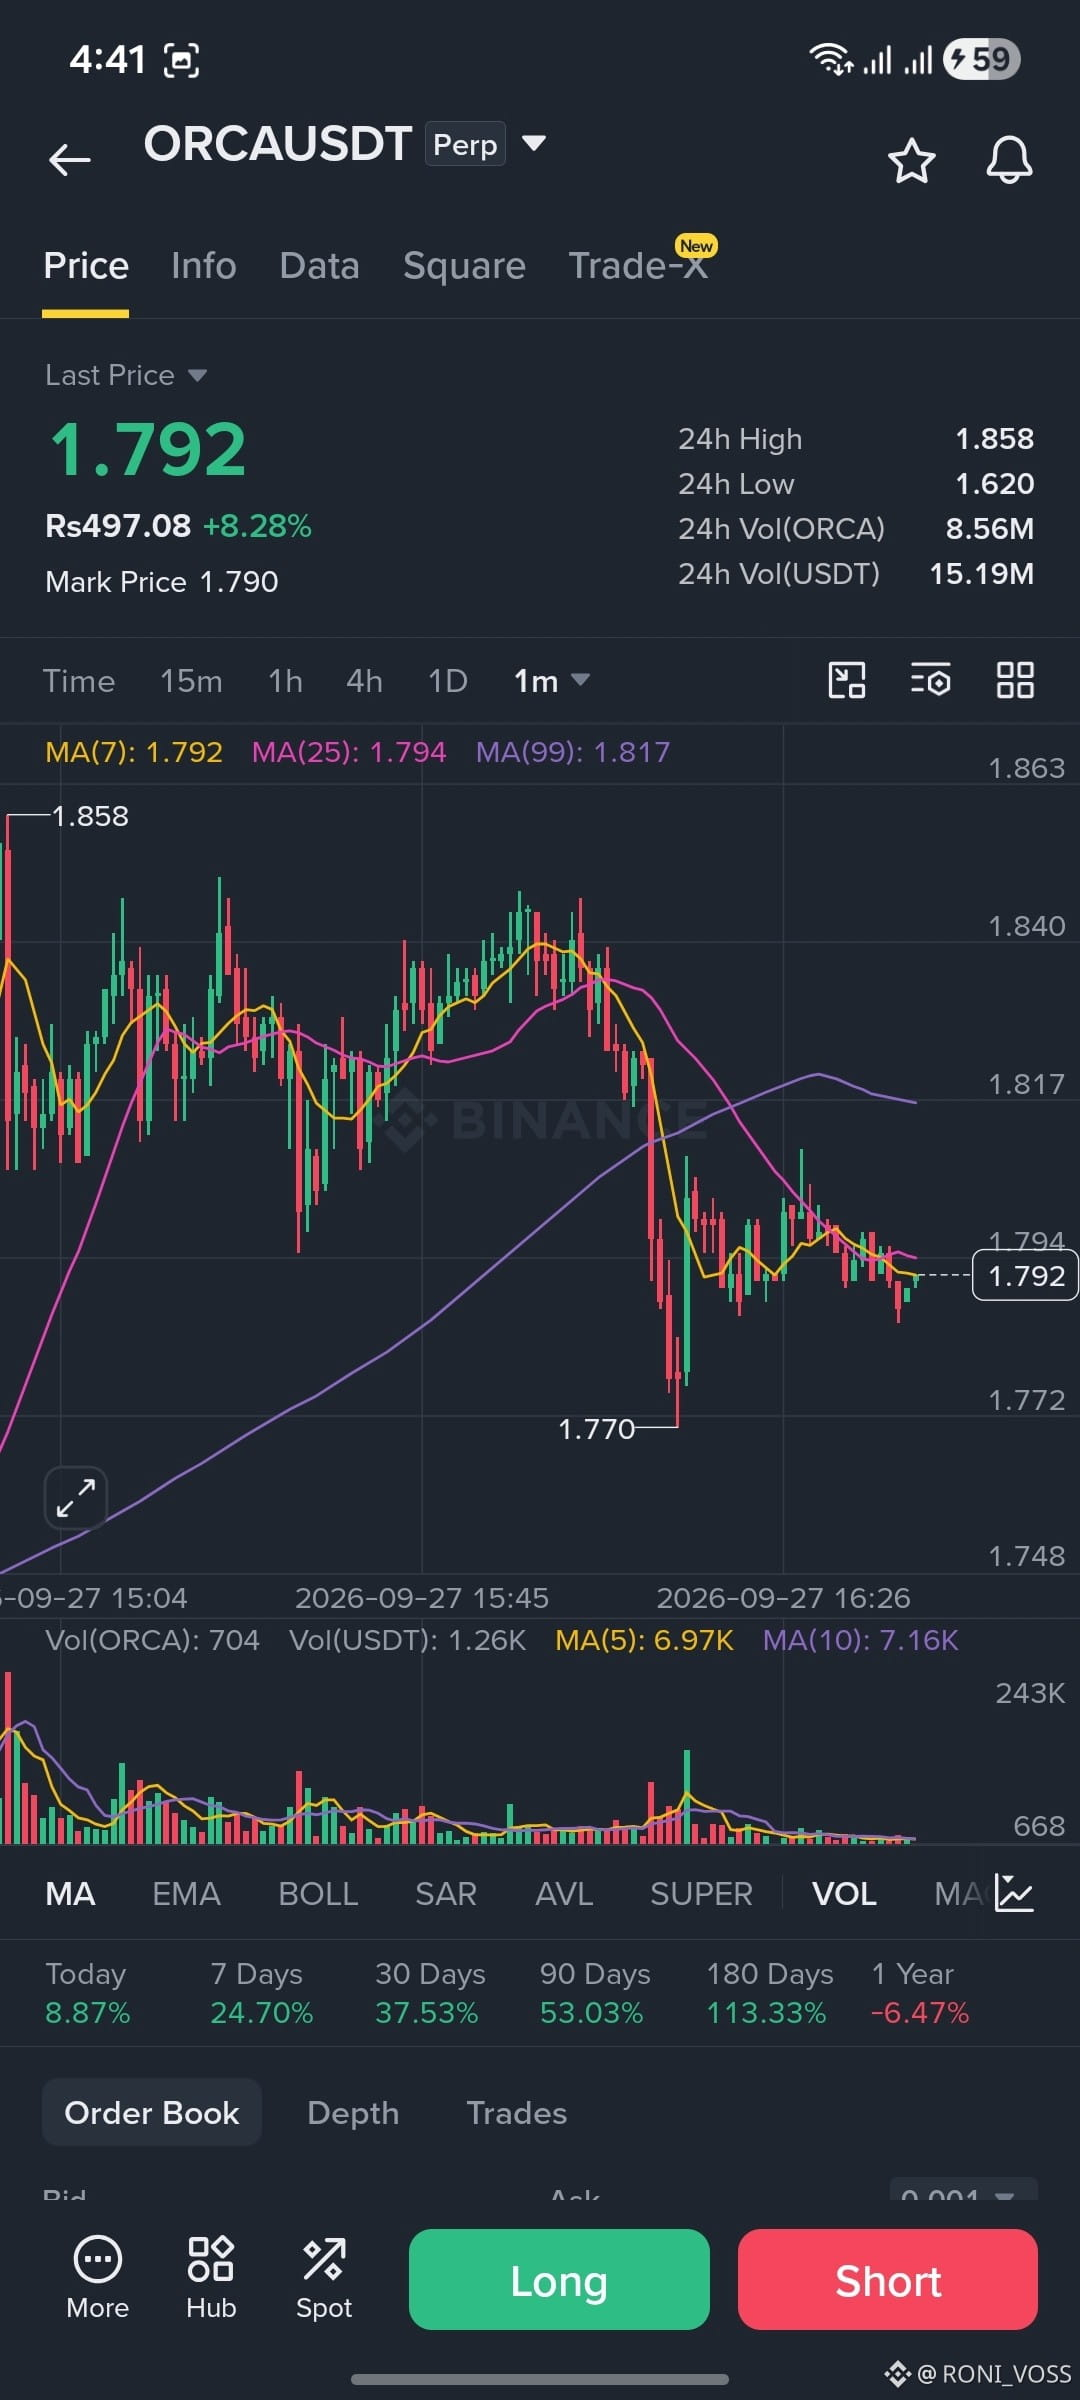
🚨📉 ATTENTION TRADERS — $ORCA REJECTION IN FOCUS!
$ORCA is showing a sharp rejection from the $1.84–$1.85 area, with sellers appearing strongly around the upper zone. 👀
📍 Key Resistance Zone: $1.78 – $1.80
🎯 Downside Levels:
• $1.74
• $1.69
• $1.64
⚠️ Key Invalidation Level: $1.86
📊 Setup Logic:
• Rejection around $1.84–$1.85 keeps the bearish structure in focus.
• A sustained move below $1.78 could bring $1.74 into focus.
• Continued selling pressure could extend toward $1.69 and $1.64.
• A break above $1.86 would weaken the current bearish setup.
The key question: can $ORCA maintain the rejection, or will buyers reclaim the upper zone? 👀📉🔥
#StrategyStriveAdd2305BitcoinThisWeek #TrumpRejectsIranHormuzReopening #CircleTetherFreezeBitgetHackerWallet #SECSaysTokenBuybacksNotAutoSecurities #CoinMarketCapCompletesCoinglassAcquisition
🚨📉 ATTENTION TRADERS — $ORCA REJECTION IN FOCUS!
$ORCA is showing a sharp rejection from the $1.84–$1.85 area, with sellers appearing strongly around the upper zone. 👀
📍 Key Resistance Zone: $1.78 – $1.80
🎯 Downside Levels:
• $1.74
• $1.69
• $1.64
⚠️ Key Invalidation Level: $1.86
📊 Setup Logic:
• Rejection around $1.84–$1.85 keeps the bearish structure in focus.
• A sustained move below $1.78 could bring $1.74 into focus.
• Continued selling pressure could extend toward $1.69 and $1.64.
• A break above $1.86 would weaken the current bearish setup.
The key question: can $ORCA maintain the rejection, or will buyers reclaim the upper zone? 👀📉🔥
#StrategyStriveAdd2305BitcoinThisWeek #TrumpRejectsIranHormuzReopening #CircleTetherFreezeBitgetHackerWallet #SECSaysTokenBuybacksNotAutoSecurities #CoinMarketCapCompletesCoinglassAcquisition
$ORCA is showing a sharp rejection from the $1.84–$1.85 area, with sellers appearing strongly around the upper zone. 👀
📍 Key Resistance Zone: $1.78 – $1.80
🎯 Downside Levels:
• $1.74
• $1.69
• $1.64
⚠️ Key Invalidation Level: $1.86
📊 Setup Logic:
• Rejection around $1.84–$1.85 keeps the bearish structure in focus.
• A sustained move below $1.78 could bring $1.74 into focus.
• Continued selling pressure could extend toward $1.69 and $1.64.
• A break above $1.86 would weaken the current bearish setup.
The key question: can $ORCA maintain the rejection, or will buyers reclaim the upper zone? 👀📉🔥
#StrategyStriveAdd2305BitcoinThisWeek #TrumpRejectsIranHormuzReopening #CircleTetherFreezeBitgetHackerWallet #SECSaysTokenBuybacksNotAutoSecurities #CoinMarketCapCompletesCoinglassAcquisition
20
·
--
Bullish
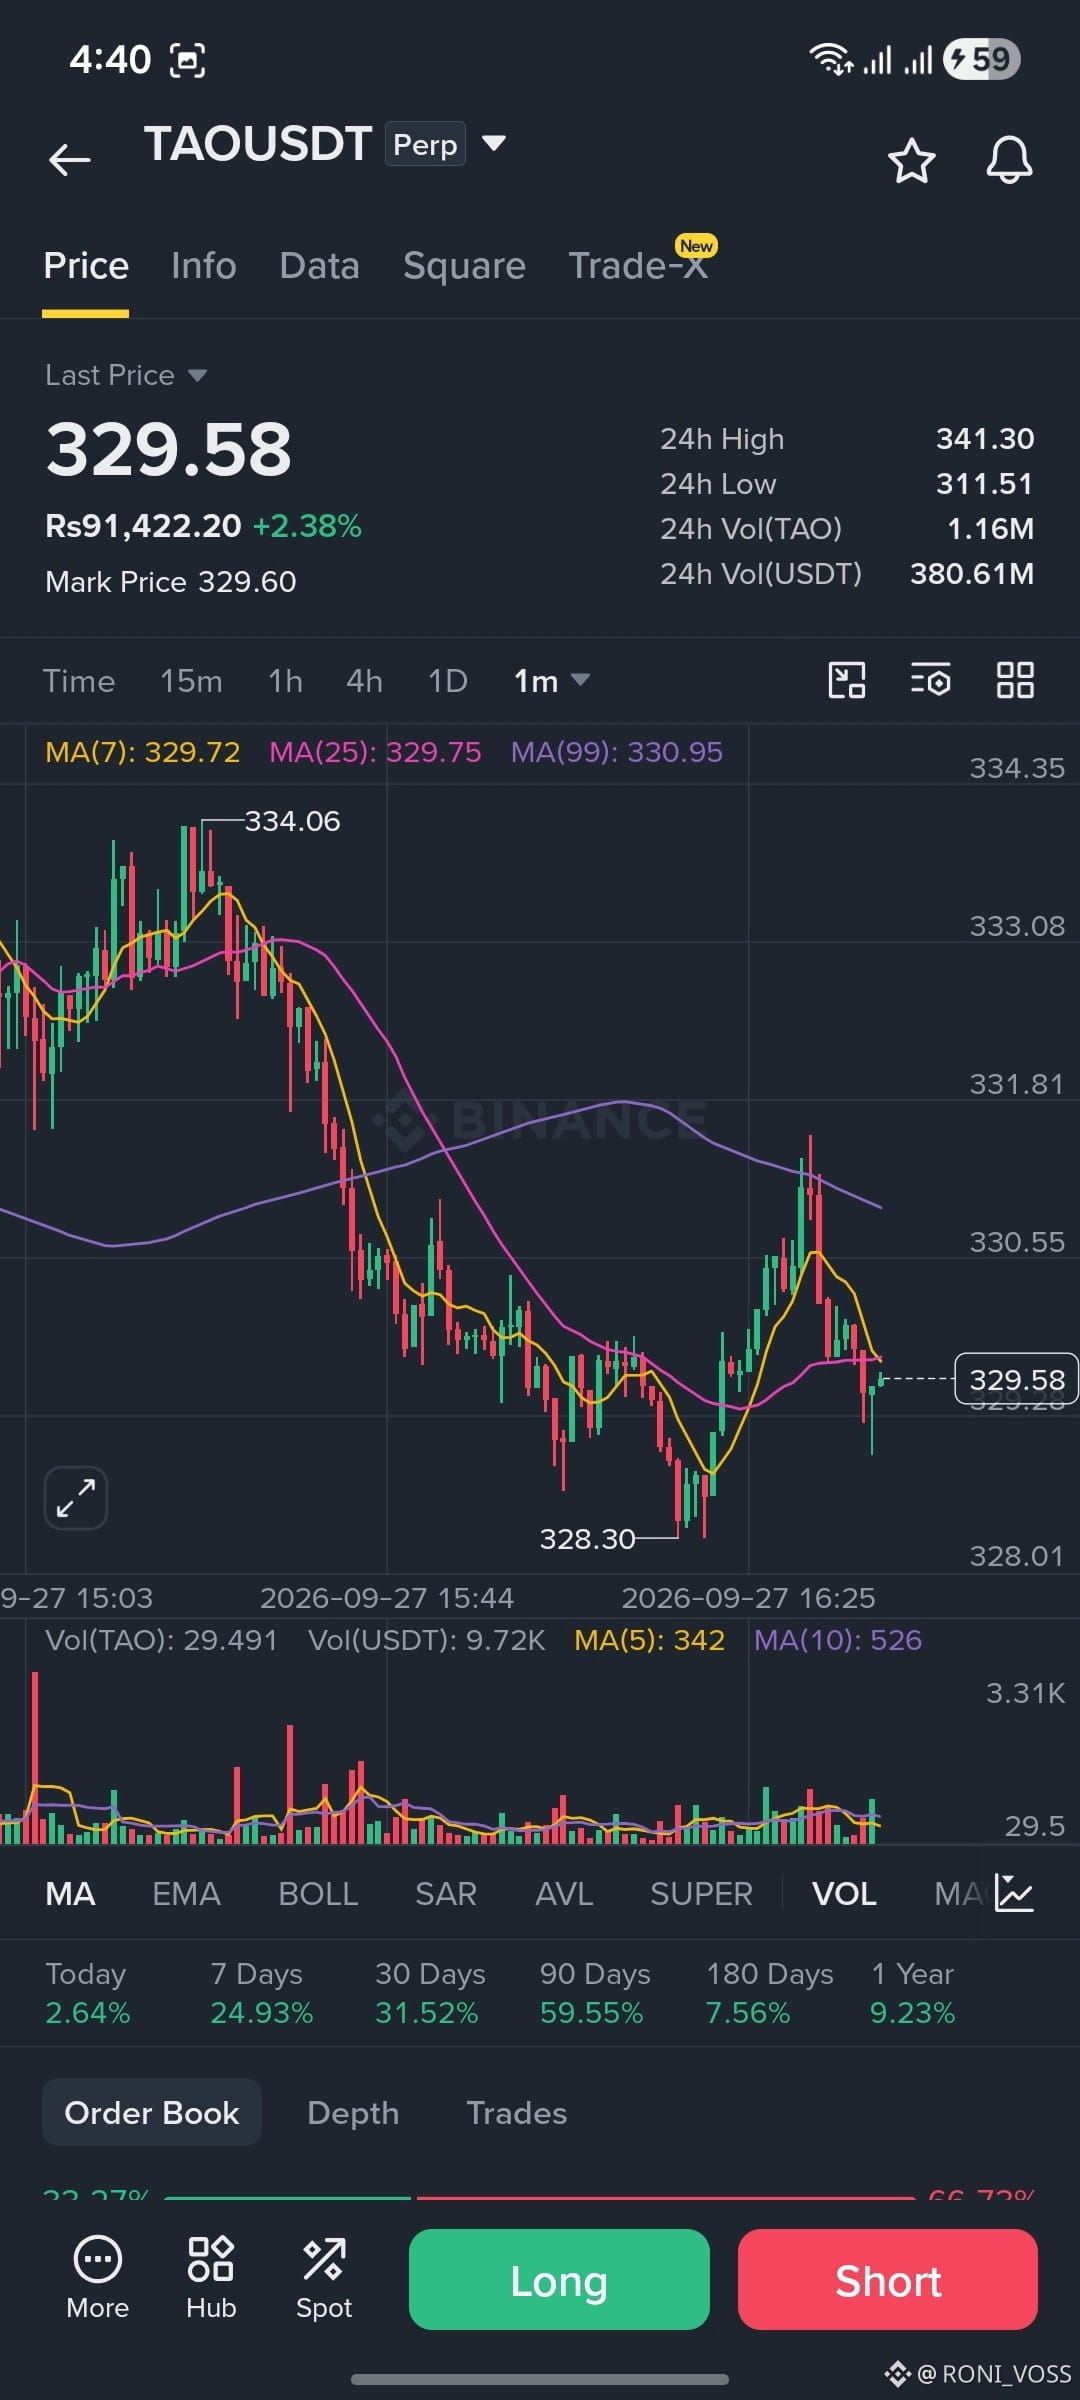
🚨🔥 GUYS — $TAO BULLISH SETUP IN FOCUS! 🚀📈
$TAO is approaching an important zone, with buyers looking to defend the area and push price toward the next upside levels. 👀
📍 Key Zone: $328 – $336
🎯 Upside Levels:
• $338
• $342
• $348
• $354
• $360
⚠️ Key Downside Level: $318
📊 Setup Logic:
• $328–$336 is the key area to watch.
• Holding this zone could keep the bullish structure active.
• A sustained move above $338 could bring the higher levels into focus.
• A break below $318 would weaken the current setup.
The big question: can $TAO defend this zone and build momentum toward $354 and $360? 👀🔥📈
{spot}(TAOUSDT)
#StrategyStriveAdd2305BitcoinThisWeek #TrumpRejectsIranHormuzReopening #CircleTetherFreezeBitgetHackerWallet #SECSaysTokenBuybacksNotAutoSecurities #CoinMarketCapCompletesCoinglassAcquisition
🚨🔥 GUYS — $TAO BULLISH SETUP IN FOCUS! 🚀📈
$TAO is approaching an important zone, with buyers looking to defend the area and push price toward the next upside levels. 👀
📍 Key Zone: $328 – $336
🎯 Upside Levels:
• $338
• $342
• $348
• $354
• $360
⚠️ Key Downside Level: $318
📊 Setup Logic:
• $328–$336 is the key area to watch.
• Holding this zone could keep the bullish structure active.
• A sustained move above $338 could bring the higher levels into focus.
• A break below $318 would weaken the current setup.
The big question: can $TAO defend this zone and build momentum toward $354 and $360? 👀🔥📈
#StrategyStriveAdd2305BitcoinThisWeek #TrumpRejectsIranHormuzReopening #CircleTetherFreezeBitgetHackerWallet #SECSaysTokenBuybacksNotAutoSecurities #CoinMarketCapCompletesCoinglassAcquisition
$TAO is approaching an important zone, with buyers looking to defend the area and push price toward the next upside levels. 👀
📍 Key Zone: $328 – $336
🎯 Upside Levels:
• $338
• $342
• $348
• $354
• $360
⚠️ Key Downside Level: $318
📊 Setup Logic:
• $328–$336 is the key area to watch.
• Holding this zone could keep the bullish structure active.
• A sustained move above $338 could bring the higher levels into focus.
• A break below $318 would weaken the current setup.
The big question: can $TAO defend this zone and build momentum toward $354 and $360? 👀🔥📈
#StrategyStriveAdd2305BitcoinThisWeek #TrumpRejectsIranHormuzReopening #CircleTetherFreezeBitgetHackerWallet #SECSaysTokenBuybacksNotAutoSecurities #CoinMarketCapCompletesCoinglassAcquisition
53
·
--
Bullish
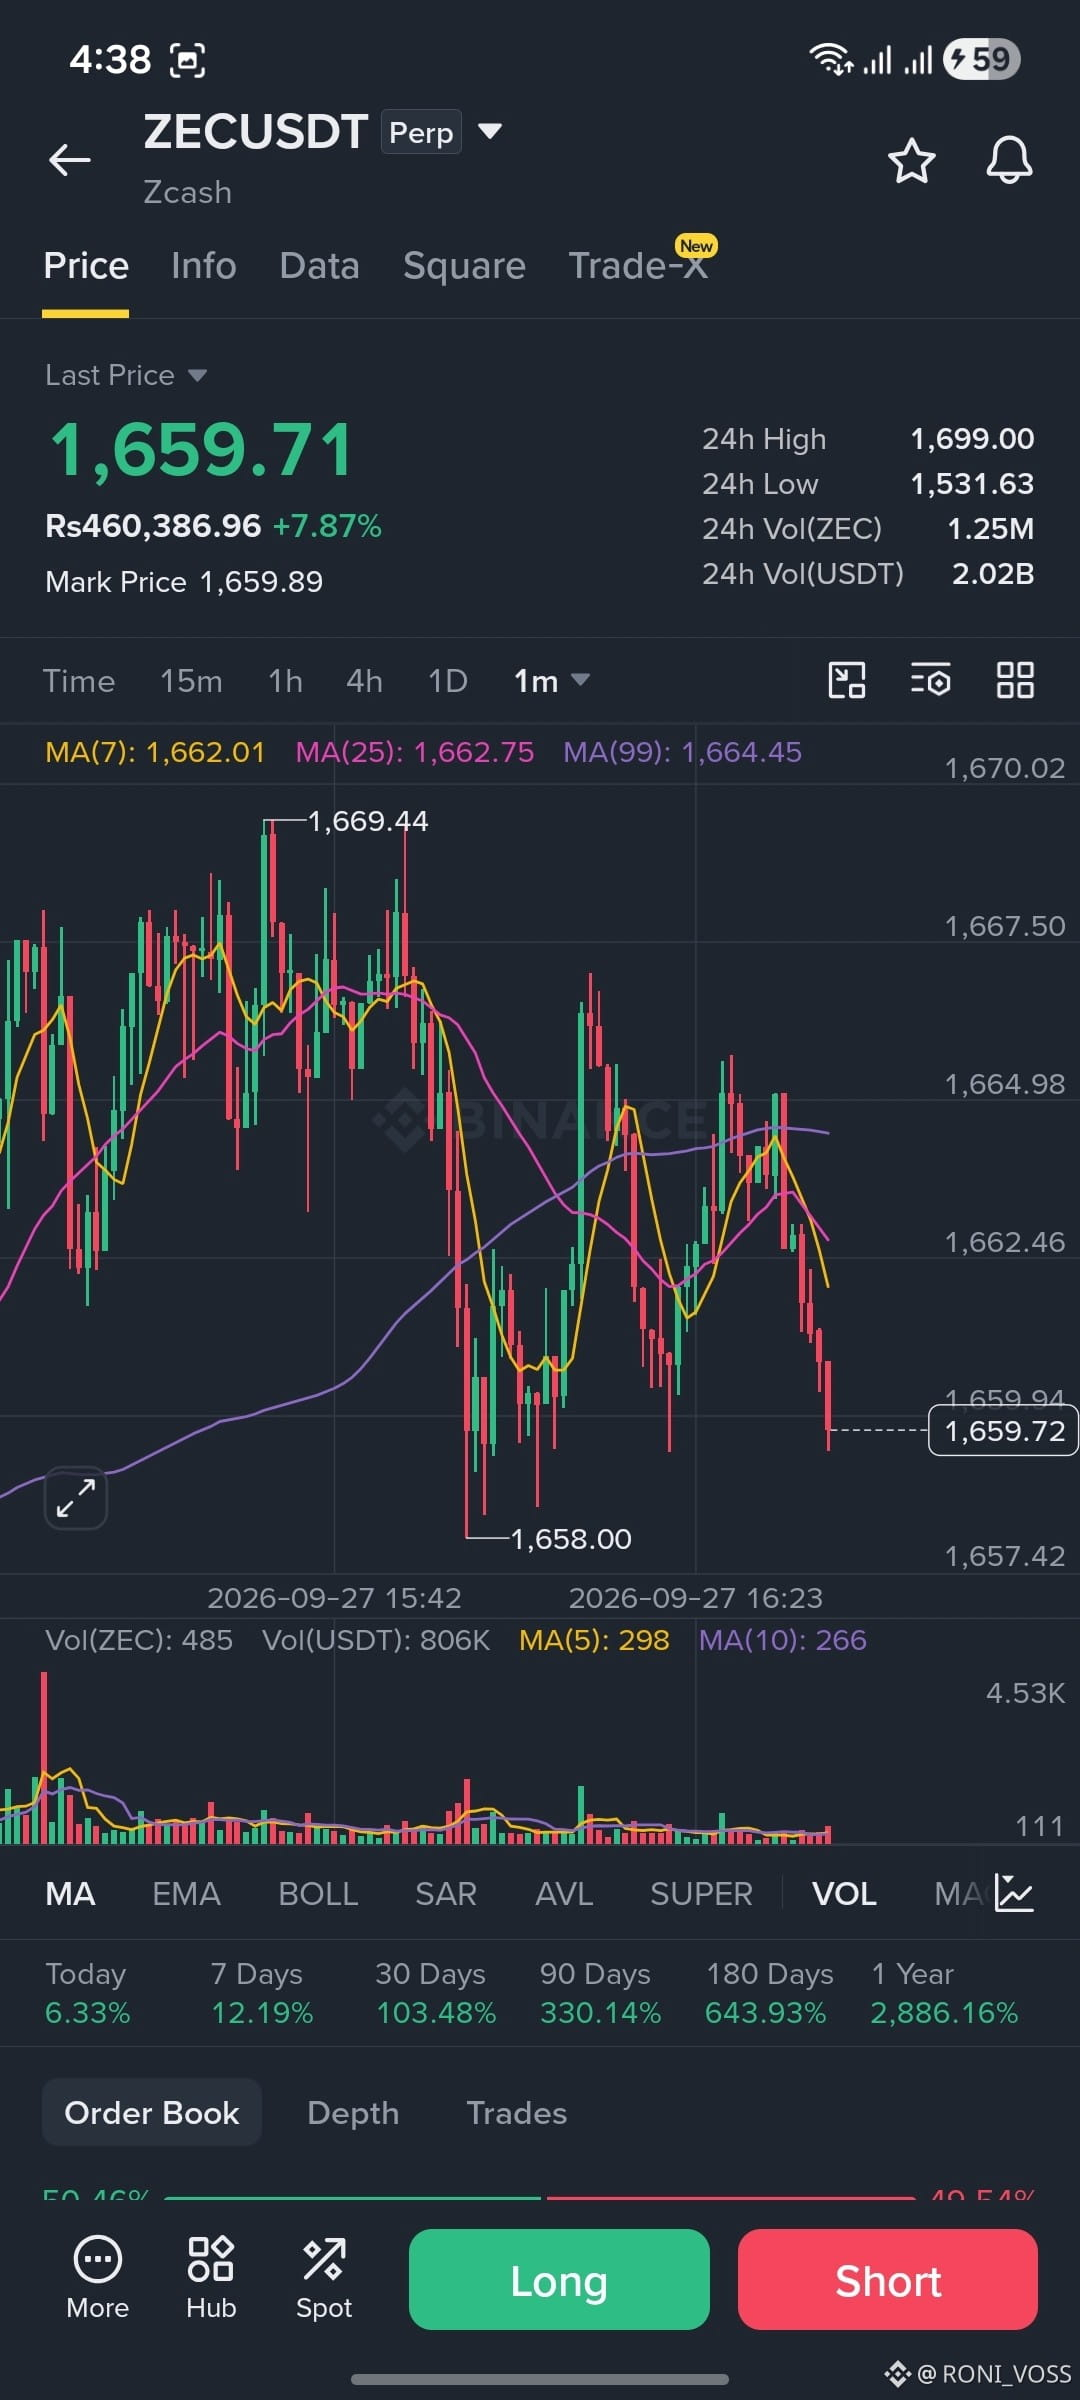
🚨🔥 DEAR FAM — $ZEC SCALPING SETUP IN FOCUS! 📈
$ZEC is showing a recovery above the key level, with buyers attempting to rebuild short-term momentum. 👀⚡
📍 Key Recovery Zone: $1,660 – $1,667
🎯 Upside Levels:
• $1,680
• $1,700
• $1,720
⚠️ Key Downside Level: $1,628
📊 Setup Logic:
• Price is recovering above the key level.
• Holding $1,660–$1,667 could keep the short-term bullish structure active.
• A sustained move above $1,680 could bring $1,700 and $1,720 into focus.
• A break below $1,628 would weaken the current setup.
The big question: can $ZEC maintain the recovery and build momentum toward $1,700 and $1,720? 👀🔥📈
#StrategyStriveAdd2305BitcoinThisWeek #TrumpRejectsIranHormuzReopening #CircleTetherFreezeBitgetHackerWallet #SECSaysTokenBuybacksNotAutoSecurities #CoinMarketCapCompletesCoinglassAcquisition
🚨🔥 DEAR FAM — $ZEC SCALPING SETUP IN FOCUS! 📈
$ZEC is showing a recovery above the key level, with buyers attempting to rebuild short-term momentum. 👀⚡
📍 Key Recovery Zone: $1,660 – $1,667
🎯 Upside Levels:
• $1,680
• $1,700
• $1,720
⚠️ Key Downside Level: $1,628
📊 Setup Logic:
• Price is recovering above the key level.
• Holding $1,660–$1,667 could keep the short-term bullish structure active.
• A sustained move above $1,680 could bring $1,700 and $1,720 into focus.
• A break below $1,628 would weaken the current setup.
The big question: can $ZEC maintain the recovery and build momentum toward $1,700 and $1,720? 👀🔥📈
#StrategyStriveAdd2305BitcoinThisWeek #TrumpRejectsIranHormuzReopening #CircleTetherFreezeBitgetHackerWallet #SECSaysTokenBuybacksNotAutoSecurities #CoinMarketCapCompletesCoinglassAcquisition
$ZEC is showing a recovery above the key level, with buyers attempting to rebuild short-term momentum. 👀⚡
📍 Key Recovery Zone: $1,660 – $1,667
🎯 Upside Levels:
• $1,680
• $1,700
• $1,720
⚠️ Key Downside Level: $1,628
📊 Setup Logic:
• Price is recovering above the key level.
• Holding $1,660–$1,667 could keep the short-term bullish structure active.
• A sustained move above $1,680 could bring $1,700 and $1,720 into focus.
• A break below $1,628 would weaken the current setup.
The big question: can $ZEC maintain the recovery and build momentum toward $1,700 and $1,720? 👀🔥📈
#StrategyStriveAdd2305BitcoinThisWeek #TrumpRejectsIranHormuzReopening #CircleTetherFreezeBitgetHackerWallet #SECSaysTokenBuybacksNotAutoSecurities #CoinMarketCapCompletesCoinglassAcquisition
103
·
--
Bullish
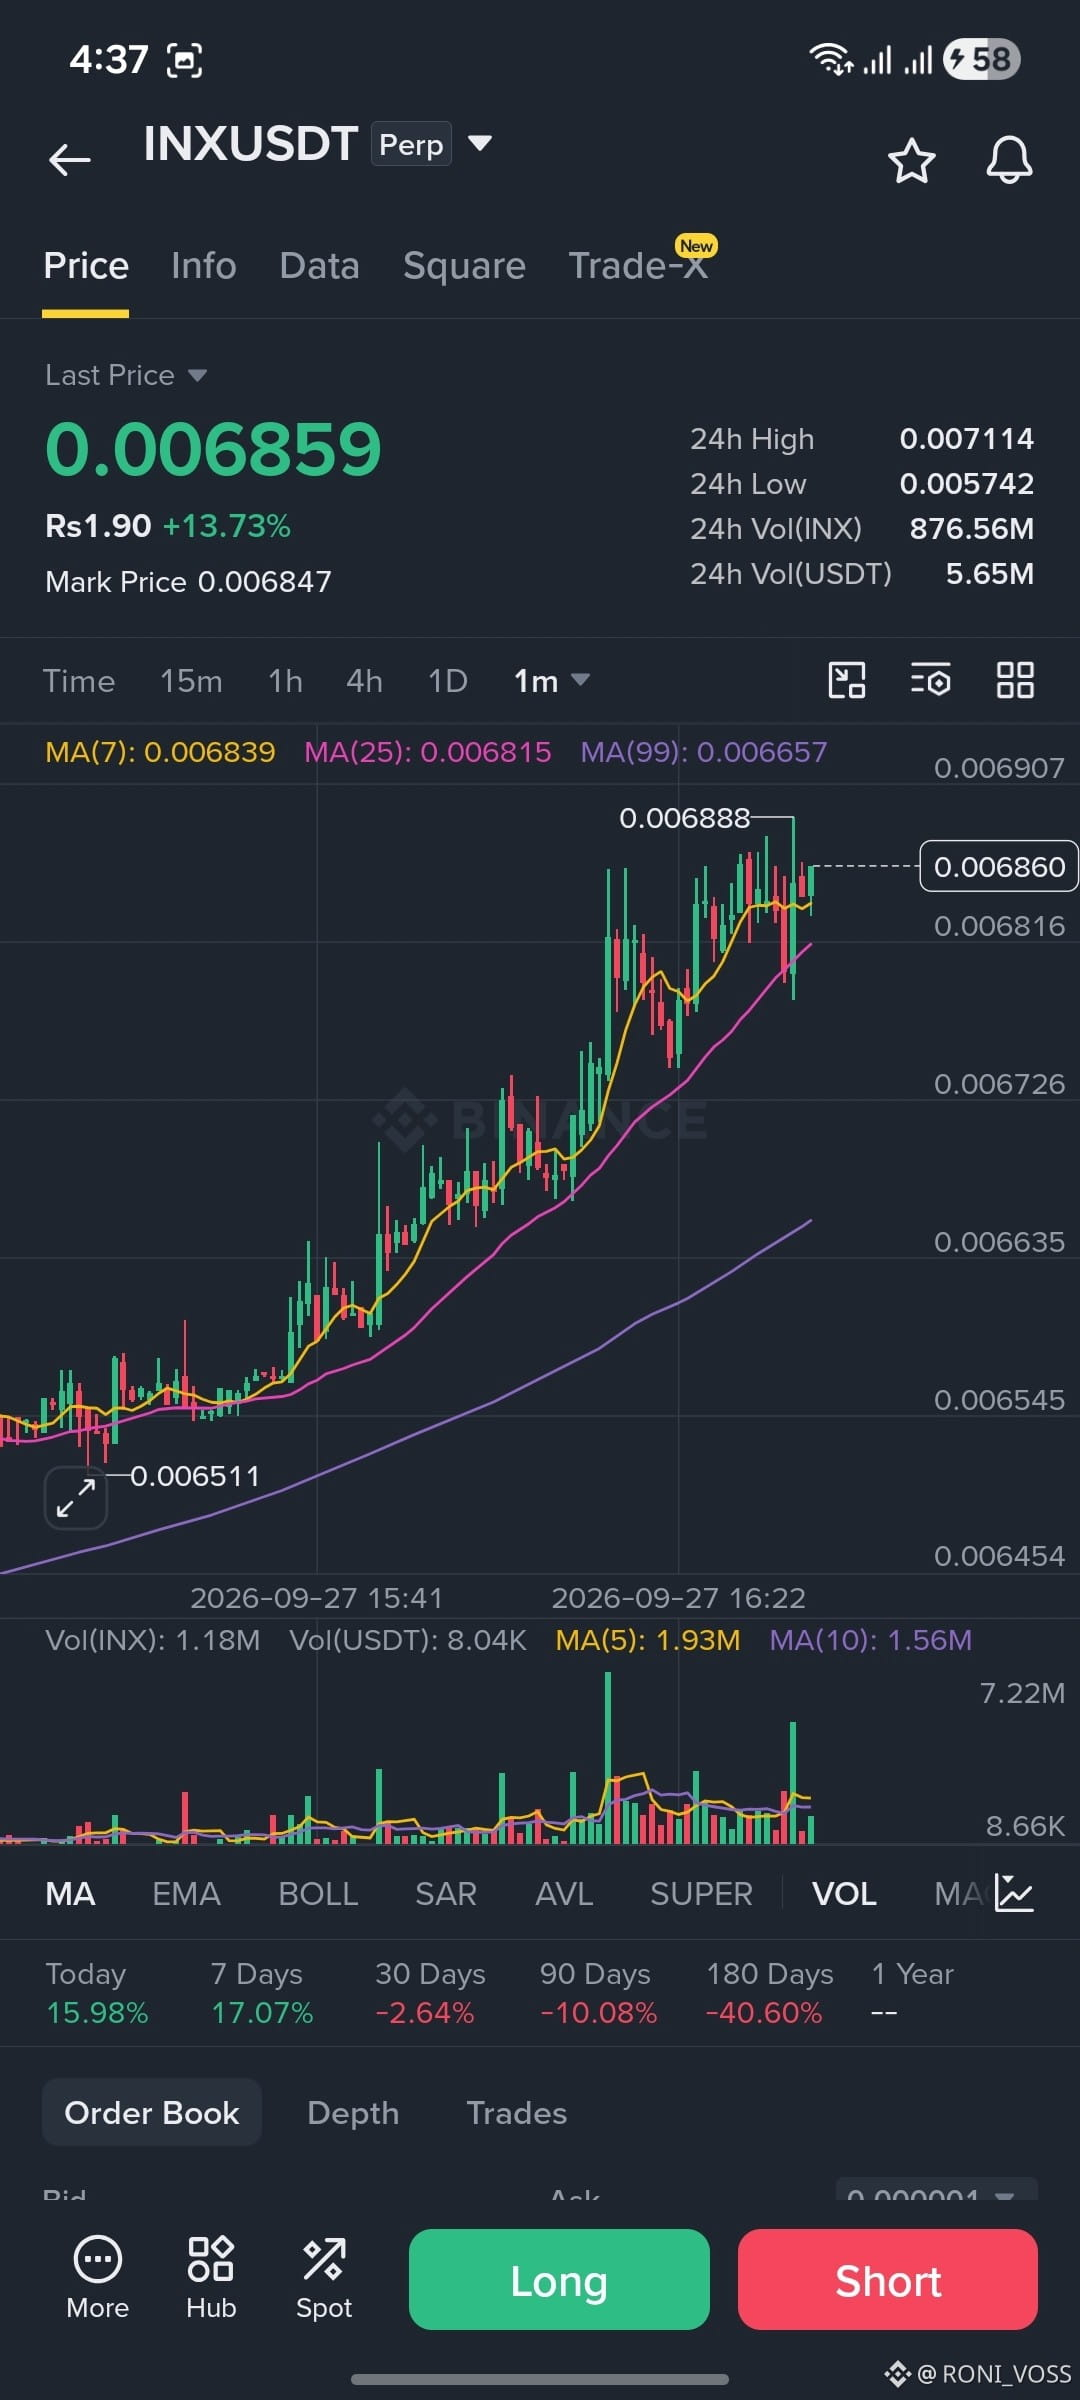
🚨🔥 LISTEN TRADERS — $INX BULLISH PUSH IN FOCUS! 📈
$INX is making a powerful bullish move, but price looks extended after the recent spike. The key now is whether a controlled pullback can create another opportunity for continuation. 👀
📍 Key Pullback Zone: $0.00655 – $0.00665
🎯 Upside Levels:
• $0.00685
• $0.00700
• $0.00715
⚠️ Key Downside Level: $0.00628
📊 Setup Logic:
• The recent spike has pushed $INX strongly higher.
• A pullback toward $0.00655–$0.00665 is the key area to watch.
• Holding this zone could keep the bullish structure active.
• A sustained move above $0.00685 could bring $0.00700 and $0.00715 into focus.
• A break below $0.00628 would weaken the current setup.
The big question: can $INX hold the pullback zone and build another move toward $0.00715? 👀🔥📈
{alpha}(560x45f55b46689402583073ff227b6ac20520052a24)
#StrategyStriveAdd2305BitcoinThisWeek #TrumpRejectsIranHormuzReopening #CircleTetherFreezeBitgetHackerWallet #SECSaysTokenBuybacksNotAutoSecurities #CoinMarketCapCompletesCoinglassAcquisition
🚨🔥 LISTEN TRADERS — $INX BULLISH PUSH IN FOCUS! 📈
$INX is making a powerful bullish move, but price looks extended after the recent spike. The key now is whether a controlled pullback can create another opportunity for continuation. 👀
📍 Key Pullback Zone: $0.00655 – $0.00665
🎯 Upside Levels:
• $0.00685
• $0.00700
• $0.00715
⚠️ Key Downside Level: $0.00628
📊 Setup Logic:
• The recent spike has pushed $INX strongly higher.
• A pullback toward $0.00655–$0.00665 is the key area to watch.
• Holding this zone could keep the bullish structure active.
• A sustained move above $0.00685 could bring $0.00700 and $0.00715 into focus.
• A break below $0.00628 would weaken the current setup.
The big question: can $INX hold the pullback zone and build another move toward $0.00715? 👀🔥📈
#StrategyStriveAdd2305BitcoinThisWeek #TrumpRejectsIranHormuzReopening #CircleTetherFreezeBitgetHackerWallet #SECSaysTokenBuybacksNotAutoSecurities #CoinMarketCapCompletesCoinglassAcquisition
$INX is making a powerful bullish move, but price looks extended after the recent spike. The key now is whether a controlled pullback can create another opportunity for continuation. 👀
📍 Key Pullback Zone: $0.00655 – $0.00665
🎯 Upside Levels:
• $0.00685
• $0.00700
• $0.00715
⚠️ Key Downside Level: $0.00628
📊 Setup Logic:
• The recent spike has pushed $INX strongly higher.
• A pullback toward $0.00655–$0.00665 is the key area to watch.
• Holding this zone could keep the bullish structure active.
• A sustained move above $0.00685 could bring $0.00700 and $0.00715 into focus.
• A break below $0.00628 would weaken the current setup.
The big question: can $INX hold the pullback zone and build another move toward $0.00715? 👀🔥📈
#StrategyStriveAdd2305BitcoinThisWeek #TrumpRejectsIranHormuzReopening #CircleTetherFreezeBitgetHackerWallet #SECSaysTokenBuybacksNotAutoSecurities #CoinMarketCapCompletesCoinglassAcquisition
51
·
--
Bullish
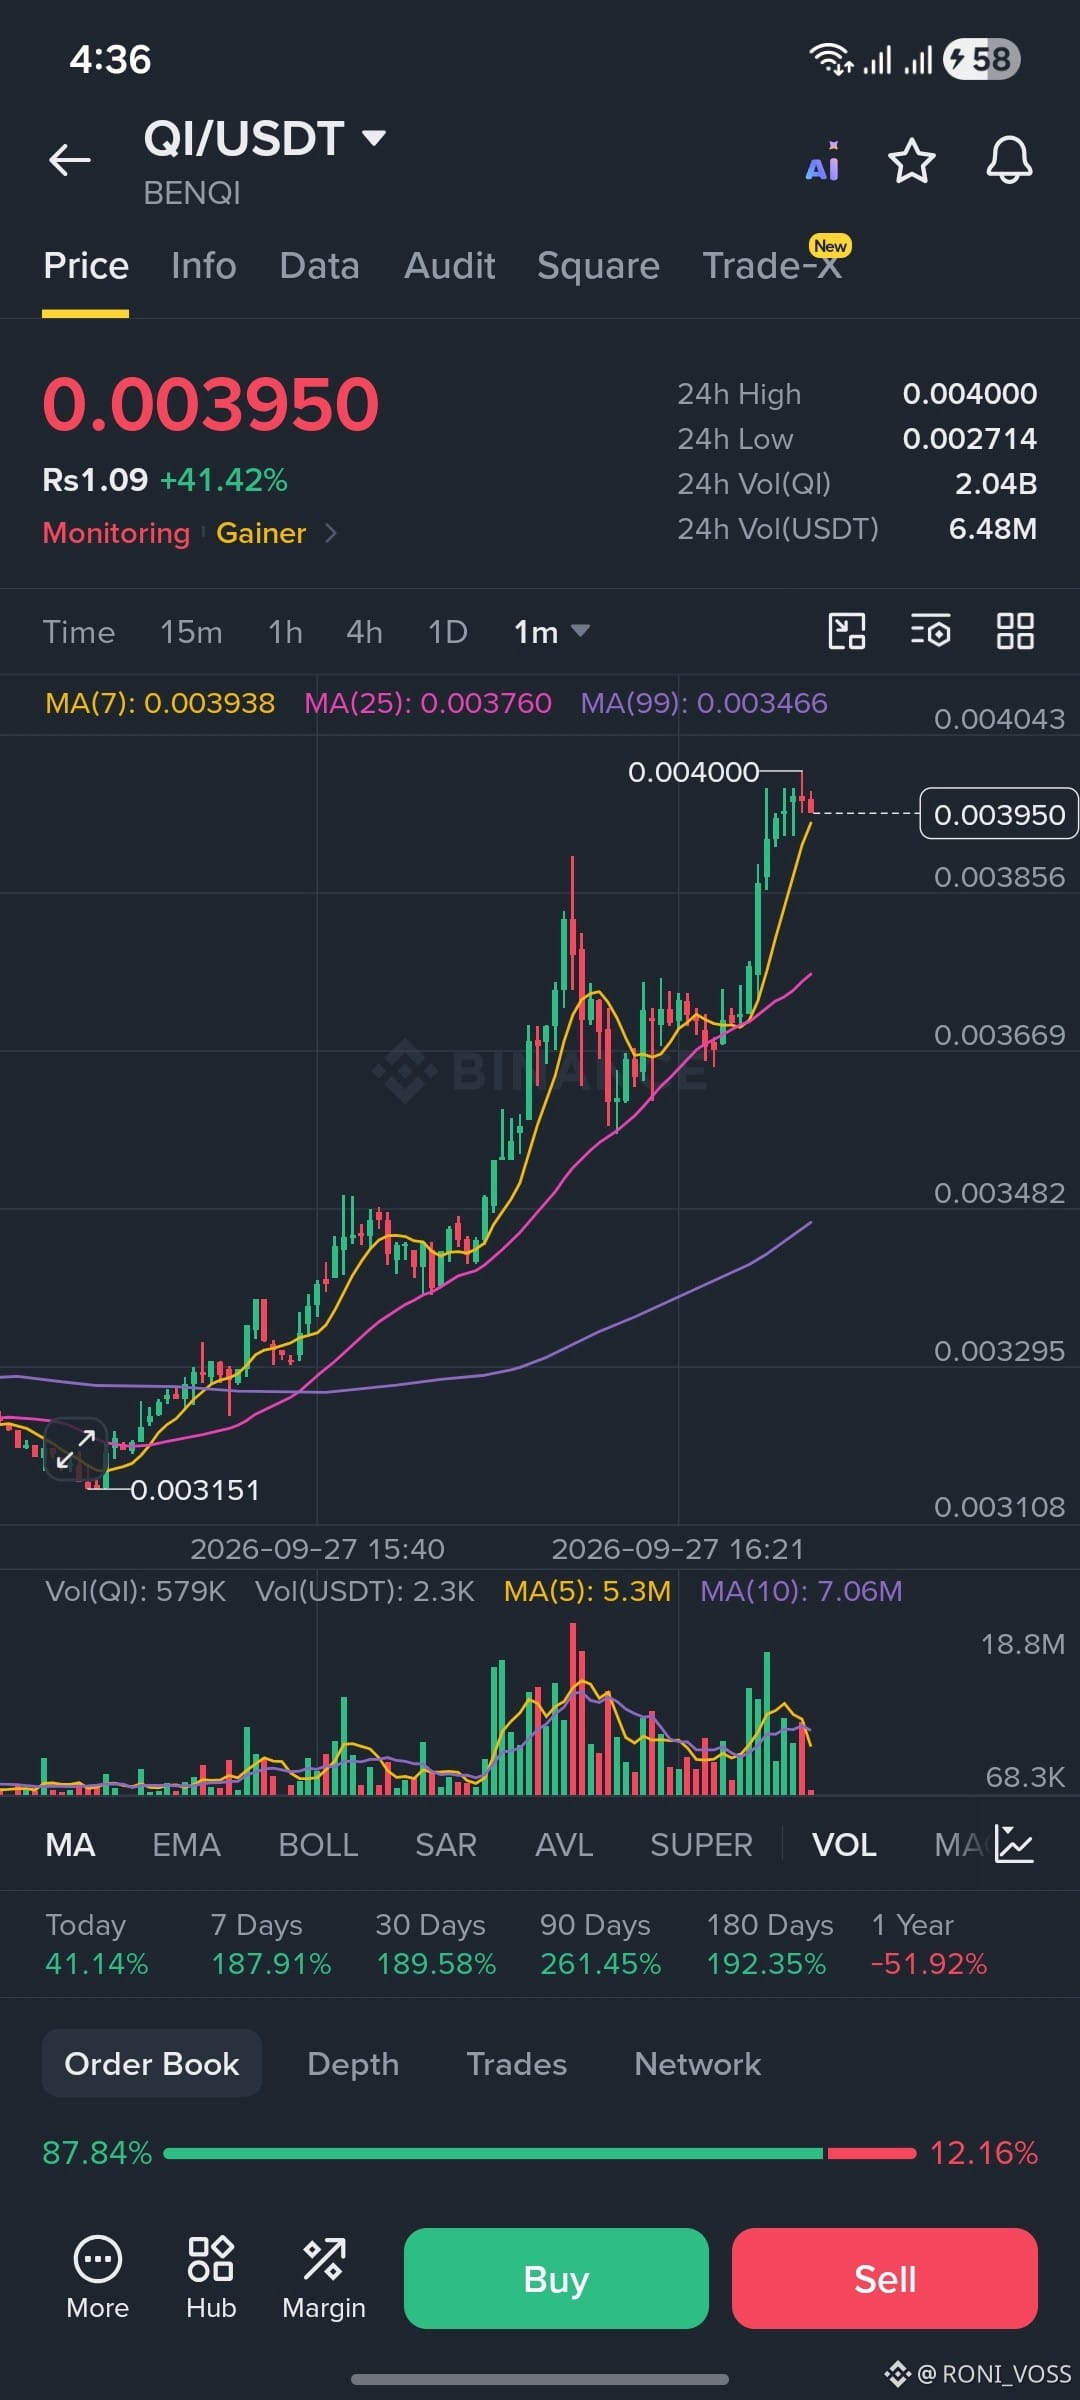
🚨🔥 $QI — BULLISH BREAKOUT IN FOCUS! 📈
$QI has reclaimed the $0.00313 zone, with buyers pushing aggressively higher. The breakout is gaining strength, and the key focus now is whether price can sustain this momentum. 👀
📍 Key Zone: $0.00355 – $0.00372
🎯 Upside Levels:
• $0.00390
• $0.00420
• $0.00450
⚠️ Key Downside Level: $0.00328
📊 Setup Logic:
• Reclaiming $0.00313 keeps the bullish structure in focus.
• Holding $0.00355–$0.00372 could support further continuation.
• A sustained move above $0.00390 could bring $0.00420 and $0.00450 into focus.
• A break below $0.00328 would weaken the current breakout structure.
The big question: can $QI hold the breakout and continue building momentum toward $0.00450? 👀🔥📈
{spot}(QIUSDT)
#StrategyStriveAdd2305BitcoinThisWeek #TrumpRejectsIranHormuzReopening #CircleTetherFreezeBitgetHackerWallet #SECSaysTokenBuybacksNotAutoSecurities #CoinMarketCapCompletesCoinglassAcquisition
🚨🔥 $QI — BULLISH BREAKOUT IN FOCUS! 📈
$QI has reclaimed the $0.00313 zone, with buyers pushing aggressively higher. The breakout is gaining strength, and the key focus now is whether price can sustain this momentum. 👀
📍 Key Zone: $0.00355 – $0.00372
🎯 Upside Levels:
• $0.00390
• $0.00420
• $0.00450
⚠️ Key Downside Level: $0.00328
📊 Setup Logic:
• Reclaiming $0.00313 keeps the bullish structure in focus.
• Holding $0.00355–$0.00372 could support further continuation.
• A sustained move above $0.00390 could bring $0.00420 and $0.00450 into focus.
• A break below $0.00328 would weaken the current breakout structure.
The big question: can $QI hold the breakout and continue building momentum toward $0.00450? 👀🔥📈
#StrategyStriveAdd2305BitcoinThisWeek #TrumpRejectsIranHormuzReopening #CircleTetherFreezeBitgetHackerWallet #SECSaysTokenBuybacksNotAutoSecurities #CoinMarketCapCompletesCoinglassAcquisition
$QI has reclaimed the $0.00313 zone, with buyers pushing aggressively higher. The breakout is gaining strength, and the key focus now is whether price can sustain this momentum. 👀
📍 Key Zone: $0.00355 – $0.00372
🎯 Upside Levels:
• $0.00390
• $0.00420
• $0.00450
⚠️ Key Downside Level: $0.00328
📊 Setup Logic:
• Reclaiming $0.00313 keeps the bullish structure in focus.
• Holding $0.00355–$0.00372 could support further continuation.
• A sustained move above $0.00390 could bring $0.00420 and $0.00450 into focus.
• A break below $0.00328 would weaken the current breakout structure.
The big question: can $QI hold the breakout and continue building momentum toward $0.00450? 👀🔥📈
#StrategyStriveAdd2305BitcoinThisWeek #TrumpRejectsIranHormuzReopening #CircleTetherFreezeBitgetHackerWallet #SECSaysTokenBuybacksNotAutoSecurities #CoinMarketCapCompletesCoinglassAcquisition
97
·
--
Bullish
🔥🚨 EVERYONE — $BTC & $ETH ARE DELIVERING! 📈
Focus here! I previously shared setups for both #BTC and #ETH, and the price action has now reached TP1 on both setups! 🎯🔥
📊 Current Update:
✅ $BTC — TP1 reached
✅ $ETH — TP1 reached
🔄 Small pullback remains possible
📈 Next focus — another recovery and continuation higher
The charts are still developing, so the next move will depend on how both assets react after this first upside milestone.
Stay patient and keep watching closely — the next update could bring another important move! 👀🔥🎯
{spot}(BTCUSDT)
{spot}(ETHUSDT)
#StrategyStriveAdd2305BitcoinThisWeek #TrumpRejectsIranHormuzReopening #CircleTetherFreezeBitgetHackerWallet #SECSaysTokenBuybacksNotAutoSecurities #CoinMarketCapCompletesCoinglassAcquisition
🔥🚨 EVERYONE — $BTC & $ETH ARE DELIVERING! 📈
Focus here! I previously shared setups for both #BTC and #ETH, and the price action has now reached TP1 on both setups! 🎯🔥
📊 Current Update:
✅ $BTC — TP1 reached
✅ $ETH — TP1 reached
🔄 Small pullback remains possible
📈 Next focus — another recovery and continuation higher
The charts are still developing, so the next move will depend on how both assets react after this first upside milestone.
Stay patient and keep watching closely — the next update could bring another important move! 👀🔥🎯
#StrategyStriveAdd2305BitcoinThisWeek #TrumpRejectsIranHormuzReopening #CircleTetherFreezeBitgetHackerWallet #SECSaysTokenBuybacksNotAutoSecurities #CoinMarketCapCompletesCoinglassAcquisition
Focus here! I previously shared setups for both #BTC and #ETH, and the price action has now reached TP1 on both setups! 🎯🔥
📊 Current Update:
✅ $BTC — TP1 reached
✅ $ETH — TP1 reached
🔄 Small pullback remains possible
📈 Next focus — another recovery and continuation higher
The charts are still developing, so the next move will depend on how both assets react after this first upside milestone.
Stay patient and keep watching closely — the next update could bring another important move! 👀🔥🎯
#StrategyStriveAdd2305BitcoinThisWeek #TrumpRejectsIranHormuzReopening #CircleTetherFreezeBitgetHackerWallet #SECSaysTokenBuybacksNotAutoSecurities #CoinMarketCapCompletesCoinglassAcquisition
88
·
--
Bullish
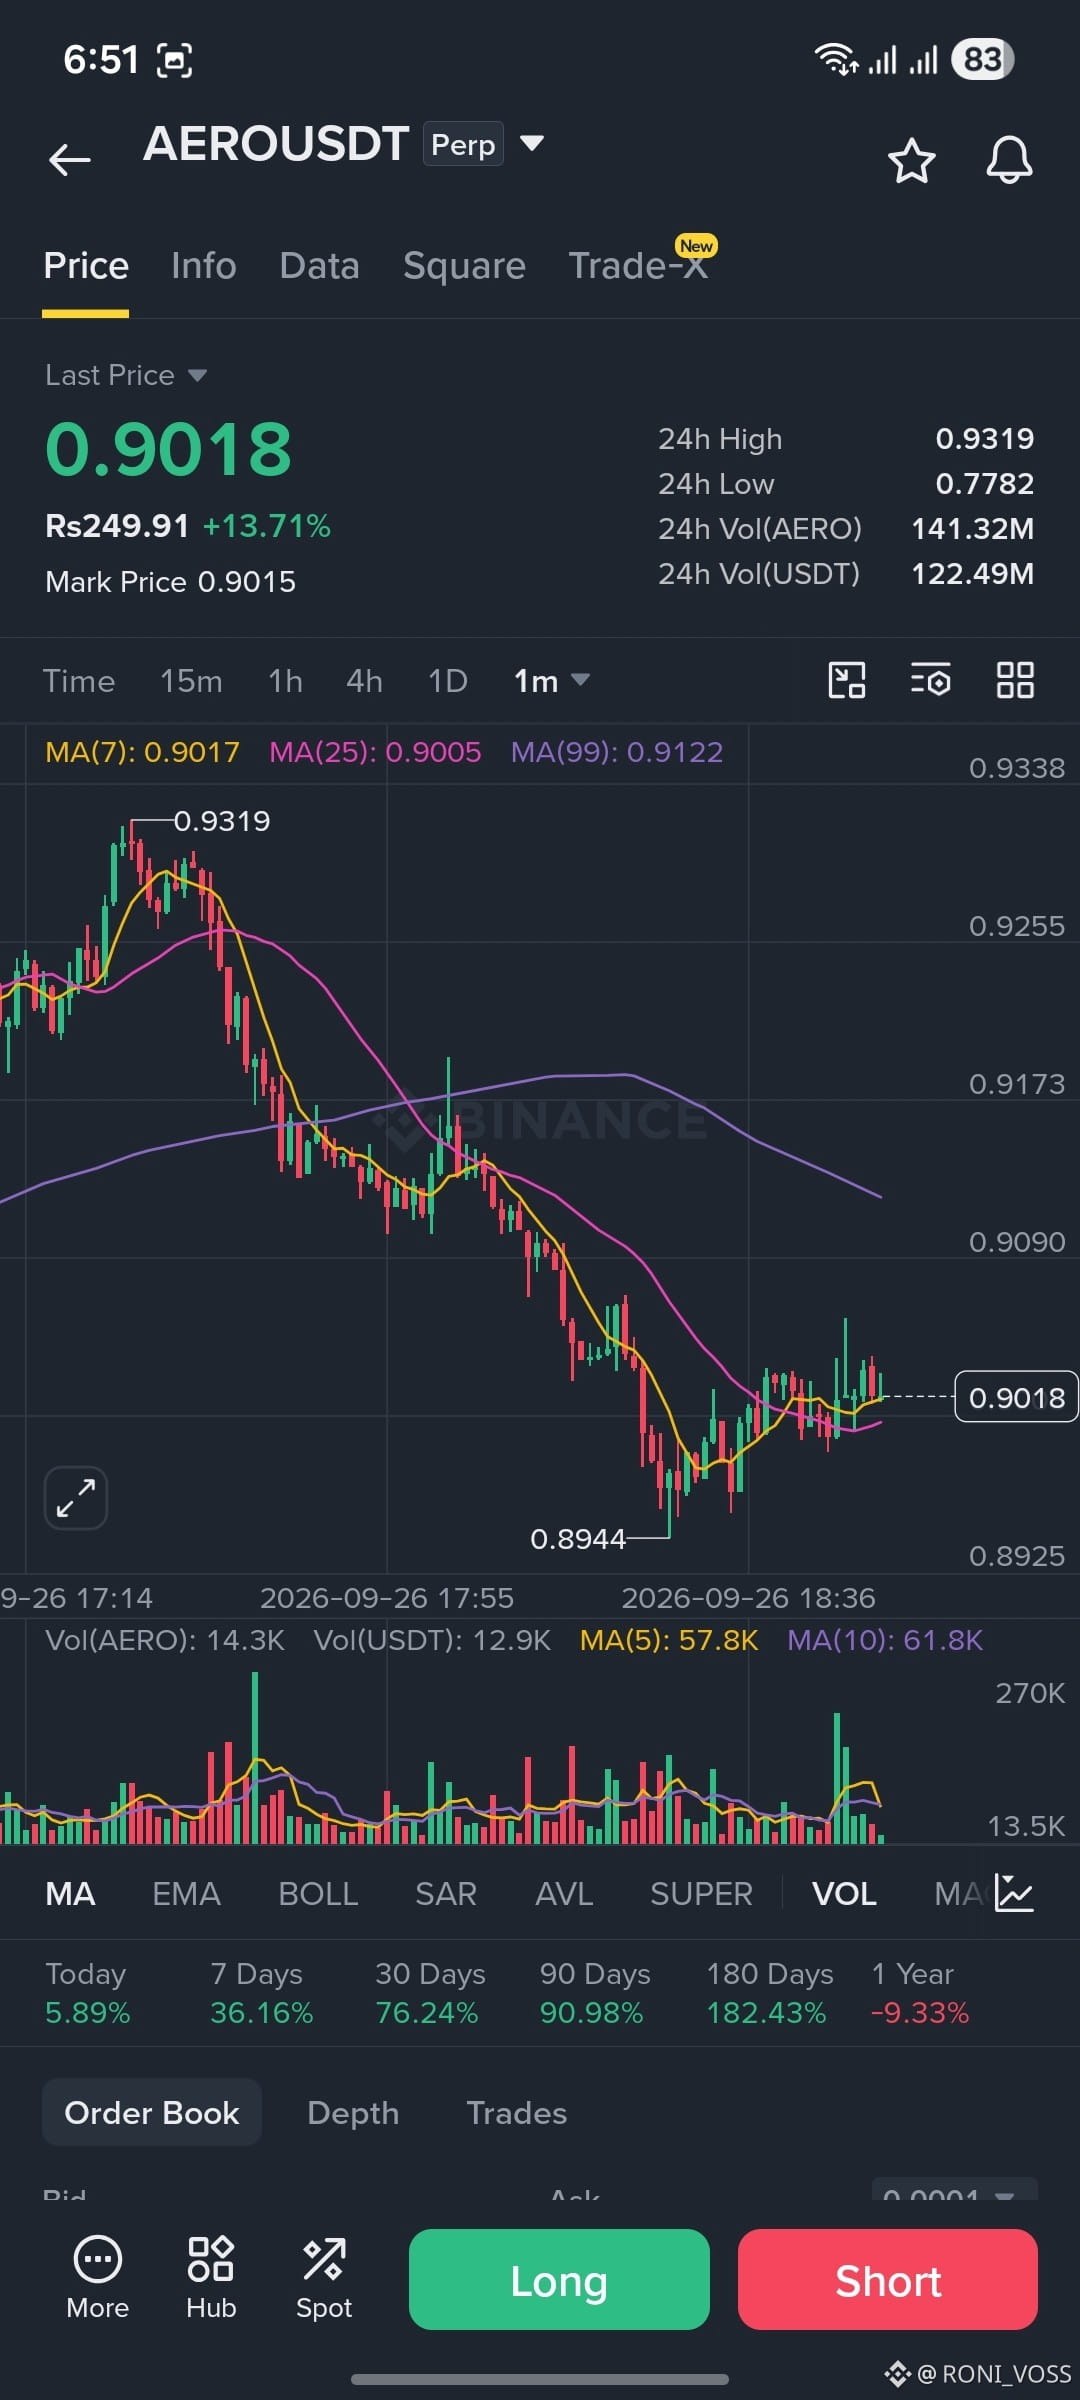
🚨🔥 GUYS — $AERO MAJOR REVERSAL IN FOCUS! 📈
$AERO is showing signs of a potential major reversal, with the $0.910–$0.930 area becoming an important zone to watch. 👀
📍 Key Zone: $0.910 – $0.930
🎯 Upside Levels:
• $0.965
• $1.00
• $1.05
• $1.10
⚠️ Key Downside Level: $0.805
📊 Setup Logic:
• Holding $0.910–$0.930 could keep the bullish reversal structure active.
• A sustained move above $0.965 could bring $1.00 and higher levels into focus.
• Continued momentum could put $1.05 and $1.10 on the chart.
• A break below $0.805 would weaken the current reversal structure.
The big question: can $AERO defend this zone and build momentum toward the $1.00–$1.10 area? 👀🔥📈
#CircleMints500MUSDCOnSolana #PolymarketBankFailureBetsDrawFDICConcern #BlackRockBuildsTokenizedPortfoliosForOndo #BitwiseFilesToListNEARETFOnNYSEArca #SECCommissionerPeirceToLeaveOct2
🚨🔥 GUYS — $AERO MAJOR REVERSAL IN FOCUS! 📈
$AERO is showing signs of a potential major reversal, with the $0.910–$0.930 area becoming an important zone to watch. 👀
📍 Key Zone: $0.910 – $0.930
🎯 Upside Levels:
• $0.965
• $1.00
• $1.05
• $1.10
⚠️ Key Downside Level: $0.805
📊 Setup Logic:
• Holding $0.910–$0.930 could keep the bullish reversal structure active.
• A sustained move above $0.965 could bring $1.00 and higher levels into focus.
• Continued momentum could put $1.05 and $1.10 on the chart.
• A break below $0.805 would weaken the current reversal structure.
The big question: can $AERO defend this zone and build momentum toward the $1.00–$1.10 area? 👀🔥📈
#CircleMints500MUSDCOnSolana #PolymarketBankFailureBetsDrawFDICConcern #BlackRockBuildsTokenizedPortfoliosForOndo #BitwiseFilesToListNEARETFOnNYSEArca #SECCommissionerPeirceToLeaveOct2
$AERO is showing signs of a potential major reversal, with the $0.910–$0.930 area becoming an important zone to watch. 👀
📍 Key Zone: $0.910 – $0.930
🎯 Upside Levels:
• $0.965
• $1.00
• $1.05
• $1.10
⚠️ Key Downside Level: $0.805
📊 Setup Logic:
• Holding $0.910–$0.930 could keep the bullish reversal structure active.
• A sustained move above $0.965 could bring $1.00 and higher levels into focus.
• Continued momentum could put $1.05 and $1.10 on the chart.
• A break below $0.805 would weaken the current reversal structure.
The big question: can $AERO defend this zone and build momentum toward the $1.00–$1.10 area? 👀🔥📈
#CircleMints500MUSDCOnSolana #PolymarketBankFailureBetsDrawFDICConcern #BlackRockBuildsTokenizedPortfoliosForOndo #BitwiseFilesToListNEARETFOnNYSEArca #SECCommissionerPeirceToLeaveOct2
16
·
--
Bullish
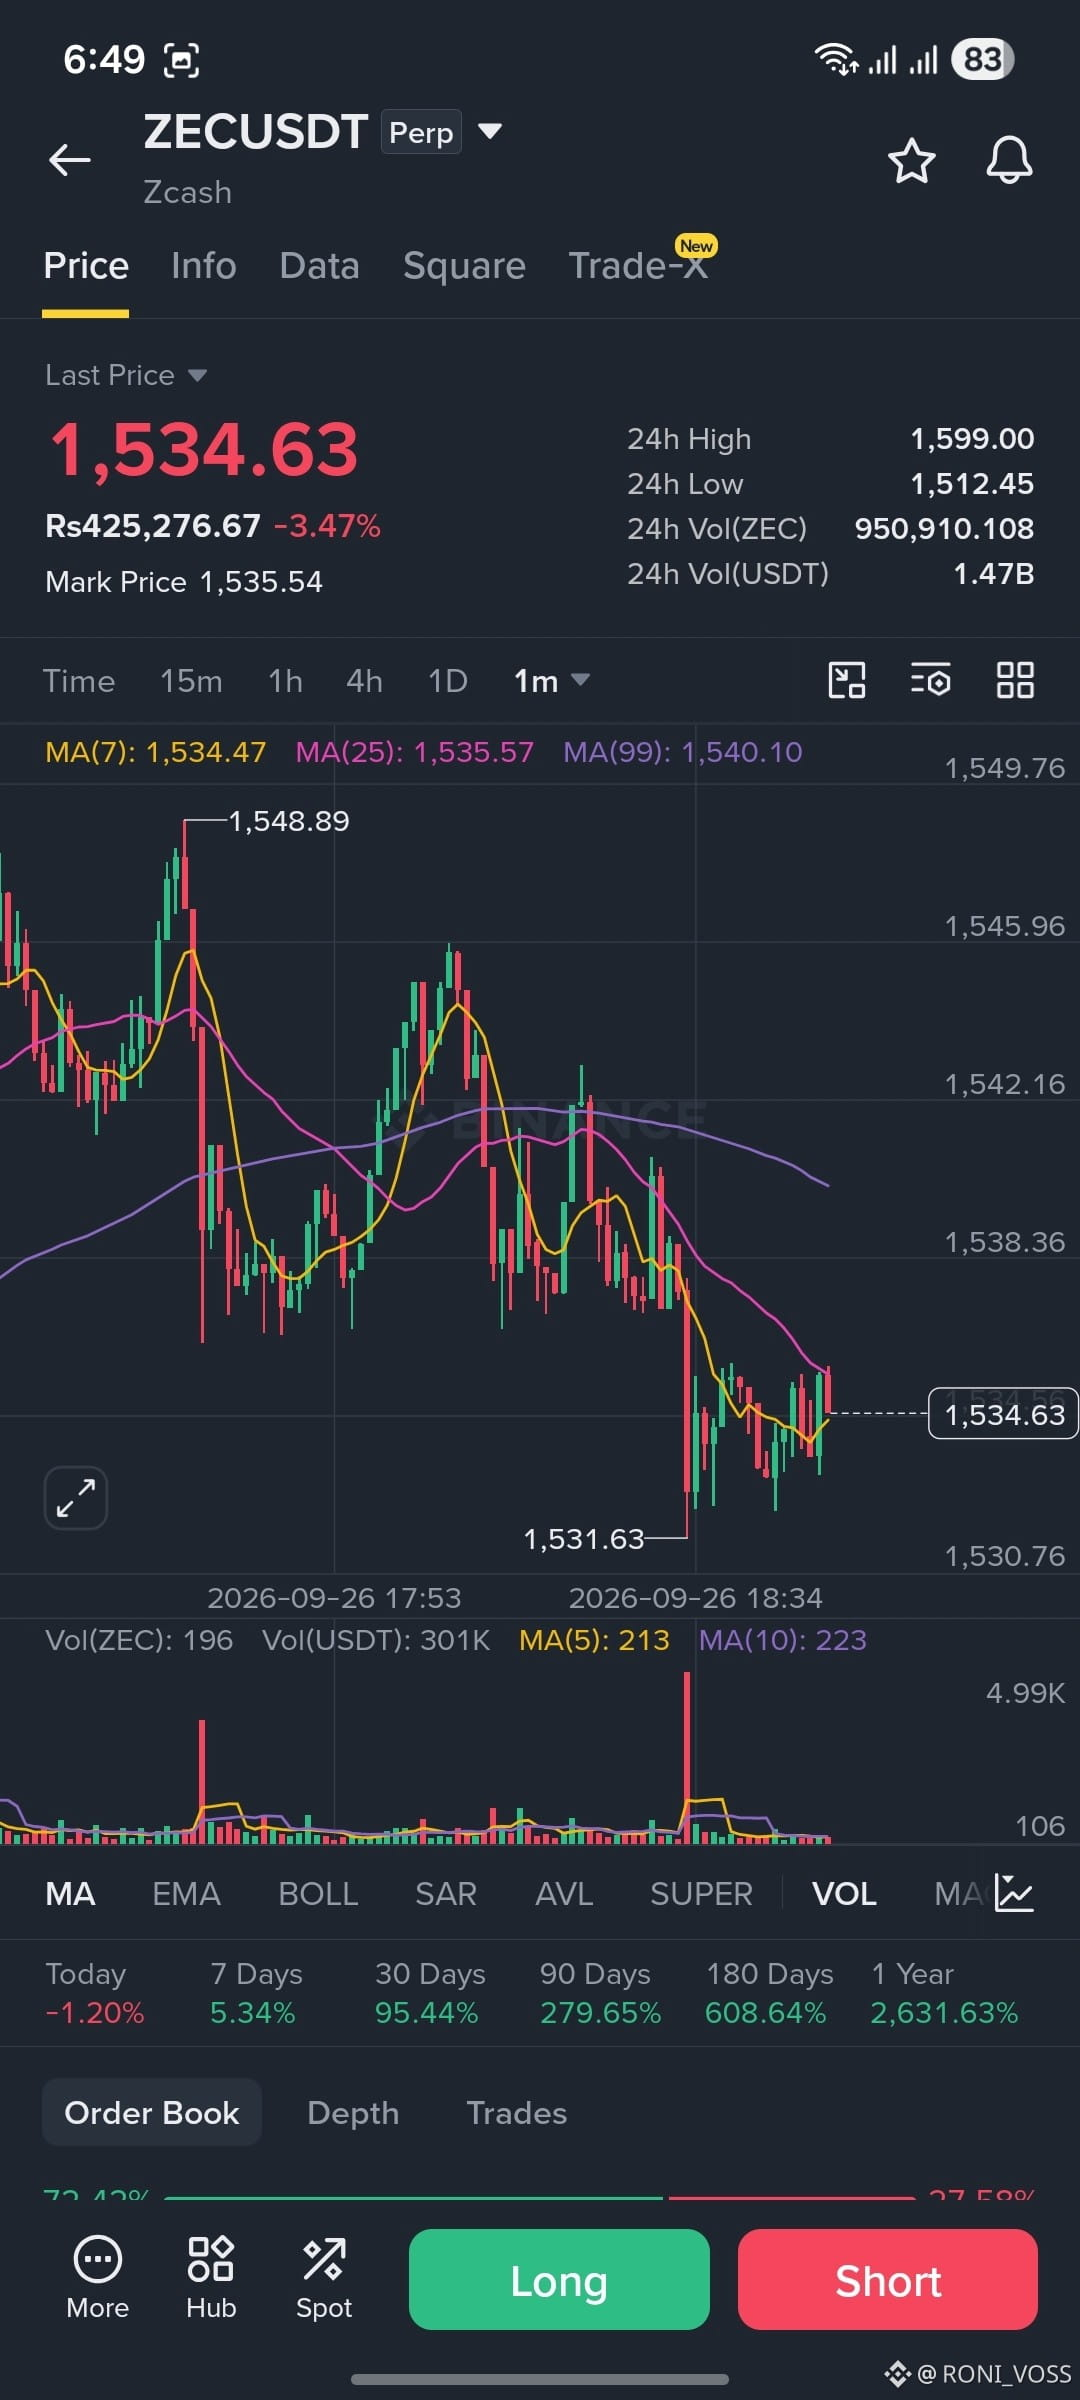
🚨📉 GUYS — $ZEC BEARISH OUTLOOK IN FOCUS!
One thing stands out to me: $ZEC could eventually move lower, but the path may not be straightforward. 👀
Before a larger decline, price could still print one more bullish candle and sweep short-side liquidity before reversing. On the other hand, selling pressure could also begin directly from the current area.
📊 Two Scenarios to Watch:
🔹 Bullish Sweep:
$ZEC could push higher first, potentially clearing nearby short-side liquidity before reversing.
🔹 Bearish Continuation:
If sellers take control from the current area, downside momentum could develop without another major upside move.
🎯 Major Downside Zone:
$1,400 – $1,300
Let’s watch the price action closely and see which scenario plays out. 👀📉
#CircleMints500MUSDCOnSolana #PolymarketBankFailureBetsDrawFDICConcern #BlackRockBuildsTokenizedPortfoliosForOndo #BitwiseFilesToListNEARETFOnNYSEArca #SECCommissionerPeirceToLeaveOct2
🚨📉 GUYS — $ZEC BEARISH OUTLOOK IN FOCUS!
One thing stands out to me: $ZEC could eventually move lower, but the path may not be straightforward. 👀
Before a larger decline, price could still print one more bullish candle and sweep short-side liquidity before reversing. On the other hand, selling pressure could also begin directly from the current area.
📊 Two Scenarios to Watch:
🔹 Bullish Sweep:
$ZEC could push higher first, potentially clearing nearby short-side liquidity before reversing.
🔹 Bearish Continuation:
If sellers take control from the current area, downside momentum could develop without another major upside move.
🎯 Major Downside Zone:
$1,400 – $1,300
Let’s watch the price action closely and see which scenario plays out. 👀📉
#CircleMints500MUSDCOnSolana #PolymarketBankFailureBetsDrawFDICConcern #BlackRockBuildsTokenizedPortfoliosForOndo #BitwiseFilesToListNEARETFOnNYSEArca #SECCommissionerPeirceToLeaveOct2
One thing stands out to me: $ZEC could eventually move lower, but the path may not be straightforward. 👀
Before a larger decline, price could still print one more bullish candle and sweep short-side liquidity before reversing. On the other hand, selling pressure could also begin directly from the current area.
📊 Two Scenarios to Watch:
🔹 Bullish Sweep:
$ZEC could push higher first, potentially clearing nearby short-side liquidity before reversing.
🔹 Bearish Continuation:
If sellers take control from the current area, downside momentum could develop without another major upside move.
🎯 Major Downside Zone:
$1,400 – $1,300
Let’s watch the price action closely and see which scenario plays out. 👀📉
#CircleMints500MUSDCOnSolana #PolymarketBankFailureBetsDrawFDICConcern #BlackRockBuildsTokenizedPortfoliosForOndo #BitwiseFilesToListNEARETFOnNYSEArca #SECCommissionerPeirceToLeaveOct2
30
·
--
Bullish
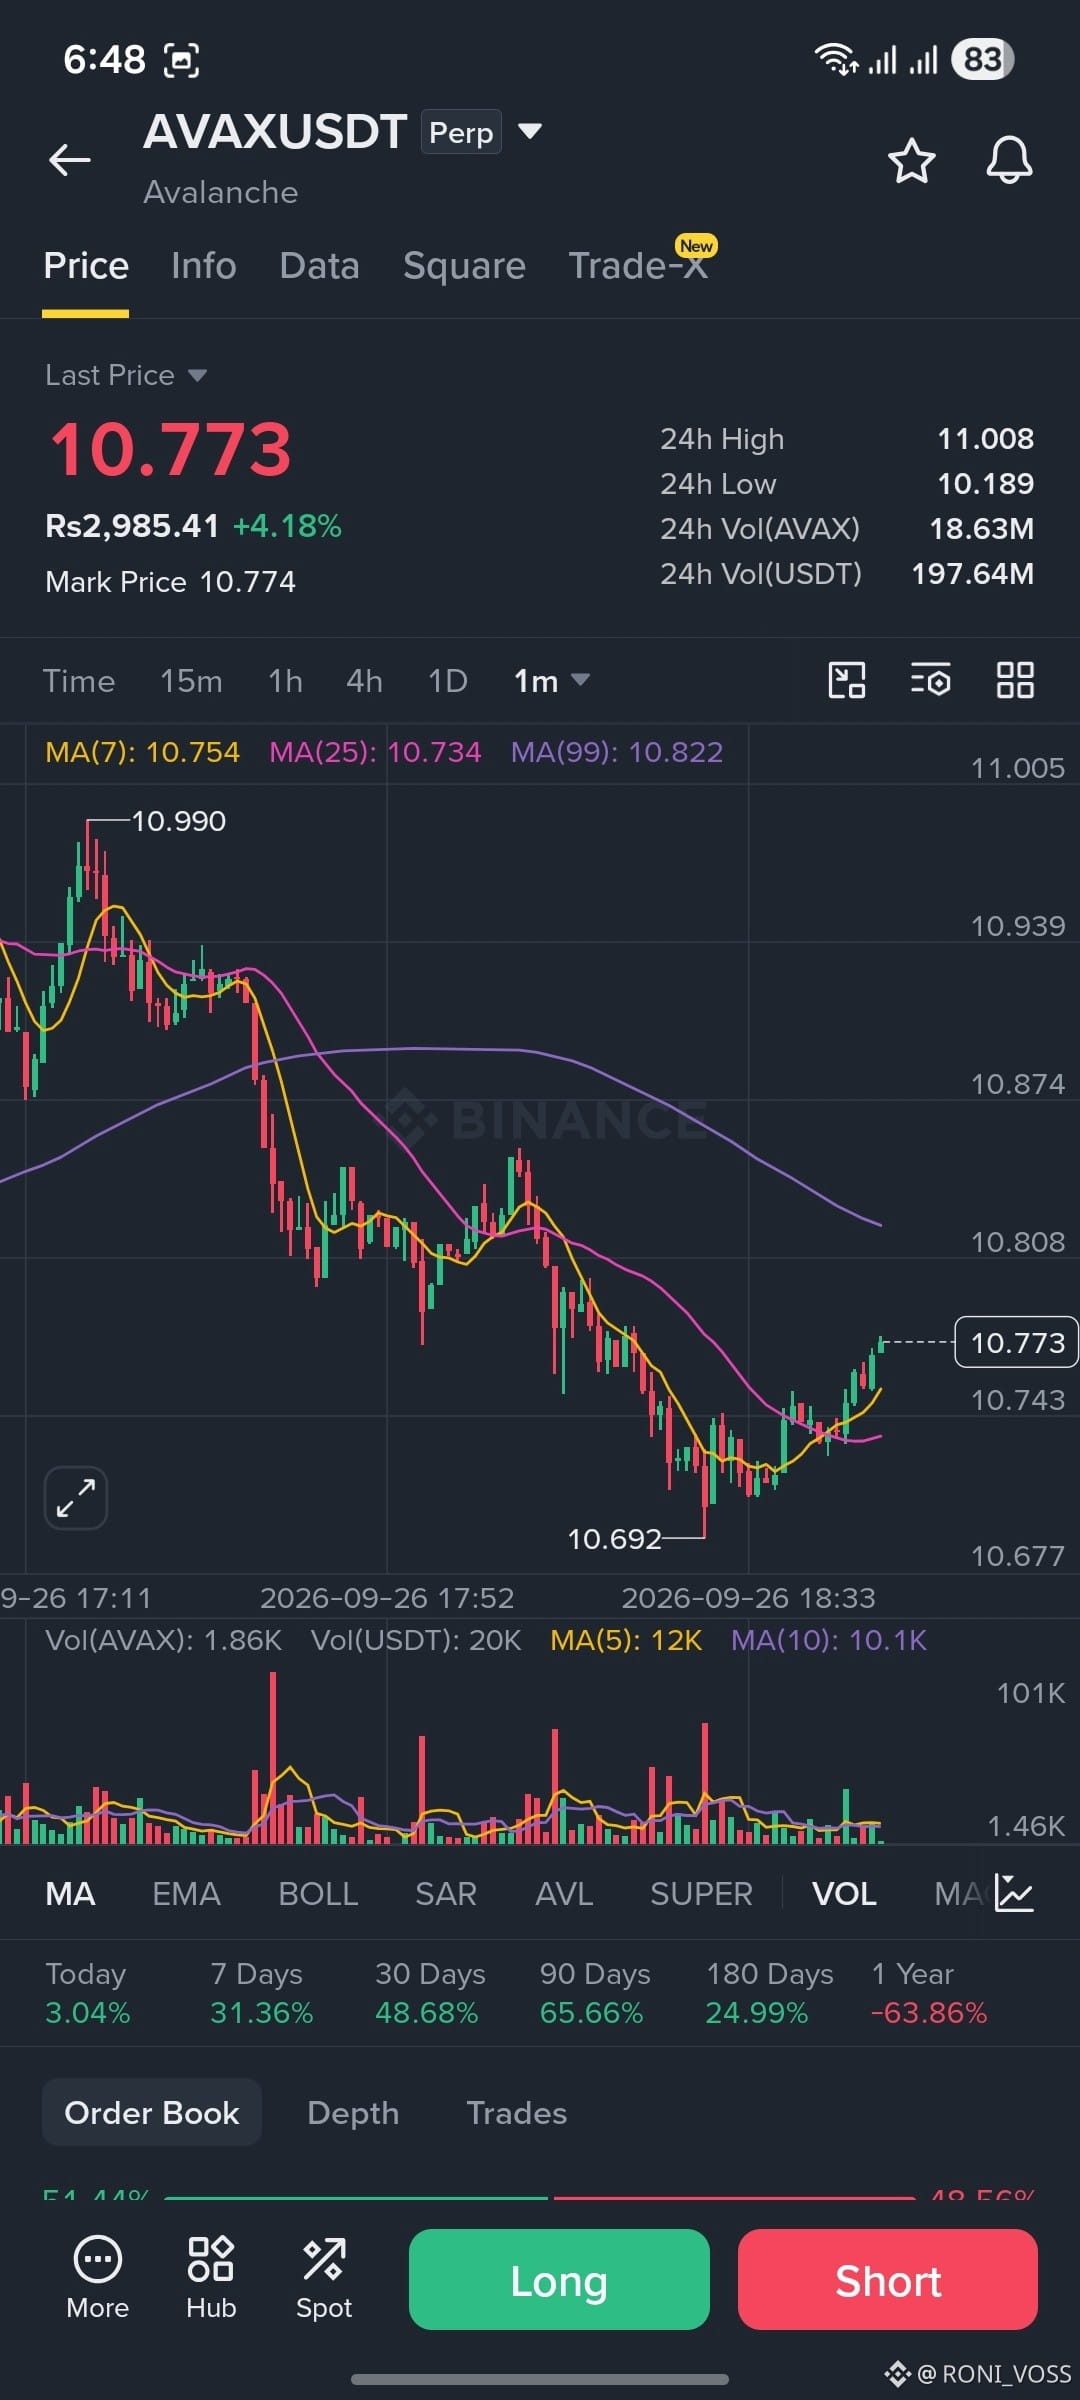
🚨🔥 $AVAX BULLISH REVERSAL IN FOCUS! 📈
Dear followers, $AVAX is showing a strong bullish reversal, with buyers attempting to rebuild momentum after the recent weakness. 👀
📍 Key Zone: $10.82 – $10.94
🎯 Upside Levels:
• $11.30
• $11.80
• $12.00
⚠️ Key Downside Level: $10.23
📊 Setup Logic:
• $10.82–$10.94 is the key recovery zone to watch.
• Holding this area could keep the bullish reversal structure active.
• A sustained move above $11.30 could bring $11.80 and $12.00 into focus.
• A break below $10.23 would weaken the current setup.
The big question: can $AVAX maintain this reversal and make a move toward the $12 level? 👀🔥📈
#CircleMints500MUSDCOnSolana #PolymarketBankFailureBetsDrawFDICConcern #BlackRockBuildsTokenizedPortfoliosForOndo #BitwiseFilesToListNEARETFOnNYSEArca #SECCommissionerPeirceToLeaveOct2
🚨🔥 $AVAX BULLISH REVERSAL IN FOCUS! 📈
Dear followers, $AVAX is showing a strong bullish reversal, with buyers attempting to rebuild momentum after the recent weakness. 👀
📍 Key Zone: $10.82 – $10.94
🎯 Upside Levels:
• $11.30
• $11.80
• $12.00
⚠️ Key Downside Level: $10.23
📊 Setup Logic:
• $10.82–$10.94 is the key recovery zone to watch.
• Holding this area could keep the bullish reversal structure active.
• A sustained move above $11.30 could bring $11.80 and $12.00 into focus.
• A break below $10.23 would weaken the current setup.
The big question: can $AVAX maintain this reversal and make a move toward the $12 level? 👀🔥📈
#CircleMints500MUSDCOnSolana #PolymarketBankFailureBetsDrawFDICConcern #BlackRockBuildsTokenizedPortfoliosForOndo #BitwiseFilesToListNEARETFOnNYSEArca #SECCommissionerPeirceToLeaveOct2
Dear followers, $AVAX is showing a strong bullish reversal, with buyers attempting to rebuild momentum after the recent weakness. 👀
📍 Key Zone: $10.82 – $10.94
🎯 Upside Levels:
• $11.30
• $11.80
• $12.00
⚠️ Key Downside Level: $10.23
📊 Setup Logic:
• $10.82–$10.94 is the key recovery zone to watch.
• Holding this area could keep the bullish reversal structure active.
• A sustained move above $11.30 could bring $11.80 and $12.00 into focus.
• A break below $10.23 would weaken the current setup.
The big question: can $AVAX maintain this reversal and make a move toward the $12 level? 👀🔥📈
#CircleMints500MUSDCOnSolana #PolymarketBankFailureBetsDrawFDICConcern #BlackRockBuildsTokenizedPortfoliosForOndo #BitwiseFilesToListNEARETFOnNYSEArca #SECCommissionerPeirceToLeaveOct2
30
Log in to explore more content
Join global crypto users on Binance Square
⚡️ Get latest and useful information about crypto.
💬 Trusted by the world’s largest crypto exchange.
👍 Discover real insights from verified creators.
Email / Phone number