

DirecK _Black
6.1k Posts

DirecK _Black
Report
Block User
Living life, one goal at a time.
Open Trade
Frequent Trader
7.9 Months
59 Following
13.2K+ Followers
6.1K+ Liked
Posts
Portfolio
All
Quotes
Live
·
--
Bullish
$MOVR is showing a SHORT rejection setup after a massive vertical breakout and a rejection from the 3.0912 high. Buyers remain aggressive, but the sharp wick and pullback toward 2.90 show sellers defending the upper liquidity zone.
EP: $2.98–$3.06
TP1: $2.82
TP2: $2.71
TP3: $2.50
SL: $3.14
The key liquidity sits above the recent 3.0912 high; a retest into $2.98–$3.06 followed by rejection would support the short setup. If price instead breaks and holds above 3.0912, the rejection thesis is invalidated, so the stop should remain above the recent high. Because MOVR has already made an extreme move, avoiding a market-entry chase and waiting for the rejection/retest gives a more controlled risk-to-reward setup.
{spot}(MOVRUSDT)
$CT
{future}(CTUSDT)
$NOM
{spot}(NOMUSDT)
$MOVR is showing a SHORT rejection setup after a massive vertical breakout and a rejection from the 3.0912 high. Buyers remain aggressive, but the sharp wick and pullback toward 2.90 show sellers defending the upper liquidity zone.
EP: $2.98–$3.06
TP1: $2.82
TP2: $2.71
TP3: $2.50
SL: $3.14
The key liquidity sits above the recent 3.0912 high; a retest into $2.98–$3.06 followed by rejection would support the short setup. If price instead breaks and holds above 3.0912, the rejection thesis is invalidated, so the stop should remain above the recent high. Because MOVR has already made an extreme move, avoiding a market-entry chase and waiting for the rejection/retest gives a more controlled risk-to-reward setup.
$CT
$NOM
EP: $2.98–$3.06
TP1: $2.82
TP2: $2.71
TP3: $2.50
SL: $3.14
The key liquidity sits above the recent 3.0912 high; a retest into $2.98–$3.06 followed by rejection would support the short setup. If price instead breaks and holds above 3.0912, the rejection thesis is invalidated, so the stop should remain above the recent high. Because MOVR has already made an extreme move, avoiding a market-entry chase and waiting for the rejection/retest gives a more controlled risk-to-reward setup.
$CT
$NOM
$CT💖
$NOM💚
$MOVR❤️
14 hr(s) left
2.6k
·
--
Bullish
$ARK is showing a pullback LONG setup after a powerful 4H breakout from the previous consolidation range. Price has already made a major move from the $0.24 area toward the $0.3962 high, so chasing at the top carries higher risk. A controlled retracement into the breakout zone offers a more realistic entry.
EP: $0.355–$0.365
TP1: $0.385
TP2: $0.396
TP3: $0.408
SL: $0.342
The recent breakout swept liquidity above the previous $0.30 resistance and buyers showed strong momentum, but the rejection near $0.3962 indicates sellers are active around the recent high. The $0.355–$0.365 area is the key pullback zone; holding it would keep the bullish structure intact and provide a better risk/reward setup. If $0.342 breaks decisively, the setup is invalidated and deeper retracement risk increases.
{spot}(ARKUSDT)
$AGT
{future}(AGTUSDT)
$MOVR
{future}(MOVRUSDT)
$ARK is showing a pullback LONG setup after a powerful 4H breakout from the previous consolidation range. Price has already made a major move from the $0.24 area toward the $0.3962 high, so chasing at the top carries higher risk. A controlled retracement into the breakout zone offers a more realistic entry.
EP: $0.355–$0.365
TP1: $0.385
TP2: $0.396
TP3: $0.408
SL: $0.342
The recent breakout swept liquidity above the previous $0.30 resistance and buyers showed strong momentum, but the rejection near $0.3962 indicates sellers are active around the recent high. The $0.355–$0.365 area is the key pullback zone; holding it would keep the bullish structure intact and provide a better risk/reward setup. If $0.342 breaks decisively, the setup is invalidated and deeper retracement risk increases.
$AGT
$MOVR
EP: $0.355–$0.365
TP1: $0.385
TP2: $0.396
TP3: $0.408
SL: $0.342
The recent breakout swept liquidity above the previous $0.30 resistance and buyers showed strong momentum, but the rejection near $0.3962 indicates sellers are active around the recent high. The $0.355–$0.365 area is the key pullback zone; holding it would keep the bullish structure intact and provide a better risk/reward setup. If $0.342 breaks decisively, the setup is invalidated and deeper retracement risk increases.
$AGT
$MOVR
$AGT♥️
10%
$ARK ❤️
37%
$MOVR💚
53%
49 votes • Voting closed
1
3.5k
·
--
Bullish
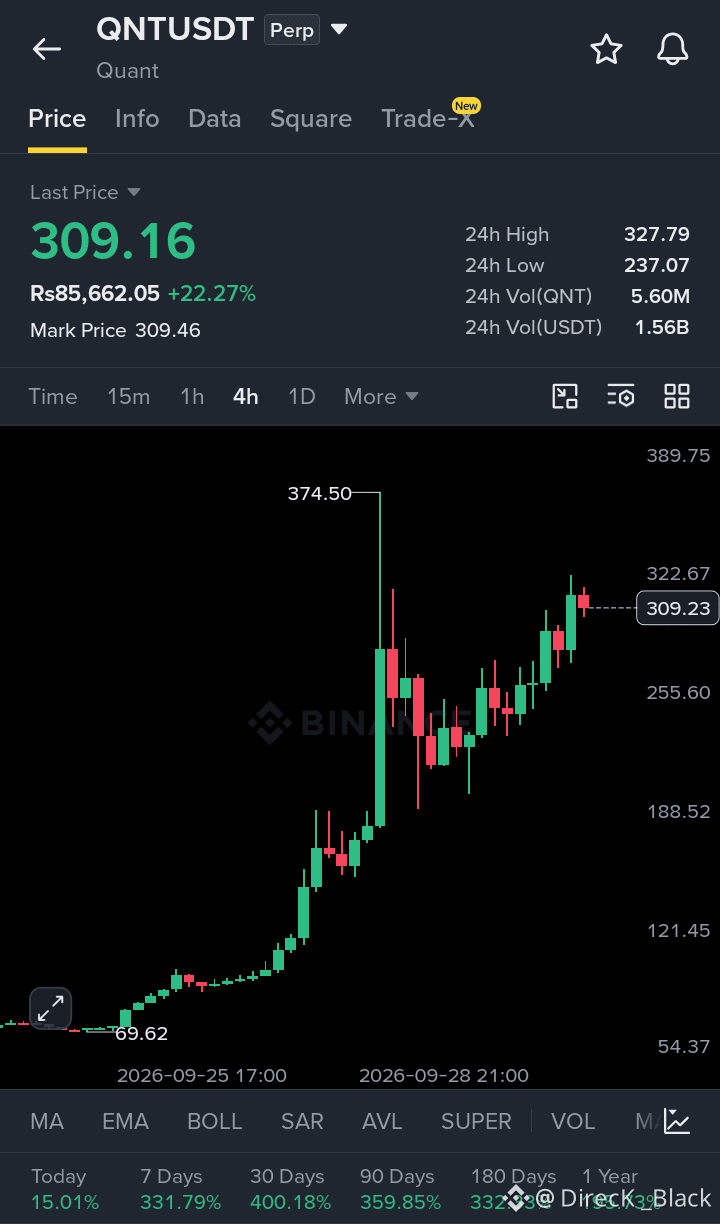
$QNT is showing a pullback LONG setup after a sharp breakout and consolidation recovery. Buyers remain in control, but price is close to the $323–$328 resistance/liquidity zone, so chasing the current move carries higher risk.
EP: $292–$300
TP1: $323
TP2: $340
TP3: $360
SL: $280
The key liquidity zone is around the recent $327.79 high; a pullback into $292–$300 would retest the breakout structure. A 4H close below $280 would weaken the bullish structure and invalidate this setup
{spot}(QNTUSDT)
#QNTRises287% #BitgetHotWalletBreachTiedToThirdPartySecurityFlaw $YB
{spot}(YBUSDT)
#AltcoinSeasonIndexHoldsAbove60For5Days #KospiPostsWorstQuarterSince2020 #SECToClarifyOnChainFundraisingRules
$QNT is showing a pullback LONG setup after a sharp breakout and consolidation recovery. Buyers remain in control, but price is close to the $323–$328 resistance/liquidity zone, so chasing the current move carries higher risk.
EP: $292–$300
TP1: $323
TP2: $340
TP3: $360
SL: $280
The key liquidity zone is around the recent $327.79 high; a pullback into $292–$300 would retest the breakout structure. A 4H close below $280 would weaken the bullish structure and invalidate this setup
#QNTRises287% #BitgetHotWalletBreachTiedToThirdPartySecurityFlaw $YB
#AltcoinSeasonIndexHoldsAbove60For5Days #KospiPostsWorstQuarterSince2020 #SECToClarifyOnChainFundraisingRules
EP: $292–$300
TP1: $323
TP2: $340
TP3: $360
SL: $280
The key liquidity zone is around the recent $327.79 high; a pullback into $292–$300 would retest the breakout structure. A 4H close below $280 would weaken the bullish structure and invalidate this setup
#QNTRises287% #BitgetHotWalletBreachTiedToThirdPartySecurityFlaw $YB
#AltcoinSeasonIndexHoldsAbove60For5Days #KospiPostsWorstQuarterSince2020 #SECToClarifyOnChainFundraisingRules
306
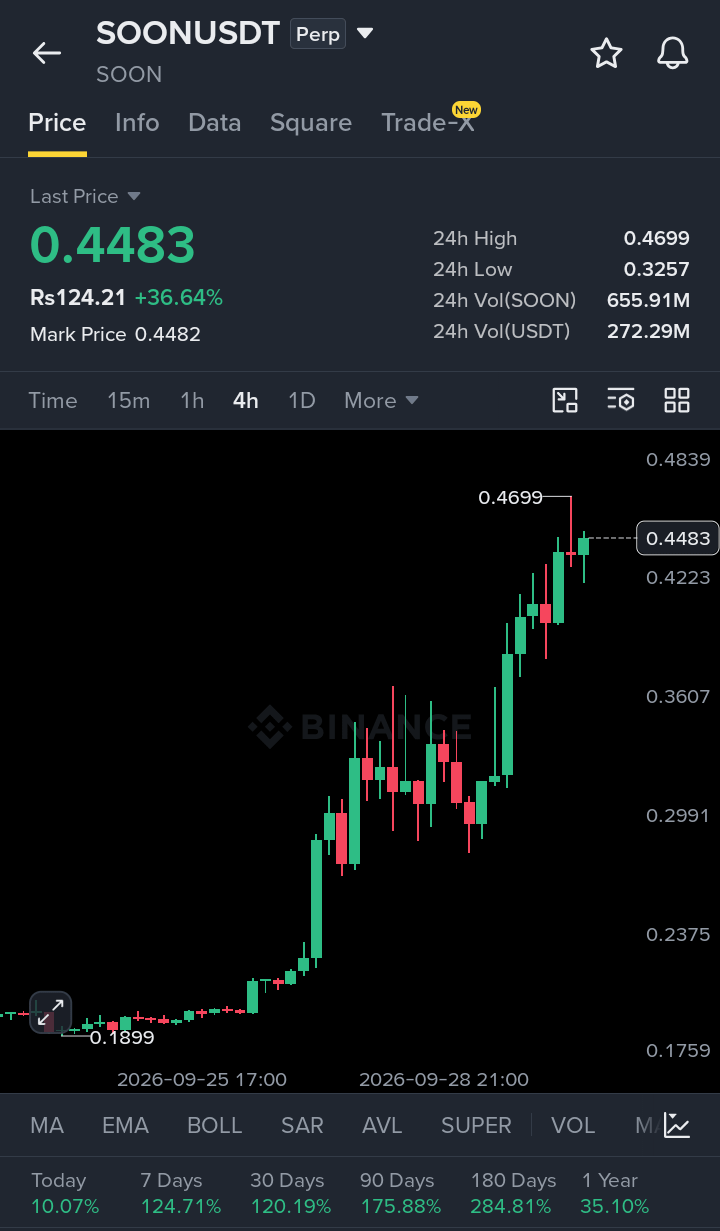
$SOON is showing a pullback LONG setup after a vertical breakout from the $0.30 area. Buyers are clearly aggressive, but the $0.4699 high is immediate resistance, making a retracement preferable to chasing the pump.
EP: $0.415–$0.425
TP1: $0.450
TP2: $0.470
TP3: $0.483
SL: $0.395
The $0.40–$0.42 region is the nearest meaningful liquidity/retest zone after the breakout. If price loses $0.395 on a 4H basis, the recent breakout structure is no longer holding and the long setup is invalidated.
{alpha}(560xb9e1fd5a02d3a33b25a14d661414e6ed6954a721)
#SECToClarifyOnChainFundraisingRules #UKFCAOpensCryptoFirmAuthorization
$JUP #AltcoinSeasonIndexHoldsAbove60For5Days #KospiPostsWorstQuarterSince2020
{spot}(JUPUSDT)
$HOT
{spot}(HOTUSDT)
$SOON is showing a pullback LONG setup after a vertical breakout from the $0.30 area. Buyers are clearly aggressive, but the $0.4699 high is immediate resistance, making a retracement preferable to chasing the pump.
EP: $0.415–$0.425
TP1: $0.450
TP2: $0.470
TP3: $0.483
SL: $0.395
The $0.40–$0.42 region is the nearest meaningful liquidity/retest zone after the breakout. If price loses $0.395 on a 4H basis, the recent breakout structure is no longer holding and the long setup is invalidated.
#SECToClarifyOnChainFundraisingRules #UKFCAOpensCryptoFirmAuthorization
$JUP #AltcoinSeasonIndexHoldsAbove60For5Days #KospiPostsWorstQuarterSince2020
$HOT
EP: $0.415–$0.425
TP1: $0.450
TP2: $0.470
TP3: $0.483
SL: $0.395
The $0.40–$0.42 region is the nearest meaningful liquidity/retest zone after the breakout. If price loses $0.395 on a 4H basis, the recent breakout structure is no longer holding and the long setup is invalidated.
#SECToClarifyOnChainFundraisingRules #UKFCAOpensCryptoFirmAuthorization
$JUP #AltcoinSeasonIndexHoldsAbove60For5Days #KospiPostsWorstQuarterSince2020
$HOT
67
·
--
Bullish
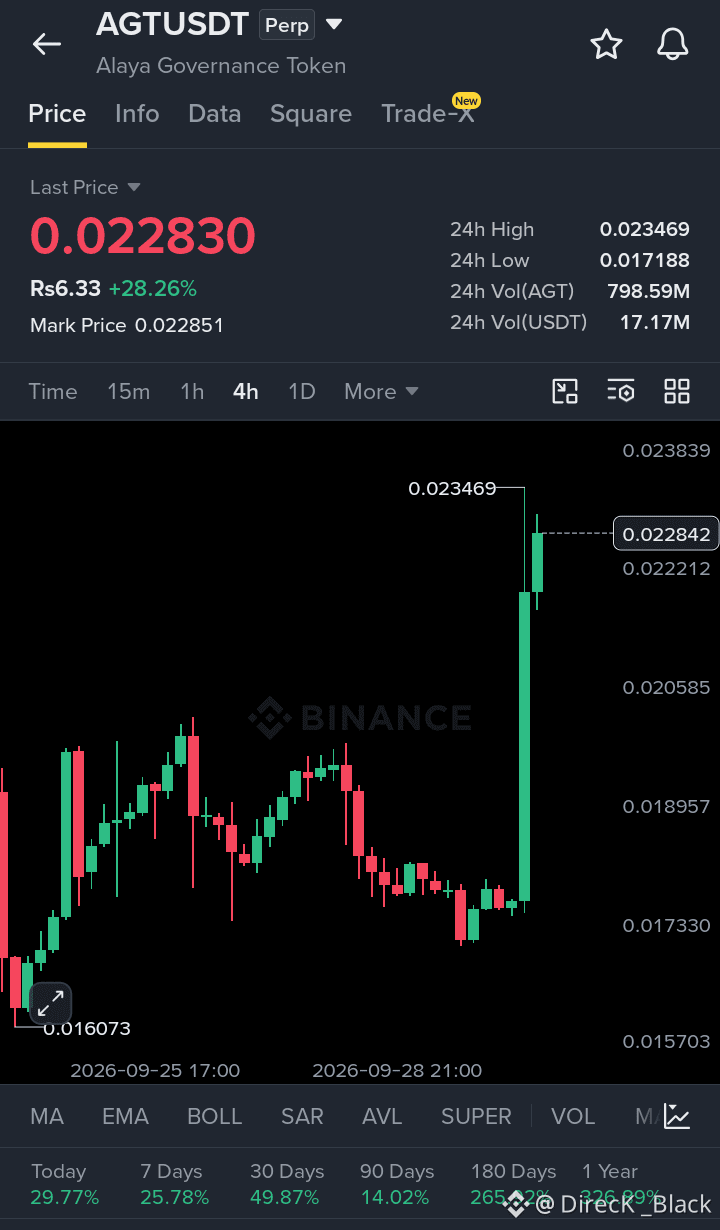
$AGT is showing a breakout-retest LONG setup after an explosive move through the prior $0.0205 resistance area. Sellers have already reacted near $0.02347, so the cleaner entry is a controlled pullback rather than buying the current candle.
EP: $0.02180–$0.02220
TP1: $0.02340
TP2: $0.02450
TP3: $0.02600
SL: $0.02050
The $0.0218–$0.0222 zone should act as the breakout-retest area, while $0.02347 is the immediate liquidity high. A sustained move below $0.02050 would invalidate the breakout structure and materially increase downside risk.
{future}(AGTUSDT)
#AltcoinSeasonIndexHoldsAbove60For5Days #KospiPostsWorstQuarterSince2020 #SECToClarifyOnChainFundraisingRules #JapanMOFStudyGroupOnTokenizedGovtBonds #QNTRises287%
$AGT is showing a breakout-retest LONG setup after an explosive move through the prior $0.0205 resistance area. Sellers have already reacted near $0.02347, so the cleaner entry is a controlled pullback rather than buying the current candle.
EP: $0.02180–$0.02220
TP1: $0.02340
TP2: $0.02450
TP3: $0.02600
SL: $0.02050
The $0.0218–$0.0222 zone should act as the breakout-retest area, while $0.02347 is the immediate liquidity high. A sustained move below $0.02050 would invalidate the breakout structure and materially increase downside risk.
#AltcoinSeasonIndexHoldsAbove60For5Days #KospiPostsWorstQuarterSince2020 #SECToClarifyOnChainFundraisingRules #JapanMOFStudyGroupOnTokenizedGovtBonds #QNTRises287%
EP: $0.02180–$0.02220
TP1: $0.02340
TP2: $0.02450
TP3: $0.02600
SL: $0.02050
The $0.0218–$0.0222 zone should act as the breakout-retest area, while $0.02347 is the immediate liquidity high. A sustained move below $0.02050 would invalidate the breakout structure and materially increase downside risk.
#AltcoinSeasonIndexHoldsAbove60For5Days #KospiPostsWorstQuarterSince2020 #SECToClarifyOnChainFundraisingRules #JapanMOFStudyGroupOnTokenizedGovtBonds #QNTRises287%
128
·
--
Bullish
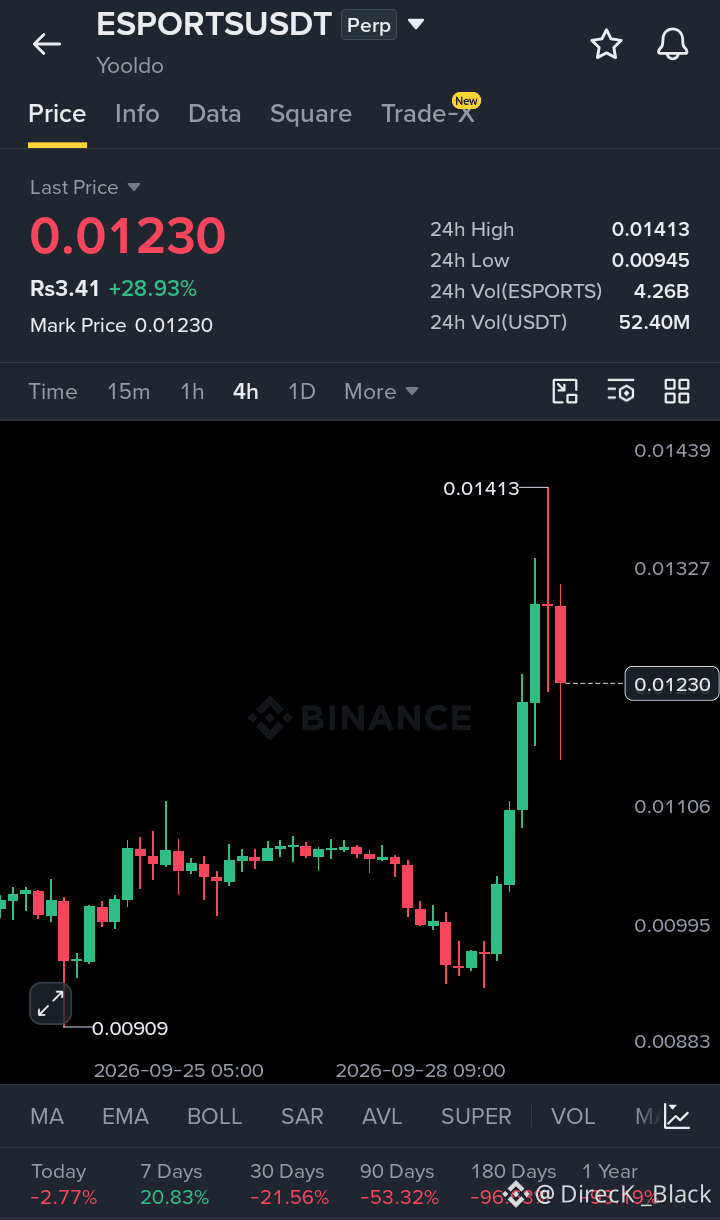
$ESPORTS is showing a pullback/rejection short setup after a sharp breakout from the $0.0095 area into $0.01413, followed by strong selling pressure.
Buyers still have the broader momentum, but the rejection near the recent high suggests short-term liquidity is being taken above $0.0140 before a retracement. Current derivatives data also shows meaningful open interest and positive funding, increasing the importance of avoiding a blind long after the pump.
EP: $0.01260–$0.01295
TP1: $0.01110
TP2: $0.01000
TP3: $0.00950
SL: $0.01345
The key liquidity zone is $0.0132–$0.01413; a failed reclaim of this area supports the short structure, while $0.01110 is the first major pullback level. The setup is invalidated if price decisively reclaims $0.01345 and holds above it; the targets are based on existing chart support rather than an extreme downside projection.
{future}(ESPORTSUSDT)
$ESPORTS is showing a pullback/rejection short setup after a sharp breakout from the $0.0095 area into $0.01413, followed by strong selling pressure.
Buyers still have the broader momentum, but the rejection near the recent high suggests short-term liquidity is being taken above $0.0140 before a retracement. Current derivatives data also shows meaningful open interest and positive funding, increasing the importance of avoiding a blind long after the pump.
EP: $0.01260–$0.01295
TP1: $0.01110
TP2: $0.01000
TP3: $0.00950
SL: $0.01345
The key liquidity zone is $0.0132–$0.01413; a failed reclaim of this area supports the short structure, while $0.01110 is the first major pullback level. The setup is invalidated if price decisively reclaims $0.01345 and holds above it; the targets are based on existing chart support rather than an extreme downside projection.
Buyers still have the broader momentum, but the rejection near the recent high suggests short-term liquidity is being taken above $0.0140 before a retracement. Current derivatives data also shows meaningful open interest and positive funding, increasing the importance of avoiding a blind long after the pump.
EP: $0.01260–$0.01295
TP1: $0.01110
TP2: $0.01000
TP3: $0.00950
SL: $0.01345
The key liquidity zone is $0.0132–$0.01413; a failed reclaim of this area supports the short structure, while $0.01110 is the first major pullback level. The setup is invalidated if price decisively reclaims $0.01345 and holds above it; the targets are based on existing chart support rather than an extreme downside projection.
321
·
--
Bullish
$OG is showing a short-on-rejection setup after a sharp 4H breakout and nearly 40% 24H rally. Price is trading near $0.3488 after touching the $0.3550 high, so chasing the pump here carries elevated risk. Buyers remain aggressive, but the $0.345–$0.355 area is now the key zone where sellers could step in.
The preferred setup is to wait for a clear rejection from the resistance zone rather than entering blindly. The previous breakout around $0.333 is the first important support, while $0.305 is the next major structure level.
EP: $0.345–$0.352
TP1: $0.326
TP2: $0.305
TP3: $0.286
SL: $0.361
The recent move swept liquidity above the previous consolidation and pushed rapidly through $0.30 and $0.33, leaving the market extended. A rejection below $0.355 followed by weakness under $0.333 would support the pullback setup. If OG instead holds above $0.355 and breaks $0.361 with strong buying volume, the short thesis is invalidated and chasing should be avoided until a new structure forms.
{spot}(OGUSDT)
$ESPORTS
{alpha}(560xf39e4b21c84e737df08e2c3b32541d856f508e48)
$CELO
{spot}(CELOUSDT)
$OG is showing a short-on-rejection setup after a sharp 4H breakout and nearly 40% 24H rally. Price is trading near $0.3488 after touching the $0.3550 high, so chasing the pump here carries elevated risk. Buyers remain aggressive, but the $0.345–$0.355 area is now the key zone where sellers could step in.
The preferred setup is to wait for a clear rejection from the resistance zone rather than entering blindly. The previous breakout around $0.333 is the first important support, while $0.305 is the next major structure level.
EP: $0.345–$0.352
TP1: $0.326
TP2: $0.305
TP3: $0.286
SL: $0.361
The recent move swept liquidity above the previous consolidation and pushed rapidly through $0.30 and $0.33, leaving the market extended. A rejection below $0.355 followed by weakness under $0.333 would support the pullback setup. If OG instead holds above $0.355 and breaks $0.361 with strong buying volume, the short thesis is invalidated and chasing should be avoided until a new structure forms.
$ESPORTS
$CELO
The preferred setup is to wait for a clear rejection from the resistance zone rather than entering blindly. The previous breakout around $0.333 is the first important support, while $0.305 is the next major structure level.
EP: $0.345–$0.352
TP1: $0.326
TP2: $0.305
TP3: $0.286
SL: $0.361
The recent move swept liquidity above the previous consolidation and pushed rapidly through $0.30 and $0.33, leaving the market extended. A rejection below $0.355 followed by weakness under $0.333 would support the pullback setup. If OG instead holds above $0.355 and breaks $0.361 with strong buying volume, the short thesis is invalidated and chasing should be avoided until a new structure forms.
$ESPORTS
$CELO
Bulleh💚
57%
Banter❤️
43%
7 votes • Voting closed
2
1.1k
·
--
Bullish
$NMR is showing a rejection-based SHORT setup after a sharp 4H pump into the $15.50 liquidity zone. The long upper wick and red reaction candle suggest sellers stepped in aggressively, while $14.40–$15.50 remains the key supply area.
EP: $14.00–$14.35
TP1: $13.05
TP2: $12.00
TP3: $11.65
SL: $15.65
The recent move swept above the prior resistance and left liquidity around $15.50, so chasing LONG here carries elevated pullback risk. The setup becomes invalid if price reclaims and holds above $15.50; if NMR fails to bounce into the entry zone, it is better to wait rather than chase the current move.
{spot}(NMRUSDT)
$MARSCOIN
{spot}(MARSCOINUSDT)
$ALGO
{spot}(ALGOUSDT)
$NMR is showing a rejection-based SHORT setup after a sharp 4H pump into the $15.50 liquidity zone. The long upper wick and red reaction candle suggest sellers stepped in aggressively, while $14.40–$15.50 remains the key supply area.
EP: $14.00–$14.35
TP1: $13.05
TP2: $12.00
TP3: $11.65
SL: $15.65
The recent move swept above the prior resistance and left liquidity around $15.50, so chasing LONG here carries elevated pullback risk. The setup becomes invalid if price reclaims and holds above $15.50; if NMR fails to bounce into the entry zone, it is better to wait rather than chase the current move.
$MARSCOIN
$ALGO
EP: $14.00–$14.35
TP1: $13.05
TP2: $12.00
TP3: $11.65
SL: $15.65
The recent move swept above the prior resistance and left liquidity around $15.50, so chasing LONG here carries elevated pullback risk. The setup becomes invalid if price reclaims and holds above $15.50; if NMR fails to bounce into the entry zone, it is better to wait rather than chase the current move.
$MARSCOIN
$ALGO
Bulllesh❤️
67%
Bantar 💚
33%
12 votes • Voting closed
1
371
·
--
Bullish
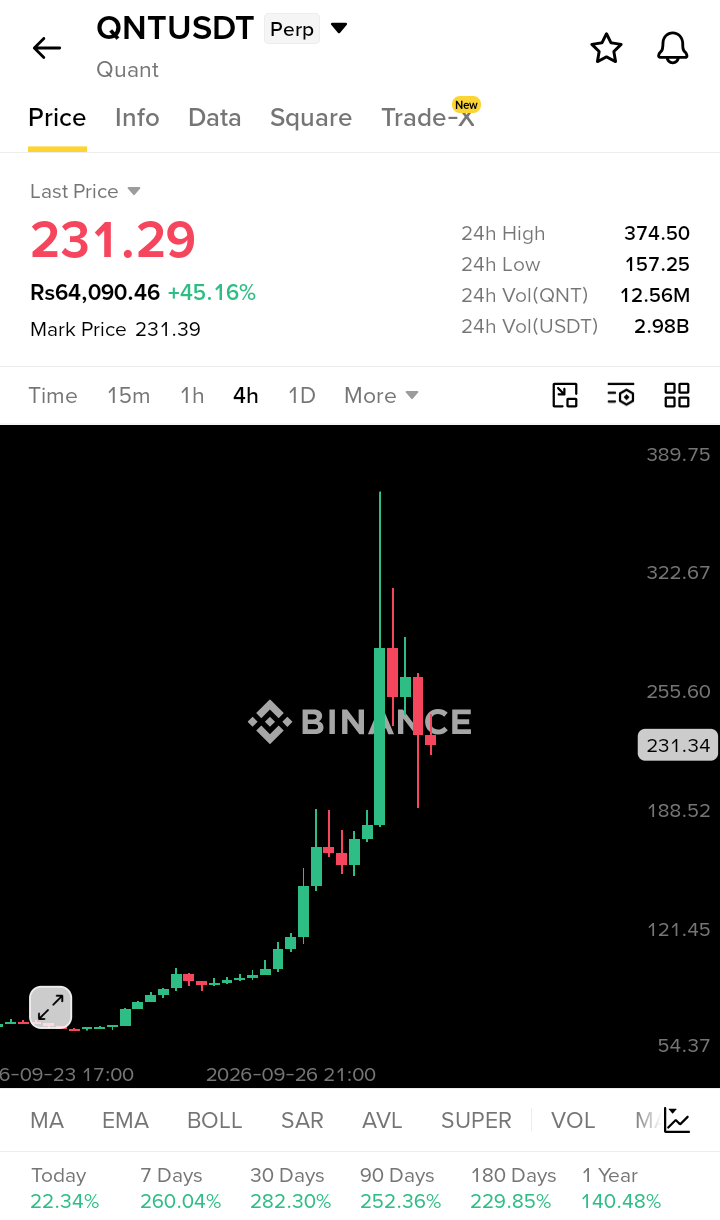
$QNT is showing a short-term rejection setup after a parabolic liquidity sweep above $350. The 4H chart shows aggressive profit-taking from the $374.50 area, while price is now consolidating below the $255–260 resistance zone.
EP: $248–$258
TP1: $225
TP2: $205
TP3: $190
SL: $276
The key liquidity sits above $255–260 and around the previous $350+ spike; a rejection there could expose the $225 and $205 areas, with the $188–190 zone acting as major support. This setup is invalidated by a sustained 4H close above $276, which would show sellers are failing to defend the post-pump structure. QNT's extreme recent volatility and >300% weekly move make chasing the current price particularly risky.
{spot}(QNTUSDT)
$MARSCOIN
{spot}(MARSCOINUSDT)
$HBAR
{spot}(HBARUSDT)
$QNT is showing a short-term rejection setup after a parabolic liquidity sweep above $350. The 4H chart shows aggressive profit-taking from the $374.50 area, while price is now consolidating below the $255–260 resistance zone.
EP: $248–$258
TP1: $225
TP2: $205
TP3: $190
SL: $276
The key liquidity sits above $255–260 and around the previous $350+ spike; a rejection there could expose the $225 and $205 areas, with the $188–190 zone acting as major support. This setup is invalidated by a sustained 4H close above $276, which would show sellers are failing to defend the post-pump structure. QNT's extreme recent volatility and >300% weekly move make chasing the current price particularly risky.
$MARSCOIN
$HBAR
EP: $248–$258
TP1: $225
TP2: $205
TP3: $190
SL: $276
The key liquidity sits above $255–260 and around the previous $350+ spike; a rejection there could expose the $225 and $205 areas, with the $188–190 zone acting as major support. This setup is invalidated by a sustained 4H close above $276, which would show sellers are failing to defend the post-pump structure. QNT's extreme recent volatility and >300% weekly move make chasing the current price particularly risky.
$MARSCOIN
$HBAR
2k
·
--
Bullish
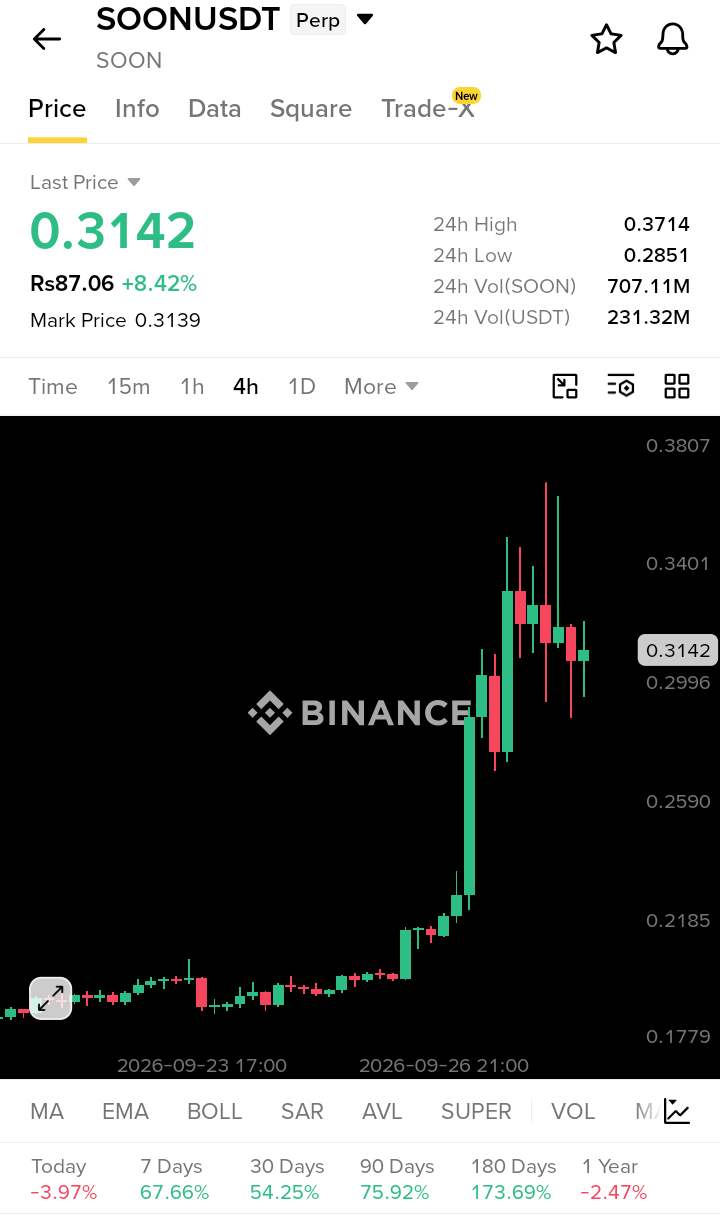
$SOON is showing a pullback-continuation setup after a sharp 4H breakout and a liquidity sweep above $0.37. The rejection from $0.3714 shows sellers defending the recent high, so chasing at $0.3292 offers weaker risk/reward; buyers need to defend the $0.298–$0.310 area.
EP: $0.300–$0.310
TP1: $0.329
TP2: $0.350
TP3: $0.369
SL: $0.286
The $0.298 area is the key nearby support and previous breakout zone, while $0.3714 is the major liquidity/high zone. A controlled pullback into the entry area followed by buyer reaction keeps the structure constructive; a 4H close below $0.286 would invalidate the setup and signal that the breakout has lost its structure. Recent historical data also confirms the unusually large acceleration from roughly $0.20 toward $0.33–$0.35, reinforcing the need to avoid chasing the move. #cz判罚 #BitwiseFilesFinalNEARSpotETFProspectus #TrumpRejectsIranHormuzReopening #SECSaysTokenBuybacksNotAutoSecurities #DogecoinETFsPostBiggestWeekSinceLaunch
{alpha}(560xb9e1fd5a02d3a33b25a14d661414e6ed6954a721)
$GRT
{spot}(GRTUSDT)
$INX
{alpha}(560x45f55b46689402583073ff227b6ac20520052a24)
$SOON is showing a pullback-continuation setup after a sharp 4H breakout and a liquidity sweep above $0.37. The rejection from $0.3714 shows sellers defending the recent high, so chasing at $0.3292 offers weaker risk/reward; buyers need to defend the $0.298–$0.310 area.
EP: $0.300–$0.310
TP1: $0.329
TP2: $0.350
TP3: $0.369
SL: $0.286
The $0.298 area is the key nearby support and previous breakout zone, while $0.3714 is the major liquidity/high zone. A controlled pullback into the entry area followed by buyer reaction keeps the structure constructive; a 4H close below $0.286 would invalidate the setup and signal that the breakout has lost its structure. Recent historical data also confirms the unusually large acceleration from roughly $0.20 toward $0.33–$0.35, reinforcing the need to avoid chasing the move. #cz判罚 #BitwiseFilesFinalNEARSpotETFProspectus #TrumpRejectsIranHormuzReopening #SECSaysTokenBuybacksNotAutoSecurities #DogecoinETFsPostBiggestWeekSinceLaunch
$GRT
$INX
EP: $0.300–$0.310
TP1: $0.329
TP2: $0.350
TP3: $0.369
SL: $0.286
The $0.298 area is the key nearby support and previous breakout zone, while $0.3714 is the major liquidity/high zone. A controlled pullback into the entry area followed by buyer reaction keeps the structure constructive; a 4H close below $0.286 would invalidate the setup and signal that the breakout has lost its structure. Recent historical data also confirms the unusually large acceleration from roughly $0.20 toward $0.33–$0.35, reinforcing the need to avoid chasing the move. #cz判罚 #BitwiseFilesFinalNEARSpotETFProspectus #TrumpRejectsIranHormuzReopening #SECSaysTokenBuybacksNotAutoSecurities #DogecoinETFsPostBiggestWeekSinceLaunch
$GRT
$INX
1
1.8k
·
--
Bullish
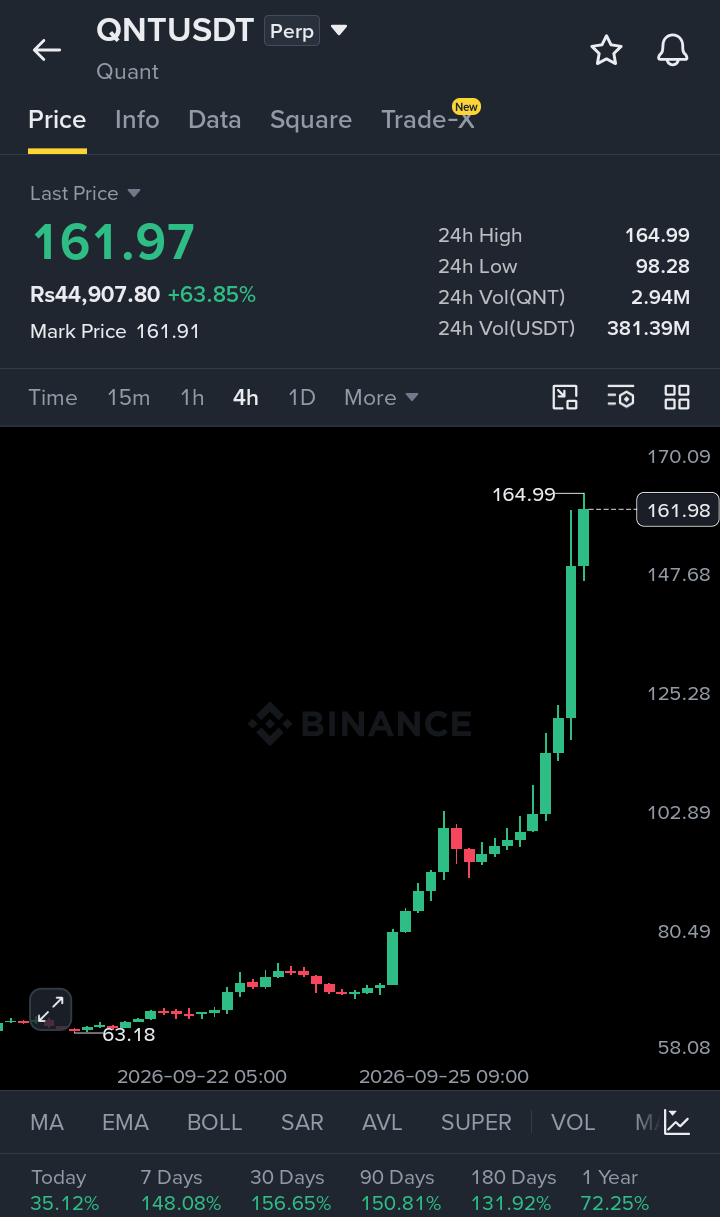
$QNT is showing a pullback/rejection setup after an aggressive breakout, with price surging from the $100 area to a 24h high near $164.99. Recent market data also confirms unusually strong expansion in QNT activity and volatility following the latest fundamental catalyst.
The 4H structure remains strongly extended, so chasing at $162+ carries poor risk/reward. The key reaction zone is $147–$152, which can act as previous breakout support; alternatively, rejection around $164–$165 could provide a short-term mean-reversion entry.
EP: $148–$153
TP1: $158
TP2: $164
TP3: $170
SL: $143
Liquidity is concentrated below the recent breakout around $147–$150, while the obvious upside liquidity sits around the $164.99 high and then above $170. A controlled pullback into the entry zone followed by buyer reaction would confirm the setup; entering immediately near $162–$165 is less attractive after such an extended move. If QNT loses $143 decisively on a 4H closing basis, the bullish pullback structure is invalidated and the setup should be abandoned.
{spot}(QNTUSDT)
$RARE
{spot}(RAREUSDT)
$Q USDT
{alpha}(560xc07e1300dc138601fa6b0b59f8d0fa477e690589)
$QNT is showing a pullback/rejection setup after an aggressive breakout, with price surging from the $100 area to a 24h high near $164.99. Recent market data also confirms unusually strong expansion in QNT activity and volatility following the latest fundamental catalyst.
The 4H structure remains strongly extended, so chasing at $162+ carries poor risk/reward. The key reaction zone is $147–$152, which can act as previous breakout support; alternatively, rejection around $164–$165 could provide a short-term mean-reversion entry.
EP: $148–$153
TP1: $158
TP2: $164
TP3: $170
SL: $143
Liquidity is concentrated below the recent breakout around $147–$150, while the obvious upside liquidity sits around the $164.99 high and then above $170. A controlled pullback into the entry zone followed by buyer reaction would confirm the setup; entering immediately near $162–$165 is less attractive after such an extended move. If QNT loses $143 decisively on a 4H closing basis, the bullish pullback structure is invalidated and the setup should be abandoned.
$RARE
$Q USDT
The 4H structure remains strongly extended, so chasing at $162+ carries poor risk/reward. The key reaction zone is $147–$152, which can act as previous breakout support; alternatively, rejection around $164–$165 could provide a short-term mean-reversion entry.
EP: $148–$153
TP1: $158
TP2: $164
TP3: $170
SL: $143
Liquidity is concentrated below the recent breakout around $147–$150, while the obvious upside liquidity sits around the $164.99 high and then above $170. A controlled pullback into the entry zone followed by buyer reaction would confirm the setup; entering immediately near $162–$165 is less attractive after such an extended move. If QNT loses $143 decisively on a 4H closing basis, the bullish pullback structure is invalidated and the setup should be abandoned.
$RARE
$Q USDT
1
4
5k
·
--
Bullish
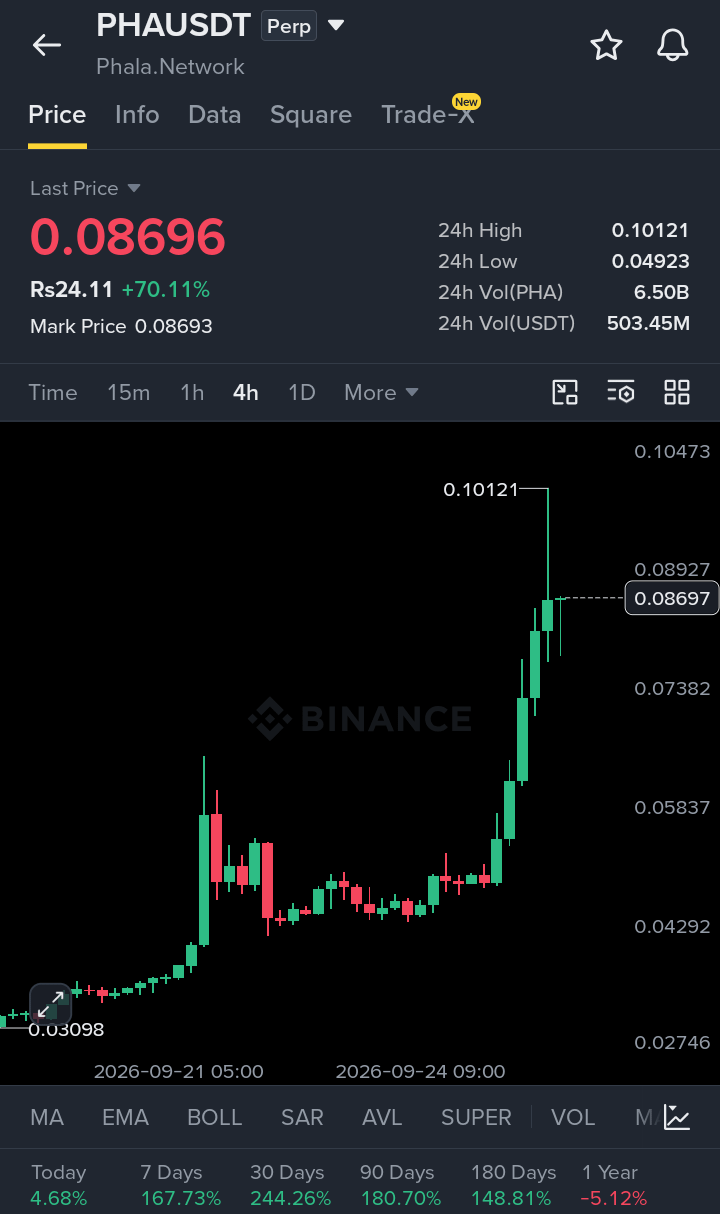
$PHA is showing a rejection/short setup after sweeping the recent $0.1012 high and failing to hold above the breakout zone.
Buyers remain aggressive, but the long upper wick signals strong selling near $0.10; a rejection around $0.089–$0.093 would favor a controlled short rather than chasing the pump.
EP: $0.089–$0.093
TP1: $0.0738
TP2: $0.0584
TP3: $0.0495
SL: $0.1028
The $0.1012 area is the key liquidity sweep, while $0.0738 is the first major structure support visible on the 4H chart. The setup is invalidated if PHA reclaims and holds above $0.1028; below the entry zone, the targets provide progressively stronger risk/reward. Current market data also shows elevated volatility and strong recent gains, supporting caution after the sharp move.
{spot}(PHAUSDT)
$龙虾
{future}(龙虾USDT)
$BTW
{alpha}(560x444045b0ee1ee319a660a5e3d604ca0ffa35acaa)
#CircleMints500MUSDCOnSolana #BlackRockBuildsTokenizedPortfoliosForOndo #SECCommissionerPeirceToLeaveOct2 #SECSaysBuybacksUpgradesDontMakeTokenSecurity #StrategyProposesDailyDividendsForPreferreds
$PHA is showing a rejection/short setup after sweeping the recent $0.1012 high and failing to hold above the breakout zone.
Buyers remain aggressive, but the long upper wick signals strong selling near $0.10; a rejection around $0.089–$0.093 would favor a controlled short rather than chasing the pump.
EP: $0.089–$0.093
TP1: $0.0738
TP2: $0.0584
TP3: $0.0495
SL: $0.1028
The $0.1012 area is the key liquidity sweep, while $0.0738 is the first major structure support visible on the 4H chart. The setup is invalidated if PHA reclaims and holds above $0.1028; below the entry zone, the targets provide progressively stronger risk/reward. Current market data also shows elevated volatility and strong recent gains, supporting caution after the sharp move.
$龙虾
$BTW
#CircleMints500MUSDCOnSolana #BlackRockBuildsTokenizedPortfoliosForOndo #SECCommissionerPeirceToLeaveOct2 #SECSaysBuybacksUpgradesDontMakeTokenSecurity #StrategyProposesDailyDividendsForPreferreds
Buyers remain aggressive, but the long upper wick signals strong selling near $0.10; a rejection around $0.089–$0.093 would favor a controlled short rather than chasing the pump.
EP: $0.089–$0.093
TP1: $0.0738
TP2: $0.0584
TP3: $0.0495
SL: $0.1028
The $0.1012 area is the key liquidity sweep, while $0.0738 is the first major structure support visible on the 4H chart. The setup is invalidated if PHA reclaims and holds above $0.1028; below the entry zone, the targets provide progressively stronger risk/reward. Current market data also shows elevated volatility and strong recent gains, supporting caution after the sharp move.
$龙虾
$BTW
#CircleMints500MUSDCOnSolana #BlackRockBuildsTokenizedPortfoliosForOndo #SECCommissionerPeirceToLeaveOct2 #SECSaysBuybacksUpgradesDontMakeTokenSecurity #StrategyProposesDailyDividendsForPreferreds
8.5k
·
--
Bullish
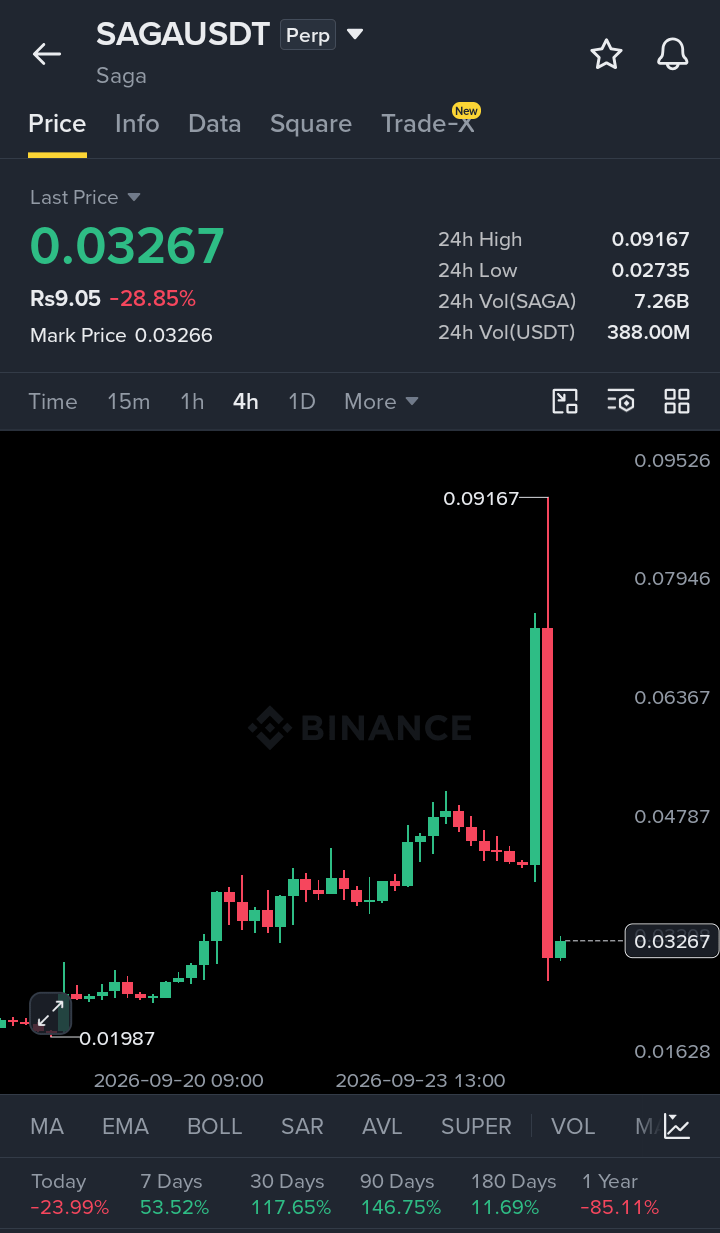
$SAGA is showing a short-on-rejection setup after a sharp vertical rally pushed price into the $0.070–$0.073 liquidity zone. Buyers remain aggressive, but the move is extended and momentum indicators are heavily overbought, making a confirmed rejection more realistic than chasing the pump.
EP: $0.0690–$0.0720
TP1: $0.0640
TP2: $0.0590
TP3: $0.0540
SL: $0.0745
The key liquidity area is around the recent $0.0704–$0.0734 highs; a sweep into this zone followed by rejection would strengthen the short structure. The setup is invalidated if price holds above $0.0745, indicating buyers have successfully absorbed the overhead supply. Risk/reward is approximately 1:1.7 to TP1, 1:3.3 to TP2, and 1:5 to TP3.
{spot}(SAGAUSDT)
$QNT
{spot}(QNTUSDT)
$ONDO
{spot}(ONDOUSDT)
#BinanceWillListHyperliquid(HYPE) #FedProposesRulesForBankIssuedStablecoins #FedOctoberRateHikeOddsRiseTo69.7% #FedOctoberRateHikeOddsRiseTo69.7% #US30YearYieldHighestSince2004
$SAGA is showing a short-on-rejection setup after a sharp vertical rally pushed price into the $0.070–$0.073 liquidity zone. Buyers remain aggressive, but the move is extended and momentum indicators are heavily overbought, making a confirmed rejection more realistic than chasing the pump.
EP: $0.0690–$0.0720
TP1: $0.0640
TP2: $0.0590
TP3: $0.0540
SL: $0.0745
The key liquidity area is around the recent $0.0704–$0.0734 highs; a sweep into this zone followed by rejection would strengthen the short structure. The setup is invalidated if price holds above $0.0745, indicating buyers have successfully absorbed the overhead supply. Risk/reward is approximately 1:1.7 to TP1, 1:3.3 to TP2, and 1:5 to TP3.
$QNT
$ONDO
#BinanceWillListHyperliquid(HYPE) #FedProposesRulesForBankIssuedStablecoins #FedOctoberRateHikeOddsRiseTo69.7% #FedOctoberRateHikeOddsRiseTo69.7% #US30YearYieldHighestSince2004
EP: $0.0690–$0.0720
TP1: $0.0640
TP2: $0.0590
TP3: $0.0540
SL: $0.0745
The key liquidity area is around the recent $0.0704–$0.0734 highs; a sweep into this zone followed by rejection would strengthen the short structure. The setup is invalidated if price holds above $0.0745, indicating buyers have successfully absorbed the overhead supply. Risk/reward is approximately 1:1.7 to TP1, 1:3.3 to TP2, and 1:5 to TP3.
$QNT
$ONDO
#BinanceWillListHyperliquid(HYPE) #FedProposesRulesForBankIssuedStablecoins #FedOctoberRateHikeOddsRiseTo69.7% #FedOctoberRateHikeOddsRiseTo69.7% #US30YearYieldHighestSince2004
2
2k
·
--
Bullish
$NOM is showing a short-term bearish rejection setup after a sharp breakout into the $0.002818 high and immediate rejection. Sellers have appeared near the breakout extreme, while $0.00270–$0.00280 is now the key resistance/liquidity zone.
EP: $0.00270–$0.00278
TP1: $0.00250
TP2: $0.00232
TP3: $0.00210
SL: $0.00290
The setup targets a pullback after an unusually extended move rather than chasing the pump. The first confirmation is rejection from $0.00270–$0.00280; a sustained move back above $0.002818 invalidates the short structure, while $0.00232 is the first important downside liquidity/support area. The displayed 24h range also shows substantial volatility, so position size should remain controlled.
{spot}(NOMUSDT)
$BTW
{future}(BTWUSDT)
$LSK
{future}(LSKUSDT)
$NOM is showing a short-term bearish rejection setup after a sharp breakout into the $0.002818 high and immediate rejection. Sellers have appeared near the breakout extreme, while $0.00270–$0.00280 is now the key resistance/liquidity zone.
EP: $0.00270–$0.00278
TP1: $0.00250
TP2: $0.00232
TP3: $0.00210
SL: $0.00290
The setup targets a pullback after an unusually extended move rather than chasing the pump. The first confirmation is rejection from $0.00270–$0.00280; a sustained move back above $0.002818 invalidates the short structure, while $0.00232 is the first important downside liquidity/support area. The displayed 24h range also shows substantial volatility, so position size should remain controlled.
$BTW
$LSK
EP: $0.00270–$0.00278
TP1: $0.00250
TP2: $0.00232
TP3: $0.00210
SL: $0.00290
The setup targets a pullback after an unusually extended move rather than chasing the pump. The first confirmation is rejection from $0.00270–$0.00280; a sustained move back above $0.002818 invalidates the short structure, while $0.00232 is the first important downside liquidity/support area. The displayed 24h range also shows substantial volatility, so position size should remain controlled.
$BTW
$LSK
Bullish
75%
Bandar
25%
8 votes • Voting closed
526
·
--
Bullish
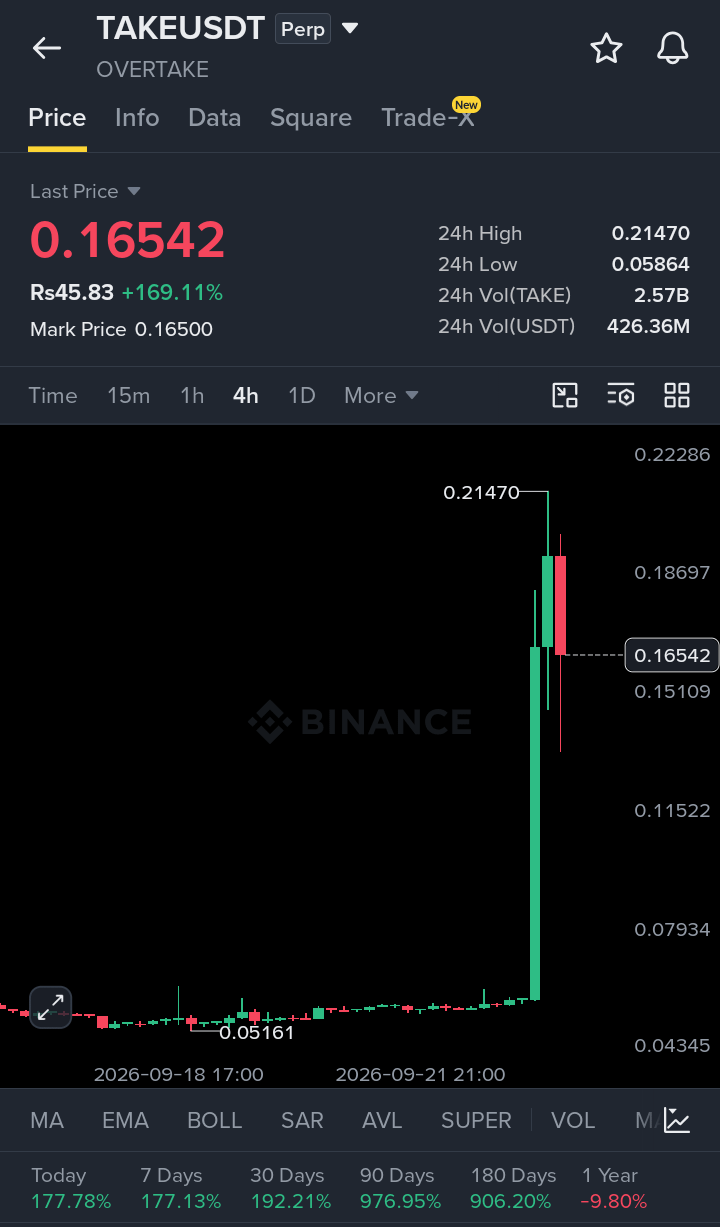
$TAKE is showing a bearish pullback/rejection setup after a sharp 4H pump into the $0.21470 high. Sellers have reacted strongly from the upper liquidity zone, while $0.1510 is the key nearby support that must hold for buyers to stabilize.
EP: $0.174–$0.181
TP1: $0.151
TP2: $0.136
TP3: $0.115
SL: $0.192
The setup targets a retest of the breakout area rather than chasing the already-extended move. The recent high at $0.21470 is major overhead liquidity, while $0.1510 and $0.1152 are visible downside structure levels; a sustained 4H reclaim above $0.192 would invalidate the short setup. Current cross-exchange data also shows TAKE trading around $0.166–$0.167 with elevated funding, supporting caution around chasing the move.
{future}(TAKEUSDT)
$MET
{spot}(METUSDT)
$ALLO
{spot}(ALLOUSDT)
$TAKE is showing a bearish pullback/rejection setup after a sharp 4H pump into the $0.21470 high. Sellers have reacted strongly from the upper liquidity zone, while $0.1510 is the key nearby support that must hold for buyers to stabilize.
EP: $0.174–$0.181
TP1: $0.151
TP2: $0.136
TP3: $0.115
SL: $0.192
The setup targets a retest of the breakout area rather than chasing the already-extended move. The recent high at $0.21470 is major overhead liquidity, while $0.1510 and $0.1152 are visible downside structure levels; a sustained 4H reclaim above $0.192 would invalidate the short setup. Current cross-exchange data also shows TAKE trading around $0.166–$0.167 with elevated funding, supporting caution around chasing the move.
$MET
$ALLO
EP: $0.174–$0.181
TP1: $0.151
TP2: $0.136
TP3: $0.115
SL: $0.192
The setup targets a retest of the breakout area rather than chasing the already-extended move. The recent high at $0.21470 is major overhead liquidity, while $0.1510 and $0.1152 are visible downside structure levels; a sustained 4H reclaim above $0.192 would invalidate the short setup. Current cross-exchange data also shows TAKE trading around $0.166–$0.167 with elevated funding, supporting caution around chasing the move.
$MET
$ALLO
2.1k
·
--
Bullish
$NIL is showing a potential short-on-rejection setup after a parabolic 4H breakout and a sweep of the recent high near $0.1145. Buyers remain aggressive, but the move is extended, so chasing LONG here carries poor risk/reward; a rejection from the $0.1120–$0.1145 liquidity zone is the more controlled setup.
EP: $0.1120–$0.1140
TP1: $0.1050
TP2: $0.1016
TP3: $0.0950
SL: $0.1185
The $0.1145 high is the immediate liquidity/resistance zone, while $0.1016 is the first important pullback support. The setup is invalidated if price establishes a 4H close above $0.1185; if $0.1120–$0.1140 breaks and holds without rejection, avoid the short rather than chasing.
{spot}(NILUSDT)
$BCH
{spot}(BCHUSDT)
$TAKE
{alpha}(560xe747e54783ba3f77a8e5251a3cba19ebe9c0e197)
$NIL is showing a potential short-on-rejection setup after a parabolic 4H breakout and a sweep of the recent high near $0.1145. Buyers remain aggressive, but the move is extended, so chasing LONG here carries poor risk/reward; a rejection from the $0.1120–$0.1145 liquidity zone is the more controlled setup.
EP: $0.1120–$0.1140
TP1: $0.1050
TP2: $0.1016
TP3: $0.0950
SL: $0.1185
The $0.1145 high is the immediate liquidity/resistance zone, while $0.1016 is the first important pullback support. The setup is invalidated if price establishes a 4H close above $0.1185; if $0.1120–$0.1140 breaks and holds without rejection, avoid the short rather than chasing.
$BCH
$TAKE
EP: $0.1120–$0.1140
TP1: $0.1050
TP2: $0.1016
TP3: $0.0950
SL: $0.1185
The $0.1145 high is the immediate liquidity/resistance zone, while $0.1016 is the first important pullback support. The setup is invalidated if price establishes a 4H close above $0.1185; if $0.1120–$0.1140 breaks and holds without rejection, avoid the short rather than chasing.
$BCH
$TAKE
$BCH✅💖
17%
$TAKE✅❤️
50%
$NIL ✅💚
33%
6 votes • Voting closed
1.4k
·
--
Bullish
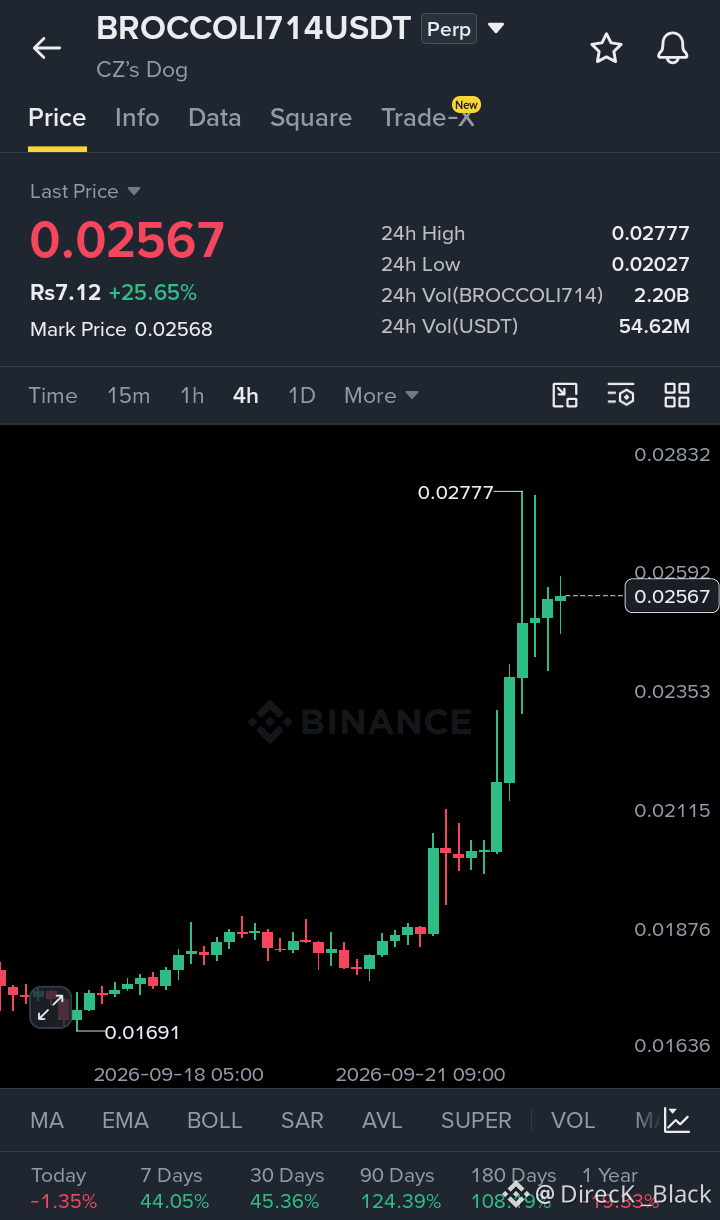
$BROCCOLI714 is showing a bullish breakout-pullback setup after a sharp 4H expansion from the $0.02027 area toward the $0.02777 high.
Buyers still control the structure, but chasing the vertical move is risky; the $0.0242–$0.0248 breakout area is the key retest zone.
EP: $0.0242–$0.0248
TP1: $0.0260
TP2: $0.0272
TP3: $0.0277
SL: $0.0234
The recent liquidity sweep below $0.021 followed by strong buying confirms demand, while $0.0277 remains the main upside liquidity. A 4H close below $0.0234 would weaken the breakout structure and invalidate this setup.#BNBMarketCapPassesBNYMellon #AIStocksWhatNext #DogecoinRises15% #TokenizedStockPlatformsCouldLaunchNextQuarter #CardanoAddedToX402KitForADAPayments
{spot}(BROCCOLI714USDT)
$BROCCOLI714 is showing a bullish breakout-pullback setup after a sharp 4H expansion from the $0.02027 area toward the $0.02777 high.
Buyers still control the structure, but chasing the vertical move is risky; the $0.0242–$0.0248 breakout area is the key retest zone.
EP: $0.0242–$0.0248
TP1: $0.0260
TP2: $0.0272
TP3: $0.0277
SL: $0.0234
The recent liquidity sweep below $0.021 followed by strong buying confirms demand, while $0.0277 remains the main upside liquidity. A 4H close below $0.0234 would weaken the breakout structure and invalidate this setup.#BNBMarketCapPassesBNYMellon #AIStocksWhatNext #DogecoinRises15% #TokenizedStockPlatformsCouldLaunchNextQuarter #CardanoAddedToX402KitForADAPayments
Buyers still control the structure, but chasing the vertical move is risky; the $0.0242–$0.0248 breakout area is the key retest zone.
EP: $0.0242–$0.0248
TP1: $0.0260
TP2: $0.0272
TP3: $0.0277
SL: $0.0234
The recent liquidity sweep below $0.021 followed by strong buying confirms demand, while $0.0277 remains the main upside liquidity. A 4H close below $0.0234 would weaken the breakout structure and invalidate this setup.#BNBMarketCapPassesBNYMellon #AIStocksWhatNext #DogecoinRises15% #TokenizedStockPlatformsCouldLaunchNextQuarter #CardanoAddedToX402KitForADAPayments
1
144
·
--
Bullish
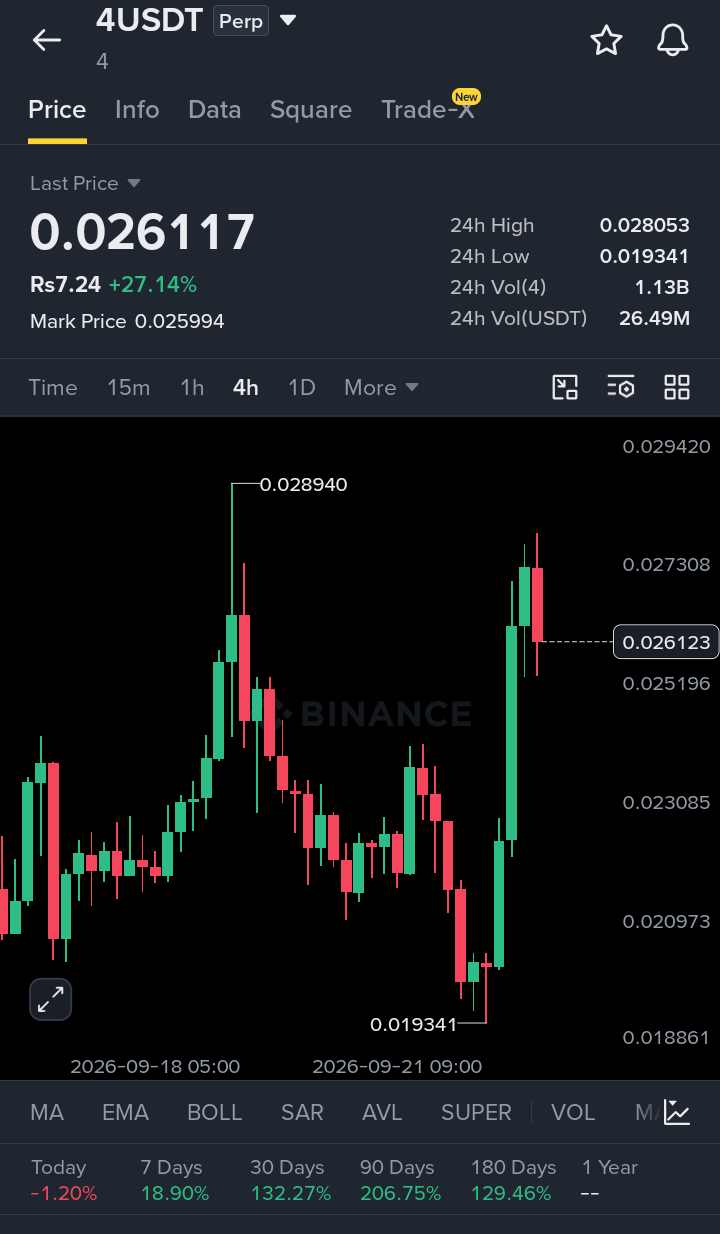
$4 is showing a bullish breakout-retest setup after reclaiming the $0.0230–$0.0240 region and pushing toward the $0.02894 swing high.
Buyers remain stronger, but the latest rejection near $0.0273 suggests waiting for a controlled pullback rather than chasing momentum.
EP: $0.0252–$0.0257
TP1: $0.0273
TP2: $0.0281
TP3: $0.0288
SL: $0.0244
The $0.0252 area can act as the first demand/retest zone after the breakout. Holding above $0.0244 keeps the higher-low structure intact; a 4H close below it invalidates the long se
{future}(4USDT)
#AIStocksWhatNext #MuseOvertakesChatGPTAsTopFreeIOSApp #StrategyAdds950Bitcoin #StrategyAdds950Bitcoin
tup.
$4 is showing a bullish breakout-retest setup after reclaiming the $0.0230–$0.0240 region and pushing toward the $0.02894 swing high.
Buyers remain stronger, but the latest rejection near $0.0273 suggests waiting for a controlled pullback rather than chasing momentum.
EP: $0.0252–$0.0257
TP1: $0.0273
TP2: $0.0281
TP3: $0.0288
SL: $0.0244
The $0.0252 area can act as the first demand/retest zone after the breakout. Holding above $0.0244 keeps the higher-low structure intact; a 4H close below it invalidates the long se
#AIStocksWhatNext #MuseOvertakesChatGPTAsTopFreeIOSApp #StrategyAdds950Bitcoin #StrategyAdds950Bitcoin
tup.
Buyers remain stronger, but the latest rejection near $0.0273 suggests waiting for a controlled pullback rather than chasing momentum.
EP: $0.0252–$0.0257
TP1: $0.0273
TP2: $0.0281
TP3: $0.0288
SL: $0.0244
The $0.0252 area can act as the first demand/retest zone after the breakout. Holding above $0.0244 keeps the higher-low structure intact; a 4H close below it invalidates the long se
#AIStocksWhatNext #MuseOvertakesChatGPTAsTopFreeIOSApp #StrategyAdds950Bitcoin #StrategyAdds950Bitcoin
tup.
195
·
--
Bullish
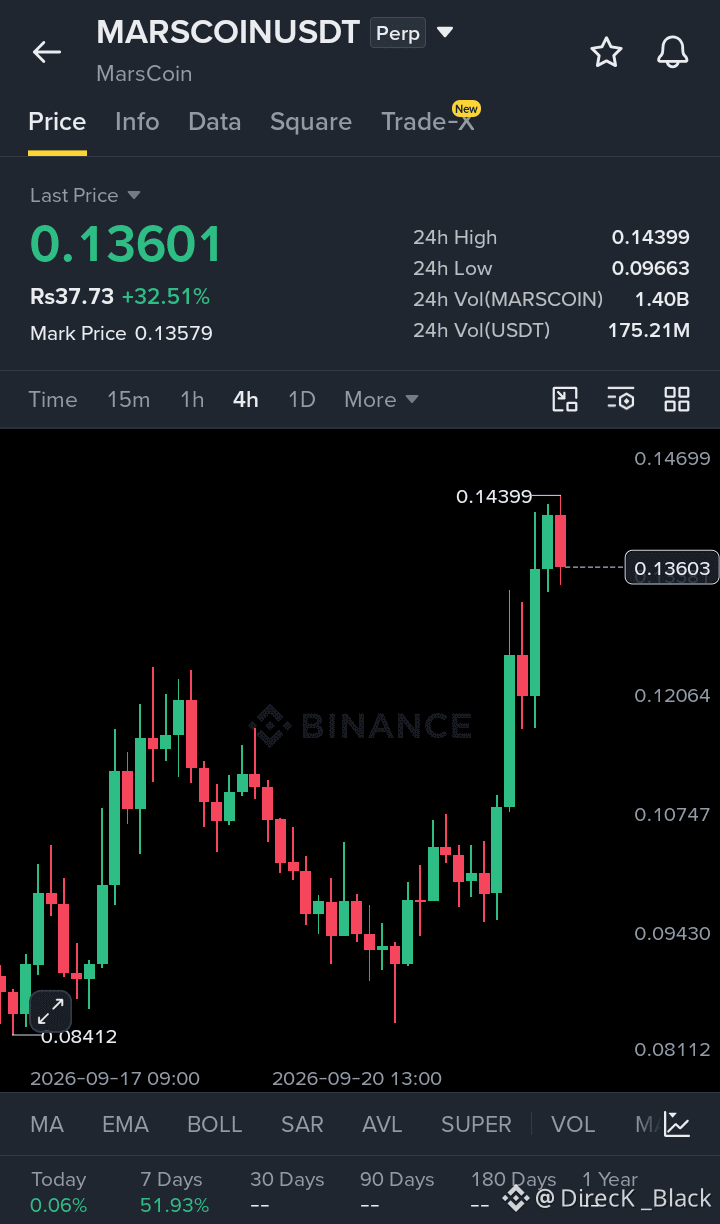
$MARSCOIN is showing a short-term rejection setup after a rapid move into the $0.14399 resistance and a visible seller reaction.
The upper wick and latest red candle suggest profit-taking near the recent high, making a rejection entry more realistic than chasing the rally.
EP: $0.1390–$0.1430
TP1: $0.1320
TP2: $0.1250
TP3: $0.1206
SL: $0.1470
The $0.1440 area contains nearby buy-side liquidity from the recent high, while $0.1320 and $0.1250 are potential pullback zones. A sustained 4H close above $0.1470 would invalidate the rejection setup.#DogecoinRises15% #AIStocksWhatNext #MuseOvertakesChatGPTAsTopFreeIOSApp #TokenizedStockPlatformsCouldLaunchNextQuarter #StrategyAdds950Bitcoin
{spot}(MARSCOINUSDT)
{spot}(AAPLBUSDT)
$MARSCOIN is showing a short-term rejection setup after a rapid move into the $0.14399 resistance and a visible seller reaction.
The upper wick and latest red candle suggest profit-taking near the recent high, making a rejection entry more realistic than chasing the rally.
EP: $0.1390–$0.1430
TP1: $0.1320
TP2: $0.1250
TP3: $0.1206
SL: $0.1470
The $0.1440 area contains nearby buy-side liquidity from the recent high, while $0.1320 and $0.1250 are potential pullback zones. A sustained 4H close above $0.1470 would invalidate the rejection setup.#DogecoinRises15% #AIStocksWhatNext #MuseOvertakesChatGPTAsTopFreeIOSApp #TokenizedStockPlatformsCouldLaunchNextQuarter #StrategyAdds950Bitcoin
The upper wick and latest red candle suggest profit-taking near the recent high, making a rejection entry more realistic than chasing the rally.
EP: $0.1390–$0.1430
TP1: $0.1320
TP2: $0.1250
TP3: $0.1206
SL: $0.1470
The $0.1440 area contains nearby buy-side liquidity from the recent high, while $0.1320 and $0.1250 are potential pullback zones. A sustained 4H close above $0.1470 would invalidate the rejection setup.#DogecoinRises15% #AIStocksWhatNext #MuseOvertakesChatGPTAsTopFreeIOSApp #TokenizedStockPlatformsCouldLaunchNextQuarter #StrategyAdds950Bitcoin
178
·
--
Bullish
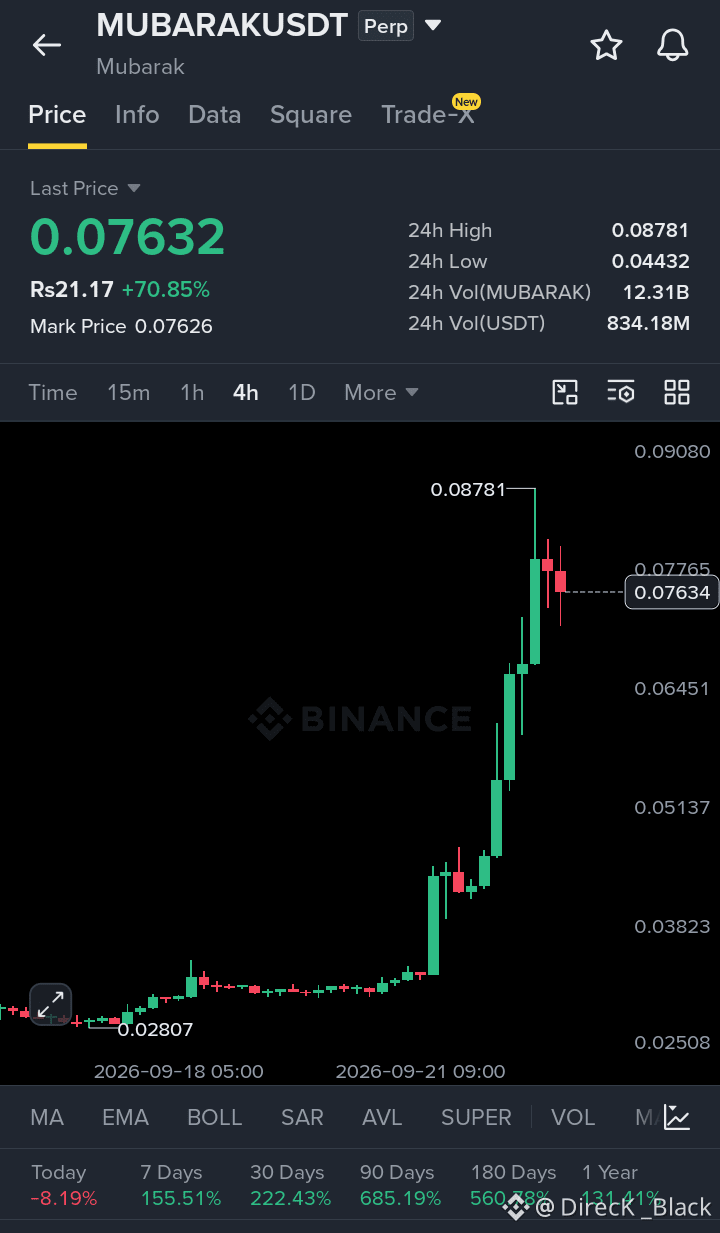
$MUBARAK is showing a bullish pullback setup after an explosive breakout from the $0.0510 area toward the $0.08781 high.
Momentum remains strong, but the recent rejection from the high favors waiting for a retracement into the breakout zone rather than entering at the top.
EP: $0.0705–$0.0730
TP1: $0.0780
TP2: $0.0830
TP3: $0.0875
SL: $0.0660
The $0.0645–$0.0730 region contains the most important nearby support after the breakout. Buyers need to defend the entry zone; a 4H close below $0.0660 would invalidate the continuation structure.#StrategyAdds950Bitcoin #AIStocksWhatNext #BNBMarketCapPassesBNYMellon #MuseOvertakesChatGPTAsTopFreeIOSApp the #StrategyAdds950Bitcoin
{spot}(MUBARAKUSDT)
$MUBARAK is showing a bullish pullback setup after an explosive breakout from the $0.0510 area toward the $0.08781 high.
Momentum remains strong, but the recent rejection from the high favors waiting for a retracement into the breakout zone rather than entering at the top.
EP: $0.0705–$0.0730
TP1: $0.0780
TP2: $0.0830
TP3: $0.0875
SL: $0.0660
The $0.0645–$0.0730 region contains the most important nearby support after the breakout. Buyers need to defend the entry zone; a 4H close below $0.0660 would invalidate the continuation structure.#StrategyAdds950Bitcoin #AIStocksWhatNext #BNBMarketCapPassesBNYMellon #MuseOvertakesChatGPTAsTopFreeIOSApp the #StrategyAdds950Bitcoin
Momentum remains strong, but the recent rejection from the high favors waiting for a retracement into the breakout zone rather than entering at the top.
EP: $0.0705–$0.0730
TP1: $0.0780
TP2: $0.0830
TP3: $0.0875
SL: $0.0660
The $0.0645–$0.0730 region contains the most important nearby support after the breakout. Buyers need to defend the entry zone; a 4H close below $0.0660 would invalidate the continuation structure.#StrategyAdds950Bitcoin #AIStocksWhatNext #BNBMarketCapPassesBNYMellon #MuseOvertakesChatGPTAsTopFreeIOSApp the #StrategyAdds950Bitcoin
218
Log in to explore more content
Join global crypto users on Binance Square
⚡️ Get latest and useful information about crypto.
💬 Trusted by the world’s largest crypto exchange.
👍 Discover real insights from verified creators.
Email / Phone number
Trending Topics
EtherGains70.9%InQ3
143,184 views
1,124 Discussing
One of the best third quarters in history 💰
September closed out last night, and with it, the quarter. For the quarter, BTC is up 42%—the second-best Q3 on record. ETH had a record-breaking Q3 overall, up 70%.
Looking at the chart, things are still looking good: we’re holding support, but we’re testing it more and more often. Plus, ETF momentum is weakening — inflows are gradually declining, and yesterday saw outflows for the first time in a long while.
Yes, historically, October has been a good month for crypto — it’s not called “Uptober” for nothing. But it’s also one of the most volatile months. Last year, for example, we managed to hit a new all-time high (ATH) and experience a flash crash.
🚀 High Accuracy Trades.
$BTC
$ETH
$SOL
#EtherGains70.9%InQ3 #DollarIndexHitsHighestSinceMay2025 #CFTCSubmitsTwoEventContractRulesToWhiteHouse #MicronBeatsEarningsLiftsGuidance
Knowledge is Power
·0 Likes
·229 views
TreasuryLetsStatesFileStablecoinCertificationsEarly
7,586 views
78 Discussing
US10YearYieldNears5.3%
146,431 views
1,119 Discussing