
Alex_Dubier
5.1k Posts

Alex_Dubier
Report
Block User
🚀 Experto en Criptomonedas💵 | Compartiendo análisis de mercado📈, tendencias e ideas 💡 | Trading | Bitcoin💱 | Altcoins | Web3 | Blockchain | DeFi👑👑👑
Occasional Trader
2 Years
63 Following
5.6K+ Followers
20.3K+ Liked
Posts
All
Quotes
PINNED
·
--
Bullish
They say a good coffee fuels ideas… and it’s true 😊☕
If any of my signals have been helpful to you, you can buy me a little coffee here 👇
☕💛
It’s not necessary, but it gives me twice the motivation to keep preparing the best for you all 🚀✨
Thank you so much for being here — every little bit counts. Love you, family! 🥹🙏
They say a good coffee fuels ideas… and it’s true 😊☕
If any of my signals have been helpful to you, you can buy me a little coffee here 👇
☕💛
It’s not necessary, but it gives me twice the motivation to keep preparing the best for you all 🚀✨
Thank you so much for being here — every little bit counts. Love you, family! 🥹🙏
If any of my signals have been helpful to you, you can buy me a little coffee here 👇
☕💛
It’s not necessary, but it gives me twice the motivation to keep preparing the best for you all 🚀✨
Thank you so much for being here — every little bit counts. Love you, family! 🥹🙏
1
303
·
--
Bullish
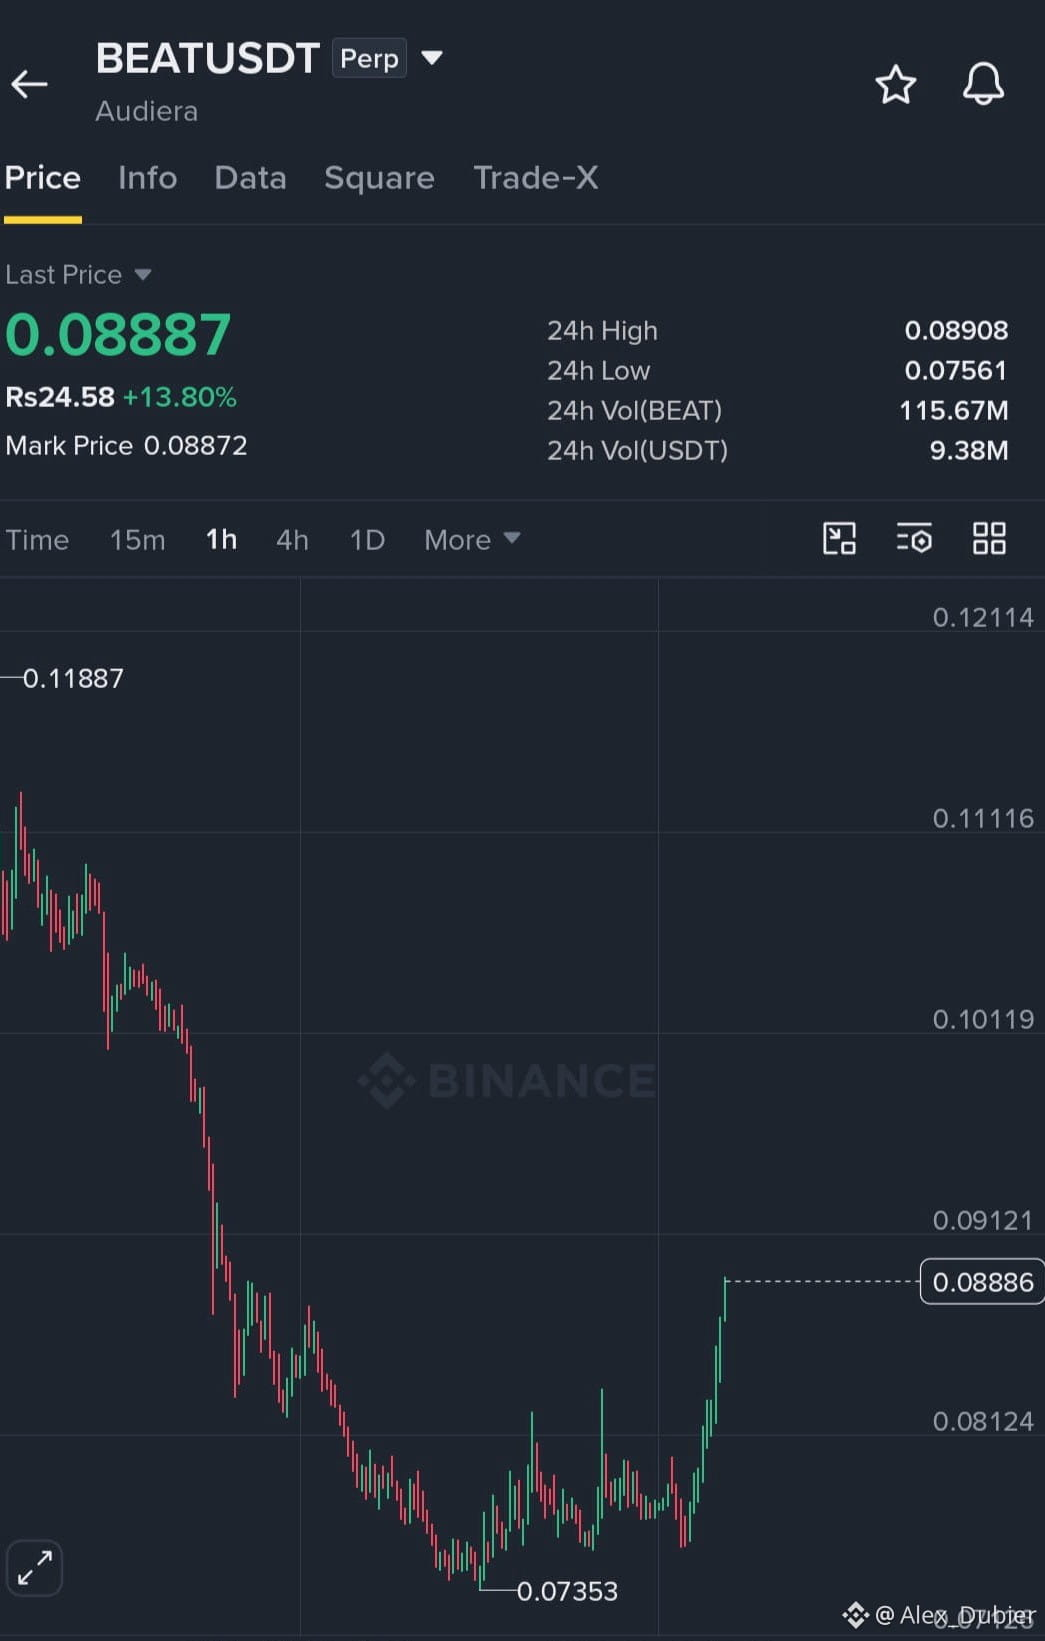
📊 $BEAT — Recovery in Progress: Breakout = Key to $0.1000 🟢🚀
🔍 Market Analysis:
{future}(BEATUSDT)
$BEAT has rebounded strongly from the low of $0.07353, gaining nearly +14% in its recovery. Key support at $0.07250 is holding firm, keeping the bullish outlook intact. However, immediate resistance at $0.08908 is the decisive filter: breaking above it with volume opens the way to new highs; rejection there could stall the momentum. The broader trend still needs confirmation — patience remains our best ally.
📍 Current price: $0.08887 — just below resistance
🎯 TP1: $0.0900 → immediate target after breaking $0.08908
🎯 TP2: $0.0950 → continuation of the momentum
🚀 Final Target: $0.1000 → key psychological level
🛡️ Key Support: $0.07250 → as long as it holds, the recovery remains intact
💡 Strategy:
Keep a close eye on $0.08908. A sustained breakout above this level confirms the next leg toward $0.0950 and ultimately $0.1000. If the price is rejected here, don't chase it — wait for another test of support or a clearer signal. Remember: $0.07250 support is your safety line. If it breaks, the outlook weakens.
🧠 "The bounce is the move; the breakout is the confirmation." Buyers are doing their job, but resistance hasn't fallen yet. Let the price prove its strength before committing capital. Stay disciplined and trade well, team! 💪🔥
📊 $BEAT — Recovery in Progress: Breakout = Key to $0.1000 🟢🚀
🔍 Market Analysis:
$BEAT has rebounded strongly from the low of $0.07353, gaining nearly +14% in its recovery. Key support at $0.07250 is holding firm, keeping the bullish outlook intact. However, immediate resistance at $0.08908 is the decisive filter: breaking above it with volume opens the way to new highs; rejection there could stall the momentum. The broader trend still needs confirmation — patience remains our best ally.
📍 Current price: $0.08887 — just below resistance
🎯 TP1: $0.0900 → immediate target after breaking $0.08908
🎯 TP2: $0.0950 → continuation of the momentum
🚀 Final Target: $0.1000 → key psychological level
🛡️ Key Support: $0.07250 → as long as it holds, the recovery remains intact
💡 Strategy:
Keep a close eye on $0.08908. A sustained breakout above this level confirms the next leg toward $0.0950 and ultimately $0.1000. If the price is rejected here, don't chase it — wait for another test of support or a clearer signal. Remember: $0.07250 support is your safety line. If it breaks, the outlook weakens.
🧠 "The bounce is the move; the breakout is the confirmation." Buyers are doing their job, but resistance hasn't fallen yet. Let the price prove its strength before committing capital. Stay disciplined and trade well, team! 💪🔥
🔍 Market Analysis:
$BEAT has rebounded strongly from the low of $0.07353, gaining nearly +14% in its recovery. Key support at $0.07250 is holding firm, keeping the bullish outlook intact. However, immediate resistance at $0.08908 is the decisive filter: breaking above it with volume opens the way to new highs; rejection there could stall the momentum. The broader trend still needs confirmation — patience remains our best ally.
📍 Current price: $0.08887 — just below resistance
🎯 TP1: $0.0900 → immediate target after breaking $0.08908
🎯 TP2: $0.0950 → continuation of the momentum
🚀 Final Target: $0.1000 → key psychological level
🛡️ Key Support: $0.07250 → as long as it holds, the recovery remains intact
💡 Strategy:
Keep a close eye on $0.08908. A sustained breakout above this level confirms the next leg toward $0.0950 and ultimately $0.1000. If the price is rejected here, don't chase it — wait for another test of support or a clearer signal. Remember: $0.07250 support is your safety line. If it breaks, the outlook weakens.
🧠 "The bounce is the move; the breakout is the confirmation." Buyers are doing their job, but resistance hasn't fallen yet. Let the price prove its strength before committing capital. Stay disciplined and trade well, team! 💪🔥
1
21
·
--
Bullish
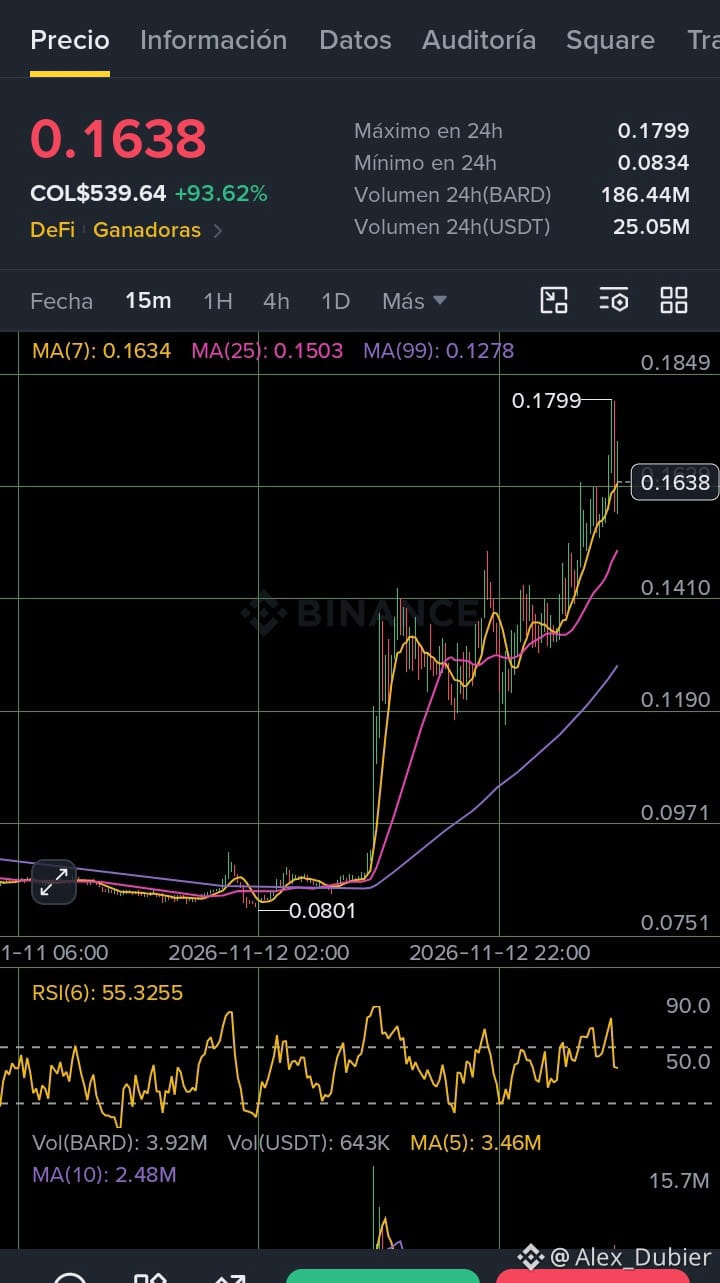
📊 $BARD — Bullish Structure Confirmed: Patience First 🟢👀
🔍 Analysis:
The 15-minute frame shows a clear bullish structure, and the 5-minute chart is already showing early confirmation — this alignment strengthens the setup. But as you wisely note: confirmation first, entry second. Don't chase price; let price come to your zone and show its strength there.
📍 Entry Zone: $0.170615 – $0.172985
🛑 Stop Loss: $0.165480 → clearly defined risk
🎯 TP1: $0.178120 → +3.0% to +4.4%
🎯 TP2: $0.183176 → +5.9% to +7.3%
🚀 TP3: $0.188232 → +8.8% to +10.3%
💡 Strategy:
Wait for price to enter your zone and show a clear bullish rejection candle before committing capital. If $0.165480 breaks to the downside, the setup is invalid — no hesitation, no hoping, step aside. Your priority is spot on: risk first, profit second.
🧠 "The best trader isn't the one who trades most — it's the one who waits best." Let the market decide first; you just follow the signal. Discipline wins, team! 💪🔥
#Bard #BARDToken
📊 $BARD — Bullish Structure Confirmed: Patience First 🟢👀
🔍 Analysis:
The 15-minute frame shows a clear bullish structure, and the 5-minute chart is already showing early confirmation — this alignment strengthens the setup. But as you wisely note: confirmation first, entry second. Don't chase price; let price come to your zone and show its strength there.
📍 Entry Zone: $0.170615 – $0.172985
🛑 Stop Loss: $0.165480 → clearly defined risk
🎯 TP1: $0.178120 → +3.0% to +4.4%
🎯 TP2: $0.183176 → +5.9% to +7.3%
🚀 TP3: $0.188232 → +8.8% to +10.3%
💡 Strategy:
Wait for price to enter your zone and show a clear bullish rejection candle before committing capital. If $0.165480 breaks to the downside, the setup is invalid — no hesitation, no hoping, step aside. Your priority is spot on: risk first, profit second.
🧠 "The best trader isn't the one who trades most — it's the one who waits best." Let the market decide first; you just follow the signal. Discipline wins, team! 💪🔥
#Bard #BARDToken
🔍 Analysis:
The 15-minute frame shows a clear bullish structure, and the 5-minute chart is already showing early confirmation — this alignment strengthens the setup. But as you wisely note: confirmation first, entry second. Don't chase price; let price come to your zone and show its strength there.
📍 Entry Zone: $0.170615 – $0.172985
🛑 Stop Loss: $0.165480 → clearly defined risk
🎯 TP1: $0.178120 → +3.0% to +4.4%
🎯 TP2: $0.183176 → +5.9% to +7.3%
🚀 TP3: $0.188232 → +8.8% to +10.3%
💡 Strategy:
Wait for price to enter your zone and show a clear bullish rejection candle before committing capital. If $0.165480 breaks to the downside, the setup is invalid — no hesitation, no hoping, step aside. Your priority is spot on: risk first, profit second.
🧠 "The best trader isn't the one who trades most — it's the one who waits best." Let the market decide first; you just follow the signal. Discipline wins, team! 💪🔥
#Bard #BARDToken
1
74
·
--
Bullish
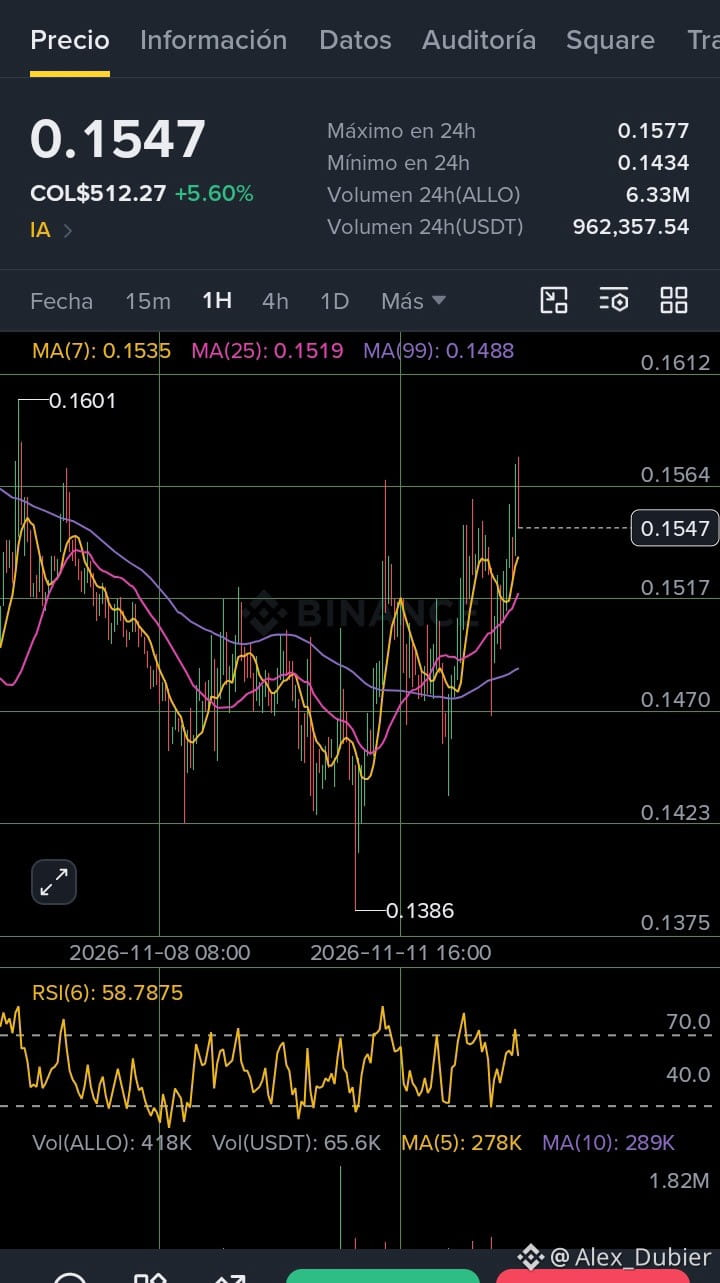
📊 $ALLO — Bullish Momentum: Confirm Before Entering 🟢🚀
🔍 Analysis:
$ALLO is gaining strength and approaching key resistance at $0.1574. A breakout with volume opens the path toward higher highs. But remember: resistance is the filter — don't chase the price before it proves it can break through.
📍 Entry zone: $0.1540 – $0.1560
🛑 Stop Loss: $0.1510 → risk contained
🎯 TP1: $0.1575 → first confirmation
🎯 TP2: $0.1600 → intermediate target
🚀 TP3: $0.1630 → maximum projection
💡 Strategy:
Enter in the marked zone. If it breaks $0.1574 with conviction, the move accelerates toward the higher targets. If it gets rejected there, don't insist — respect your SL at $0.1510.
🧠 "Resistance isn't the enemy — it's the door you have to open." Wait for confirmation, then move up with confidence. Discipline above all, team! 💪🔥
{spot}(ALLOUSDT)
📊 $ALLO — Bullish Momentum: Confirm Before Entering 🟢🚀
🔍 Analysis:
$ALLO is gaining strength and approaching key resistance at $0.1574. A breakout with volume opens the path toward higher highs. But remember: resistance is the filter — don't chase the price before it proves it can break through.
📍 Entry zone: $0.1540 – $0.1560
🛑 Stop Loss: $0.1510 → risk contained
🎯 TP1: $0.1575 → first confirmation
🎯 TP2: $0.1600 → intermediate target
🚀 TP3: $0.1630 → maximum projection
💡 Strategy:
Enter in the marked zone. If it breaks $0.1574 with conviction, the move accelerates toward the higher targets. If it gets rejected there, don't insist — respect your SL at $0.1510.
🧠 "Resistance isn't the enemy — it's the door you have to open." Wait for confirmation, then move up with confidence. Discipline above all, team! 💪🔥
🔍 Analysis:
$ALLO is gaining strength and approaching key resistance at $0.1574. A breakout with volume opens the path toward higher highs. But remember: resistance is the filter — don't chase the price before it proves it can break through.
📍 Entry zone: $0.1540 – $0.1560
🛑 Stop Loss: $0.1510 → risk contained
🎯 TP1: $0.1575 → first confirmation
🎯 TP2: $0.1600 → intermediate target
🚀 TP3: $0.1630 → maximum projection
💡 Strategy:
Enter in the marked zone. If it breaks $0.1574 with conviction, the move accelerates toward the higher targets. If it gets rejected there, don't insist — respect your SL at $0.1510.
🧠 "Resistance isn't the enemy — it's the door you have to open." Wait for confirmation, then move up with confidence. Discipline above all, team! 💪🔥
2
45
·
--
Bullish
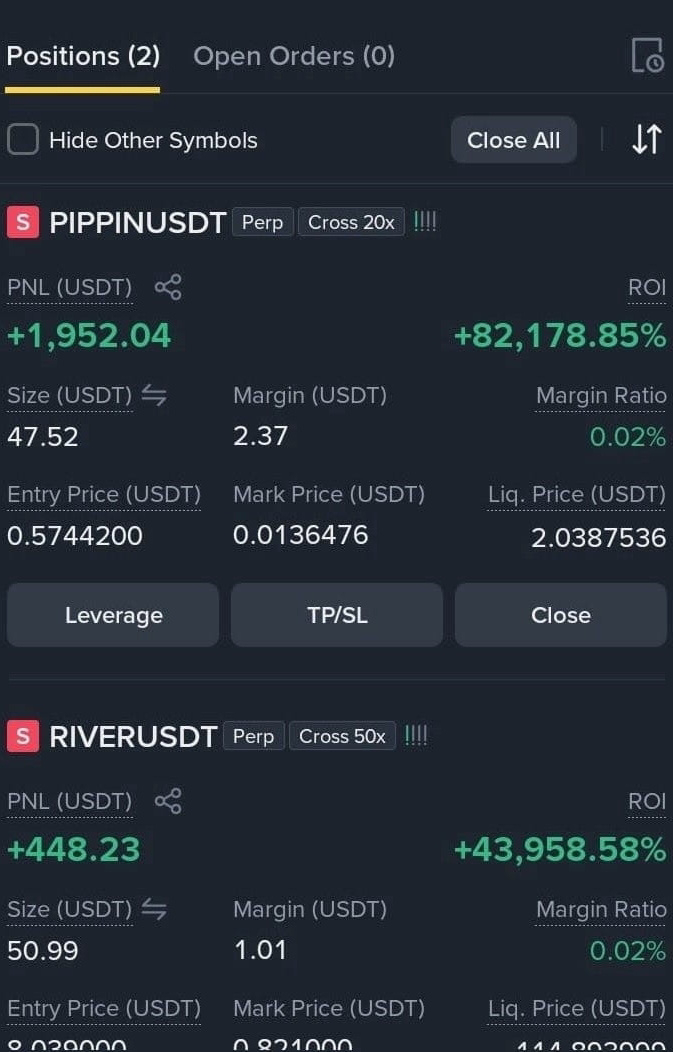
⭐ Keep your gains big: the simple truth 🧠🔥
Holding losses is easy; letting profits run is the hard part. When you see +50% or +100%, the fear of losing it all pushes you to close too soon.
🔑 Those who make thousands of percent usually do at least one of these:
✅ Entered with a small amount — with no pressure, they can wait
✅ Believe in the project, not just the price — they don’t sell just because it went up
✅ Move their Stop Loss up — protect their capital without closing the position
💡 In short:
It’s not about making better predictions, but about being less afraid. Enter with a comfortable position size, define your exit plan, and don’t let emotions decide for you. Patience = lasting gains. 💪🔥
🤔 What’s the biggest percentage gain you’ve held onto? Tell us 👇
#Cripto #trading #PsicologiaTrader
⭐ Keep your gains big: the simple truth 🧠🔥
Holding losses is easy; letting profits run is the hard part. When you see +50% or +100%, the fear of losing it all pushes you to close too soon.
🔑 Those who make thousands of percent usually do at least one of these:
✅ Entered with a small amount — with no pressure, they can wait
✅ Believe in the project, not just the price — they don’t sell just because it went up
✅ Move their Stop Loss up — protect their capital without closing the position
💡 In short:
It’s not about making better predictions, but about being less afraid. Enter with a comfortable position size, define your exit plan, and don’t let emotions decide for you. Patience = lasting gains. 💪🔥
🤔 What’s the biggest percentage gain you’ve held onto? Tell us 👇
#Cripto #trading #PsicologiaTrader
Holding losses is easy; letting profits run is the hard part. When you see +50% or +100%, the fear of losing it all pushes you to close too soon.
🔑 Those who make thousands of percent usually do at least one of these:
✅ Entered with a small amount — with no pressure, they can wait
✅ Believe in the project, not just the price — they don’t sell just because it went up
✅ Move their Stop Loss up — protect their capital without closing the position
💡 In short:
It’s not about making better predictions, but about being less afraid. Enter with a comfortable position size, define your exit plan, and don’t let emotions decide for you. Patience = lasting gains. 💪🔥
🤔 What’s the biggest percentage gain you’ve held onto? Tell us 👇
#Cripto #trading #PsicologiaTrader
1
9
7.8k
·
--
Bullish
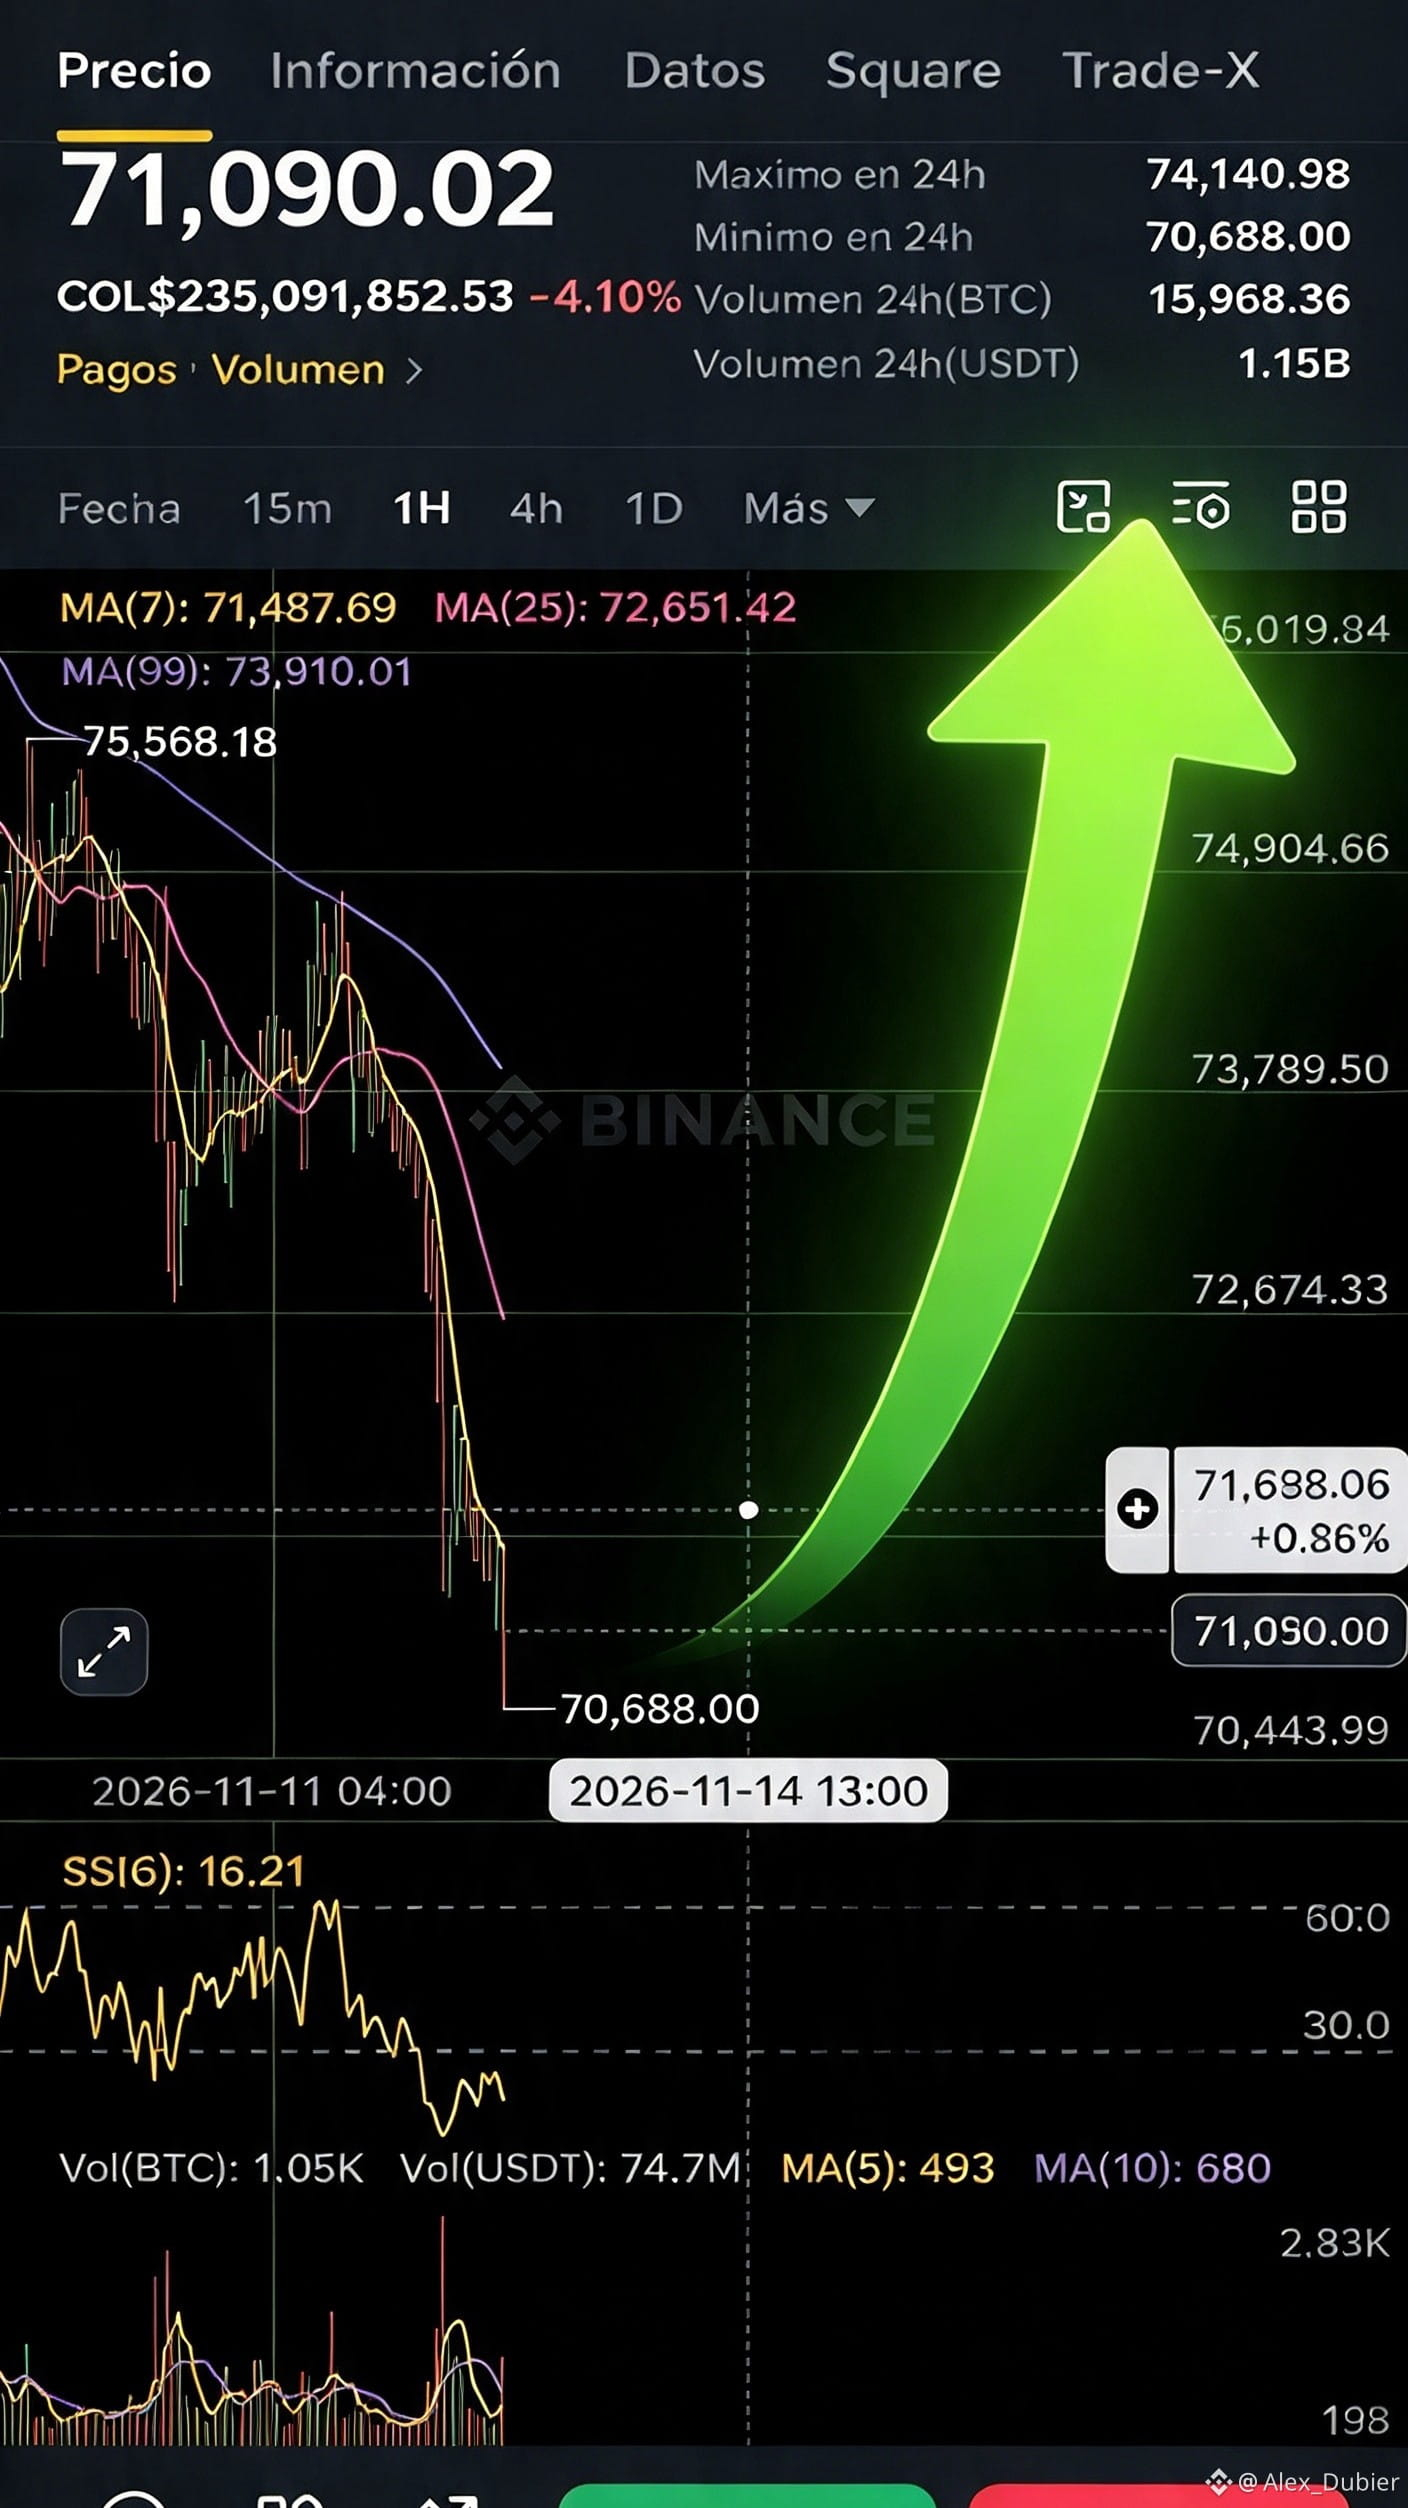
📊 $BTC — Oversold RSI: Bounce Opportunity with Caution 🟢🚀
🔍 Analysis:
An oversold RSI signals that selling pressure may be drying up, opening the door to a mean-reversion bounce. But as you rightly say: catching a falling knife carries risk. If support at 71,000 gives way, further capitulation could follow — that's why clear risk boundaries are essential.
📍 Entry Zone: 70,823.4 – 71,337.2
🎯 TP1: 72,594.0 → +1.8% to +2.5%
🎯 TP2: 73,805.0 → +3.5% to +4.2%
🛑 Stop Loss: 70,115.2 → -1.0% to -1.7% defined risk
💡 Strategy:
Enter with a small position size as you suggest. Watch 71,000 as the decisive level — holding above it keeps the bounce scenario alive. If broken to the downside, don't chase — protect your capital. Your final advice is golden: never bet it all. Controlled risk = peace of mind above all else. Good trade, colleague! 💪🔥
#BTC☀️ #BTC #BTC突破7万大关
{spot}(BTCUSDT)
📊 $BTC — Oversold RSI: Bounce Opportunity with Caution 🟢🚀
🔍 Analysis:
An oversold RSI signals that selling pressure may be drying up, opening the door to a mean-reversion bounce. But as you rightly say: catching a falling knife carries risk. If support at 71,000 gives way, further capitulation could follow — that's why clear risk boundaries are essential.
📍 Entry Zone: 70,823.4 – 71,337.2
🎯 TP1: 72,594.0 → +1.8% to +2.5%
🎯 TP2: 73,805.0 → +3.5% to +4.2%
🛑 Stop Loss: 70,115.2 → -1.0% to -1.7% defined risk
💡 Strategy:
Enter with a small position size as you suggest. Watch 71,000 as the decisive level — holding above it keeps the bounce scenario alive. If broken to the downside, don't chase — protect your capital. Your final advice is golden: never bet it all. Controlled risk = peace of mind above all else. Good trade, colleague! 💪🔥
#BTC☀️ #BTC #BTC突破7万大关
🔍 Analysis:
An oversold RSI signals that selling pressure may be drying up, opening the door to a mean-reversion bounce. But as you rightly say: catching a falling knife carries risk. If support at 71,000 gives way, further capitulation could follow — that's why clear risk boundaries are essential.
📍 Entry Zone: 70,823.4 – 71,337.2
🎯 TP1: 72,594.0 → +1.8% to +2.5%
🎯 TP2: 73,805.0 → +3.5% to +4.2%
🛑 Stop Loss: 70,115.2 → -1.0% to -1.7% defined risk
💡 Strategy:
Enter with a small position size as you suggest. Watch 71,000 as the decisive level — holding above it keeps the bounce scenario alive. If broken to the downside, don't chase — protect your capital. Your final advice is golden: never bet it all. Controlled risk = peace of mind above all else. Good trade, colleague! 💪🔥
#BTC☀️ #BTC #BTC突破7万大关
2
411
·
--
Bullish
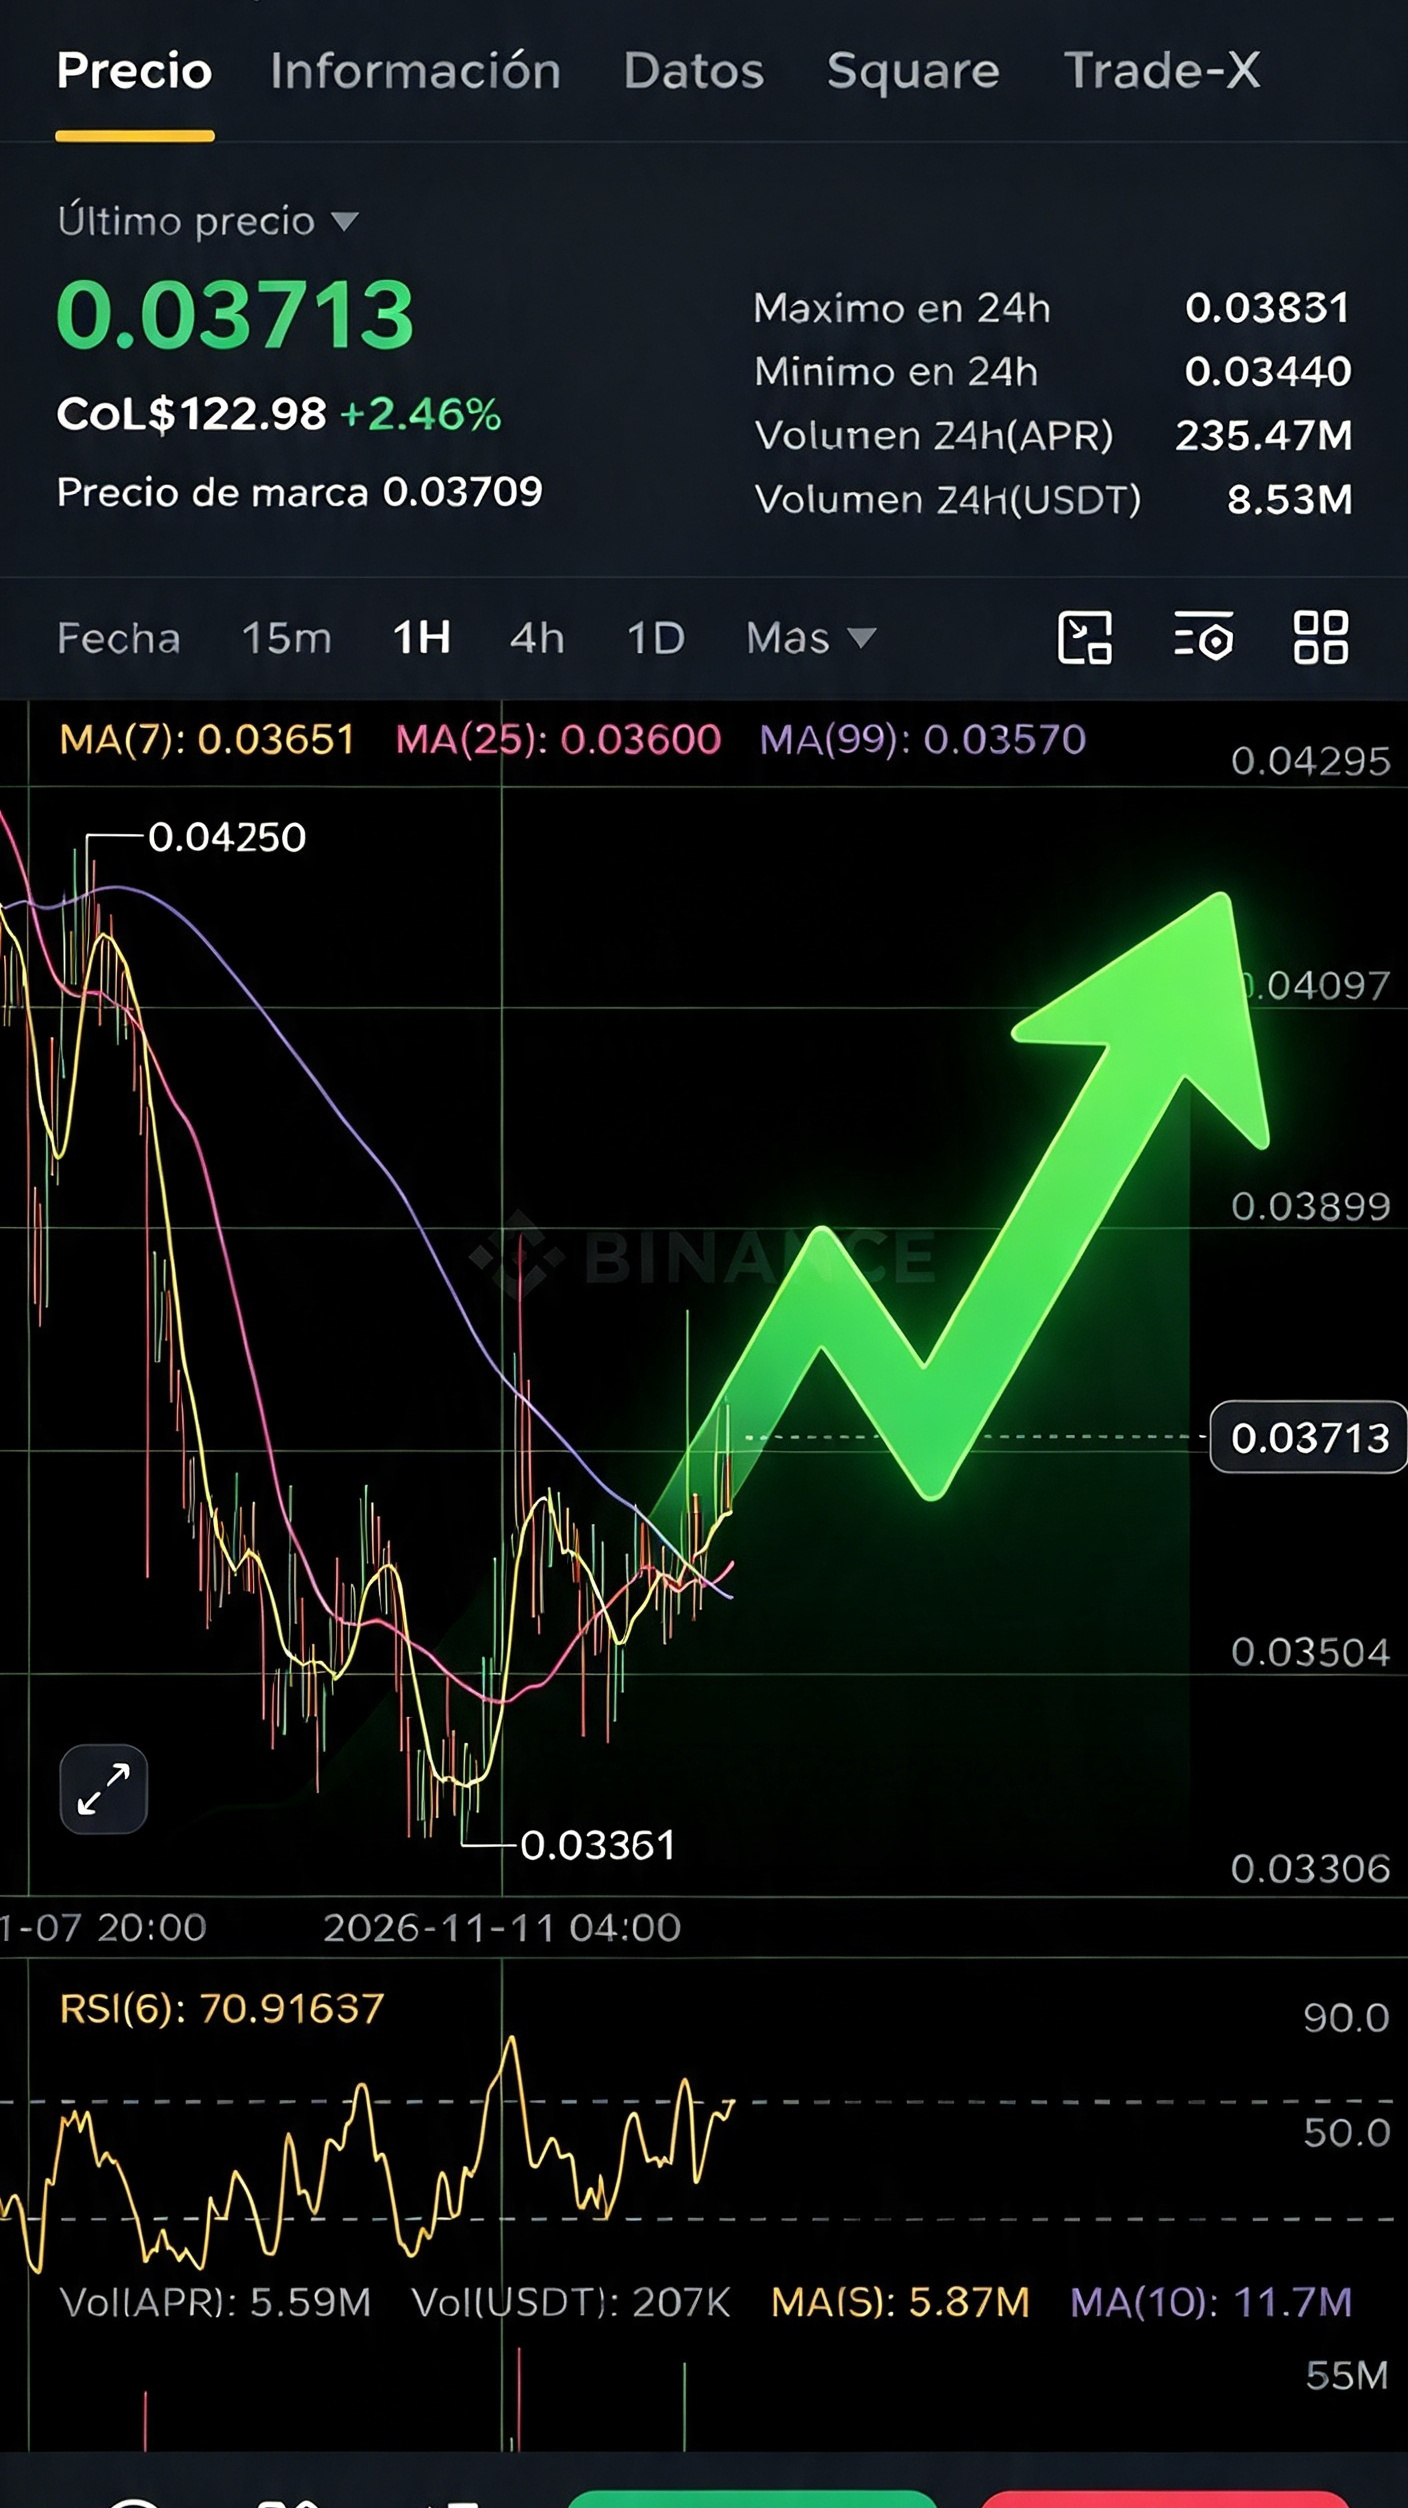
📊 $APR — First Signs of a Bullish Recovery 🟢🚀
🔍 Analysis:
After a prolonged downtrend, $APR shows clear signs of a turnaround. Buyers have stepped in to defend the $0.034–$0.036 zone, and recent momentum is gaining ground. However, resistance at $0.038 is the decisive level: a sustained break above it confirms the bullish reversal and paves the way toward the next highs.
📍 Entry zone: $0.0375 – $0.0381 (wait for confirmation above $0.038)
🎯 Target: $0.04625 → +21% to +23% potential
🛑 Stop Loss: $0.03391 → -9% to -11% defined risk
💡 Strategy:
Enter in the marked zone, but let the price show its strength first. A sustained break above $0.038 with increasing volume is the signal that validates this move. If it breaks below $0.03391, the setup is invalidated — don't force it; protect your capital.
🧠 "Support stops the fall; a break through resistance confirms the rise." The beginning of a new trend always starts with the first step. Clear risk, clear target. If it confirms, let's go all in! 💪🔥
#APR #APR
{future}(APRUSDT)
📊 $APR — First Signs of a Bullish Recovery 🟢🚀
🔍 Analysis:
After a prolonged downtrend, $APR shows clear signs of a turnaround. Buyers have stepped in to defend the $0.034–$0.036 zone, and recent momentum is gaining ground. However, resistance at $0.038 is the decisive level: a sustained break above it confirms the bullish reversal and paves the way toward the next highs.
📍 Entry zone: $0.0375 – $0.0381 (wait for confirmation above $0.038)
🎯 Target: $0.04625 → +21% to +23% potential
🛑 Stop Loss: $0.03391 → -9% to -11% defined risk
💡 Strategy:
Enter in the marked zone, but let the price show its strength first. A sustained break above $0.038 with increasing volume is the signal that validates this move. If it breaks below $0.03391, the setup is invalidated — don't force it; protect your capital.
🧠 "Support stops the fall; a break through resistance confirms the rise." The beginning of a new trend always starts with the first step. Clear risk, clear target. If it confirms, let's go all in! 💪🔥
#APR #APR
🔍 Analysis:
After a prolonged downtrend, $APR shows clear signs of a turnaround. Buyers have stepped in to defend the $0.034–$0.036 zone, and recent momentum is gaining ground. However, resistance at $0.038 is the decisive level: a sustained break above it confirms the bullish reversal and paves the way toward the next highs.
📍 Entry zone: $0.0375 – $0.0381 (wait for confirmation above $0.038)
🎯 Target: $0.04625 → +21% to +23% potential
🛑 Stop Loss: $0.03391 → -9% to -11% defined risk
💡 Strategy:
Enter in the marked zone, but let the price show its strength first. A sustained break above $0.038 with increasing volume is the signal that validates this move. If it breaks below $0.03391, the setup is invalidated — don't force it; protect your capital.
🧠 "Support stops the fall; a break through resistance confirms the rise." The beginning of a new trend always starts with the first step. Clear risk, clear target. If it confirms, let's go all in! 💪🔥
#APR #APR
1
260
·
--
Bullish
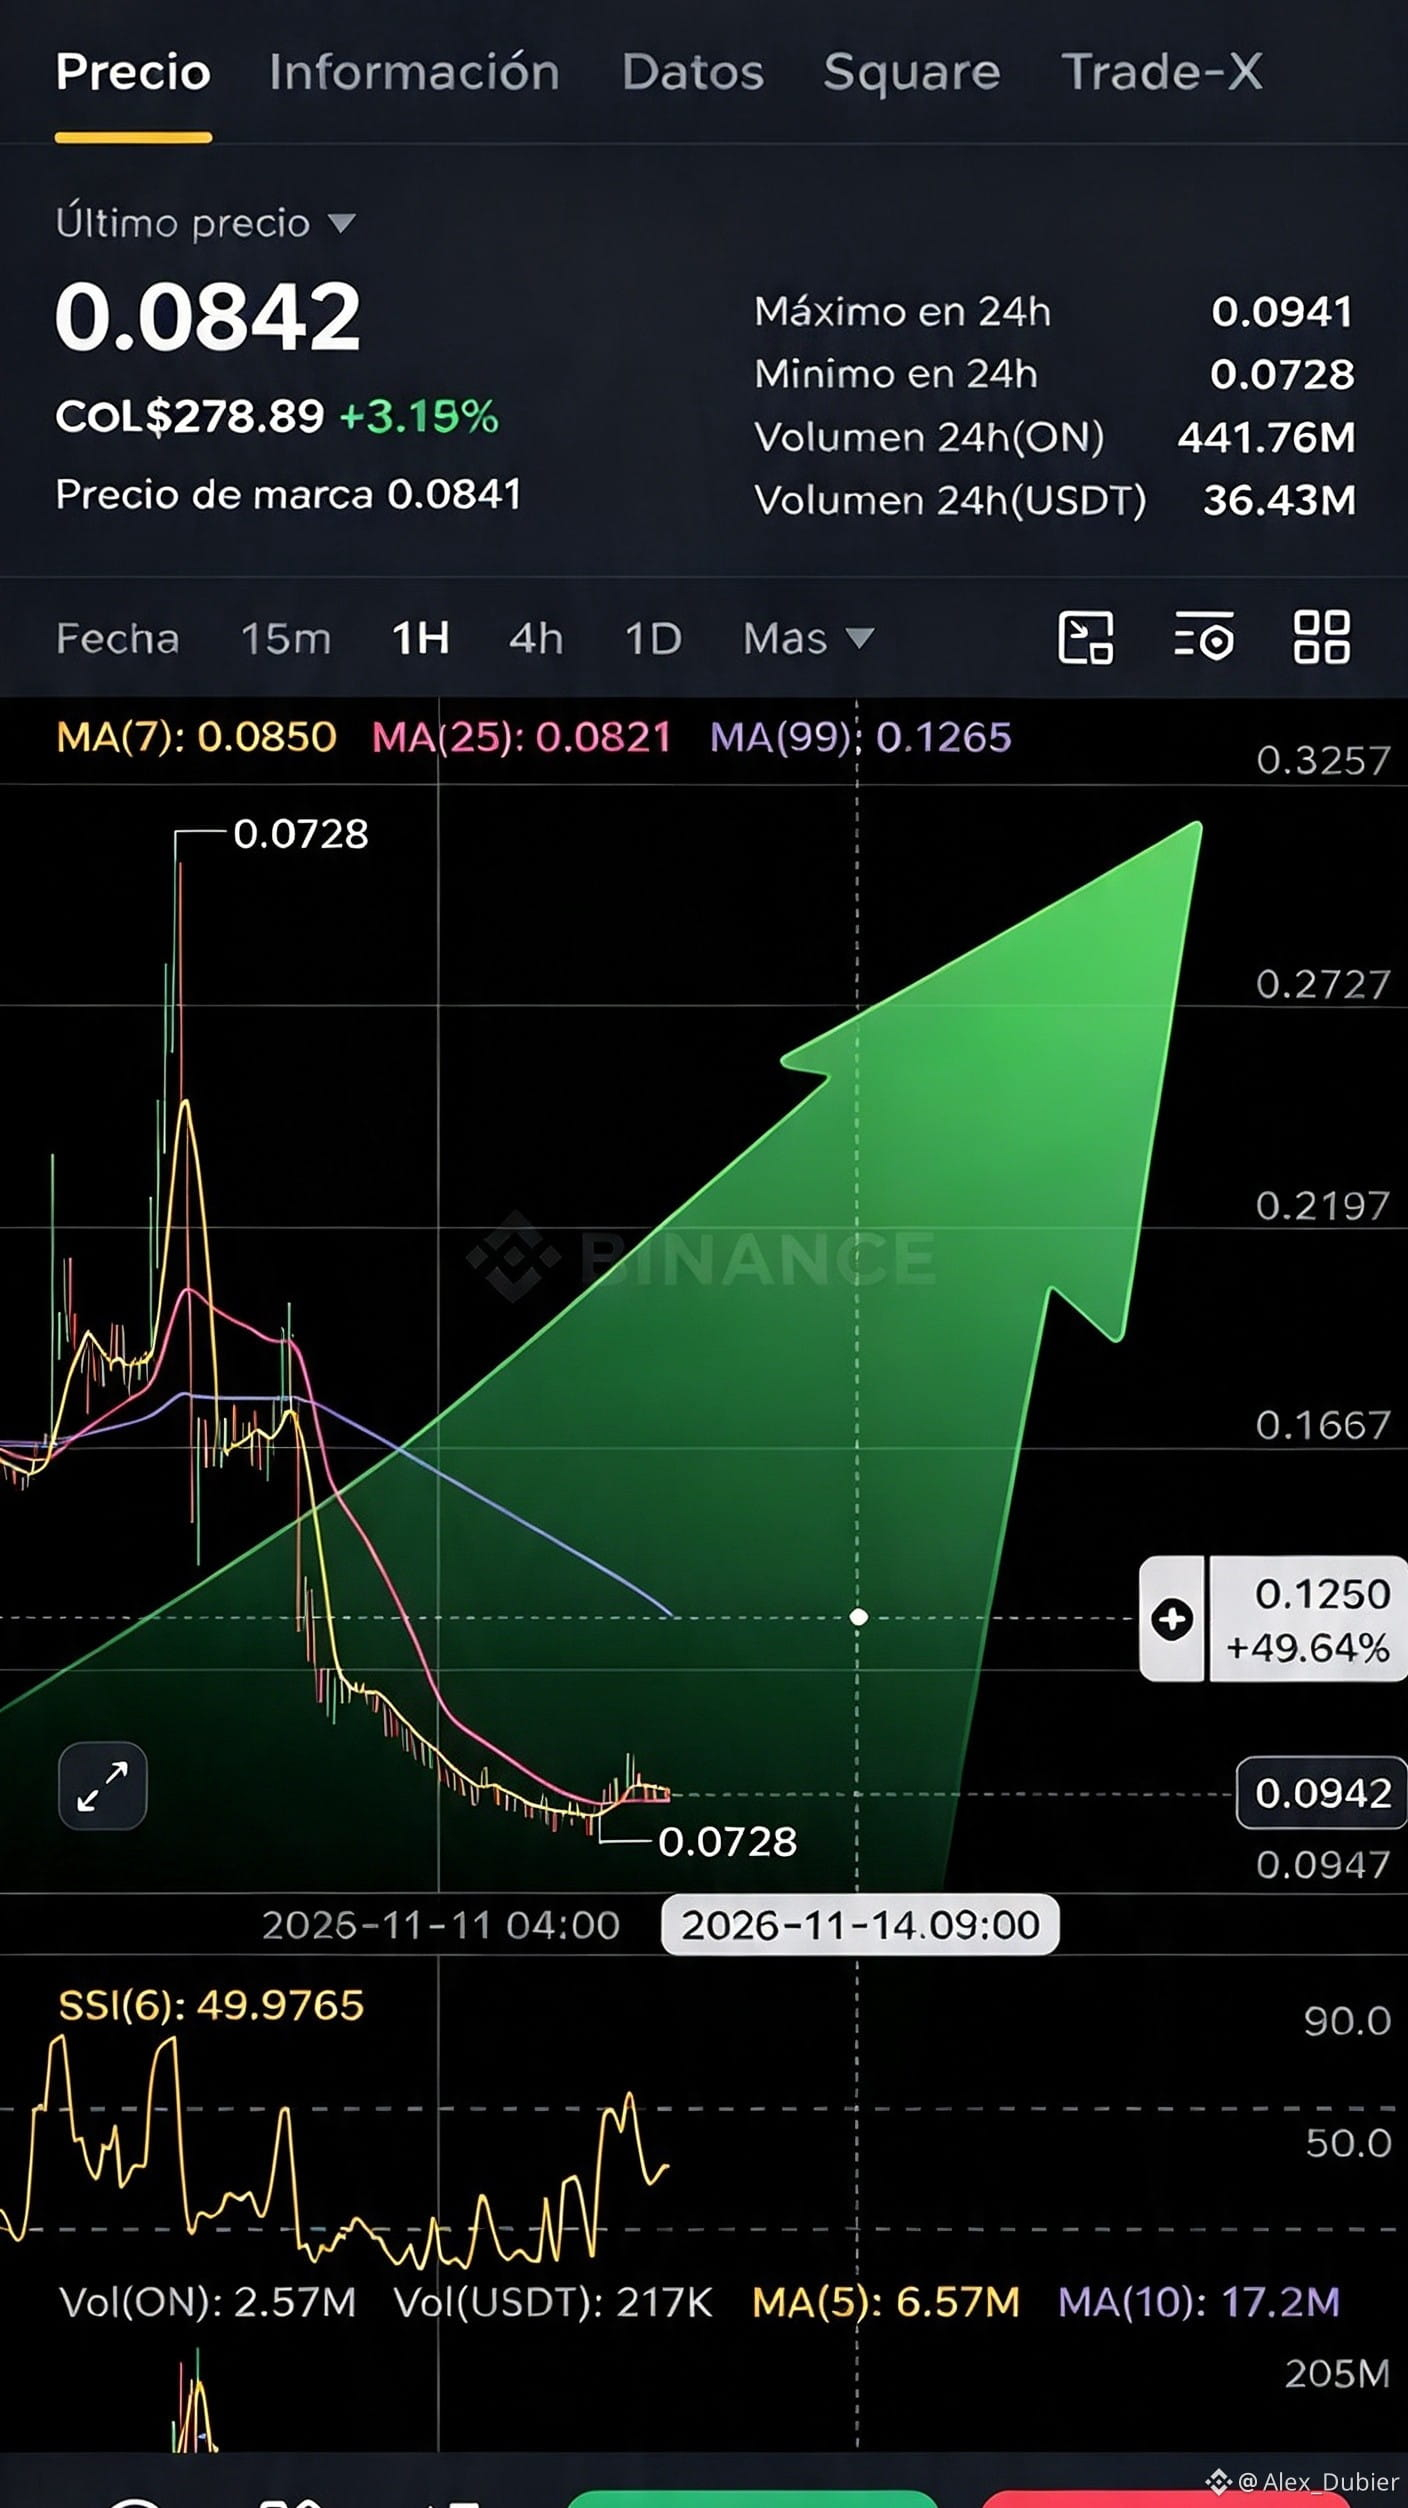
📊 $ON — Recovery in Progress, Confirm Before Committing 🟢🚀
🔍 Analysis:
$ON has rebounded strongly from support at $0.0728, showing renewed buying interest. However, the broader trend still needs validation — this bounce is the first step, not a guaranteed reversal. Breaking above $0.0941 with volume would confirm that bulls have taken control.
📍 Entry Zone: $0.0890 – $0.0920
🛑 Stop Loss: $0.0700 — clear protection if the setup fails
🎯 TP1: $0.0990 — first partial take-profit
🎯 TP2: $0.1250 — continuation of momentum
🚀 Final Target: $0.1400 — full recovery projection
💡 Strategy:
Enter your marked zone, but watch $0.0850 as immediate support. Holding above it keeps the bullish bias alive. A confirmed breakout above $0.0941 is the key that unlocks higher targets. If price loses $0.0700, the recovery is invalid — step aside and protect your capital.
🧠 "Support gives the starting point; broken resistance confirms the journey." Promising recovery indeed — but one step at a time: hold first, then break, then run. Patience and discipline, team. Trade smart! 💪
#on
{future}(ONUSDT)
📊 $ON — Recovery in Progress, Confirm Before Committing 🟢🚀
🔍 Analysis:
$ON has rebounded strongly from support at $0.0728, showing renewed buying interest. However, the broader trend still needs validation — this bounce is the first step, not a guaranteed reversal. Breaking above $0.0941 with volume would confirm that bulls have taken control.
📍 Entry Zone: $0.0890 – $0.0920
🛑 Stop Loss: $0.0700 — clear protection if the setup fails
🎯 TP1: $0.0990 — first partial take-profit
🎯 TP2: $0.1250 — continuation of momentum
🚀 Final Target: $0.1400 — full recovery projection
💡 Strategy:
Enter your marked zone, but watch $0.0850 as immediate support. Holding above it keeps the bullish bias alive. A confirmed breakout above $0.0941 is the key that unlocks higher targets. If price loses $0.0700, the recovery is invalid — step aside and protect your capital.
🧠 "Support gives the starting point; broken resistance confirms the journey." Promising recovery indeed — but one step at a time: hold first, then break, then run. Patience and discipline, team. Trade smart! 💪
#on
🔍 Analysis:
$ON has rebounded strongly from support at $0.0728, showing renewed buying interest. However, the broader trend still needs validation — this bounce is the first step, not a guaranteed reversal. Breaking above $0.0941 with volume would confirm that bulls have taken control.
📍 Entry Zone: $0.0890 – $0.0920
🛑 Stop Loss: $0.0700 — clear protection if the setup fails
🎯 TP1: $0.0990 — first partial take-profit
🎯 TP2: $0.1250 — continuation of momentum
🚀 Final Target: $0.1400 — full recovery projection
💡 Strategy:
Enter your marked zone, but watch $0.0850 as immediate support. Holding above it keeps the bullish bias alive. A confirmed breakout above $0.0941 is the key that unlocks higher targets. If price loses $0.0700, the recovery is invalid — step aside and protect your capital.
🧠 "Support gives the starting point; broken resistance confirms the journey." Promising recovery indeed — but one step at a time: hold first, then break, then run. Patience and discipline, team. Trade smart! 💪
#on
1
462
·
--
Bullish
📊 $XLM — Watching the High: Breakout with Caution 🐺🚀
🔍 Analysis:
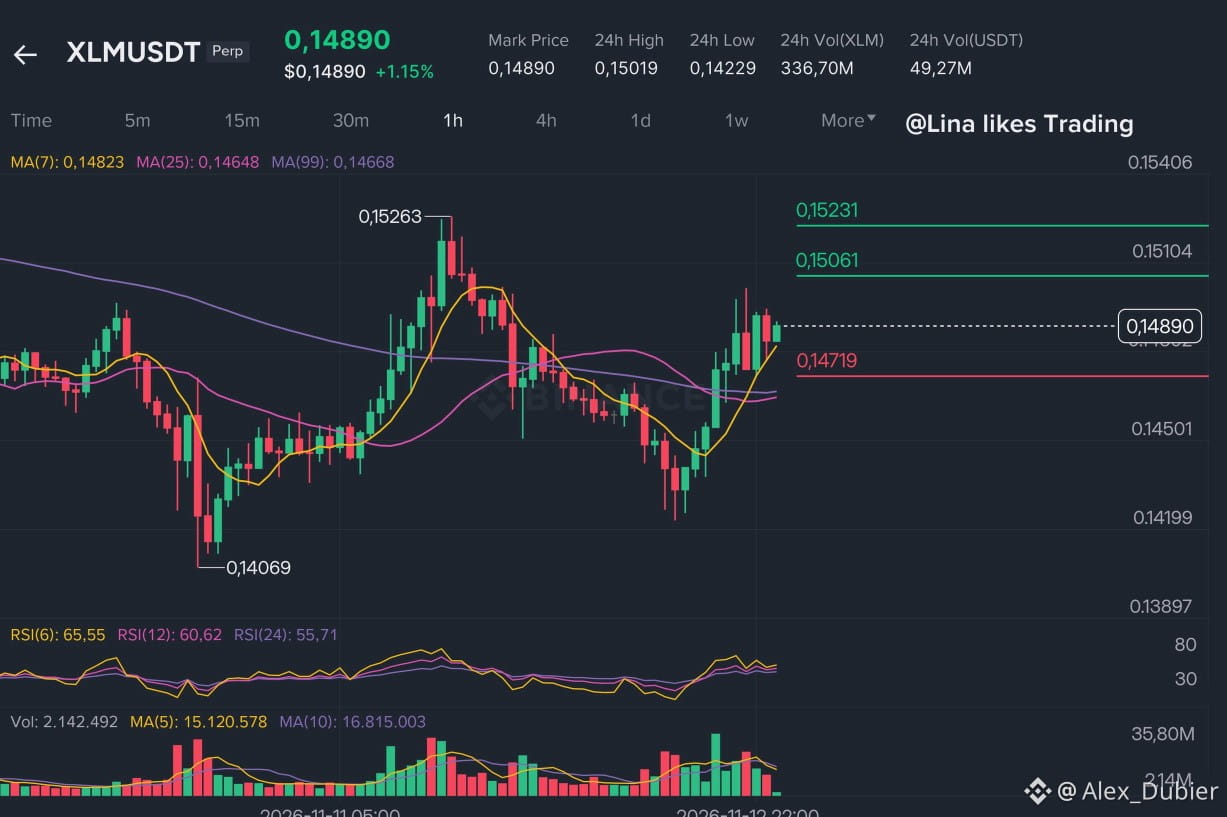
$XLM is approaching its 24-hour high with renewed momentum. However, there are two signals we should respect: low volume and a slight divergence in open interest. This means a false breakout is a real possibility — don't blindly chase the price. Wait for the breakout to hold with conviction before committing capital.
📍 Entry zone: $0.1480 – $0.1487
🎯 TP1: $0.15555 → +4.6% to +5.1%
🎯 TP2: $0.16131 → +8.4% to +9.0%
🛑 SL: $0.14356 → -3.0% to -3.5%
💡 Strategy:
Enter in the marked zone, but only if the breakout above the high holds. If the price rises quickly and then falls back almost immediately, it could be that false signal you mentioned — don't force it. Your final warning is golden: never bet everything. A prudent position size lets you stay calm whether it breaks upward or turns out to be a trap. Intelligence first, buddy! 🐺💪🔥
#XLMUSDT #XLM.24小时交易策略 #XLM
{spot}(XLMUSDT)
📊 $XLM — Watching the High: Breakout with Caution 🐺🚀
🔍 Analysis:
$XLM is approaching its 24-hour high with renewed momentum. However, there are two signals we should respect: low volume and a slight divergence in open interest. This means a false breakout is a real possibility — don't blindly chase the price. Wait for the breakout to hold with conviction before committing capital.
📍 Entry zone: $0.1480 – $0.1487
🎯 TP1: $0.15555 → +4.6% to +5.1%
🎯 TP2: $0.16131 → +8.4% to +9.0%
🛑 SL: $0.14356 → -3.0% to -3.5%
💡 Strategy:
Enter in the marked zone, but only if the breakout above the high holds. If the price rises quickly and then falls back almost immediately, it could be that false signal you mentioned — don't force it. Your final warning is golden: never bet everything. A prudent position size lets you stay calm whether it breaks upward or turns out to be a trap. Intelligence first, buddy! 🐺💪🔥
#XLMUSDT #XLM.24小时交易策略 #XLM
🔍 Analysis:
$XLM is approaching its 24-hour high with renewed momentum. However, there are two signals we should respect: low volume and a slight divergence in open interest. This means a false breakout is a real possibility — don't blindly chase the price. Wait for the breakout to hold with conviction before committing capital.
📍 Entry zone: $0.1480 – $0.1487
🎯 TP1: $0.15555 → +4.6% to +5.1%
🎯 TP2: $0.16131 → +8.4% to +9.0%
🛑 SL: $0.14356 → -3.0% to -3.5%
💡 Strategy:
Enter in the marked zone, but only if the breakout above the high holds. If the price rises quickly and then falls back almost immediately, it could be that false signal you mentioned — don't force it. Your final warning is golden: never bet everything. A prudent position size lets you stay calm whether it breaks upward or turns out to be a trap. Intelligence first, buddy! 🐺💪🔥
#XLMUSDT #XLM.24小时交易策略 #XLM
2
615
·
--
Bullish
📊 $SOL — Critical Support Zone: Where the Next Move Is Decided 🟡👀
🔍 Analysis:
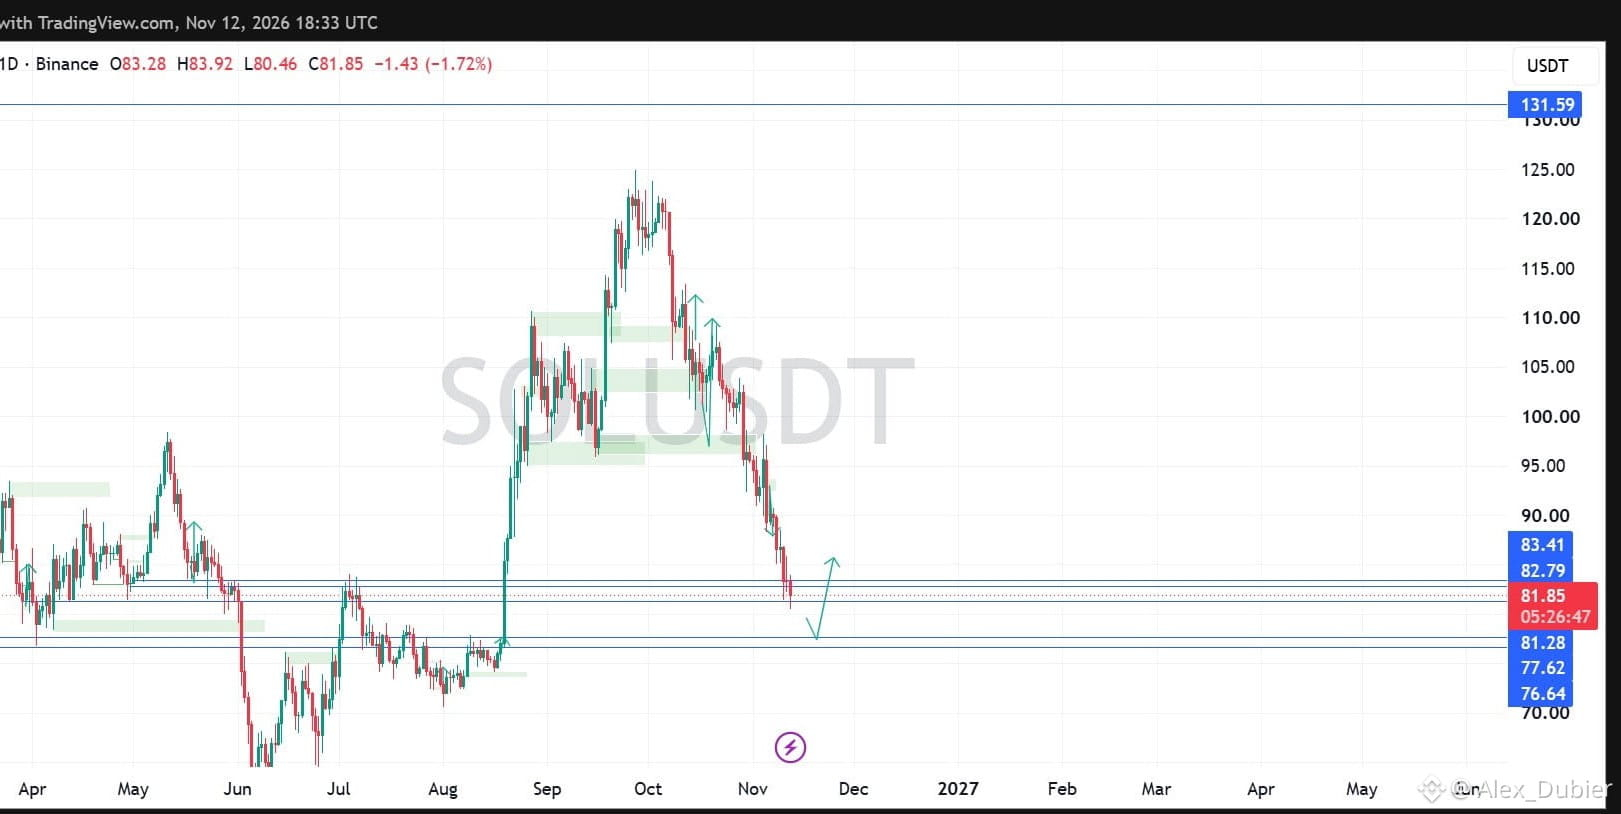
After pulling back from highs above $120, $SOL is approaching a critical support area. Currently trading near $81.85, price is testing the $77–$81 zone — where buyers must show strength to halt the downward pressure. This zone is pivotal: holding it opens the door to a rebound, while losing it would deepen the correction.
📍 Key Support Zone: $77 – $81
🎯 First Recovery Targets: $83 → $85
👀 Strategy: Watch price action closely in this area. A clear bullish rejection signal here would be the first sign that a bounce is near. A break below $77 weakens the picture — patience first.
🧠 "Support isn't an automatic buy — it's where you watch for reaction." Don't anticipate; wait to see who takes control at this decisive level. The market always gives you time to enter well positioned. Stay sharp, team! 💪🔥
#solana #Crypto #analysis
{spot}(SOLUSDT)
📊 $SOL — Critical Support Zone: Where the Next Move Is Decided 🟡👀
🔍 Analysis:
After pulling back from highs above $120, $SOL is approaching a critical support area. Currently trading near $81.85, price is testing the $77–$81 zone — where buyers must show strength to halt the downward pressure. This zone is pivotal: holding it opens the door to a rebound, while losing it would deepen the correction.
📍 Key Support Zone: $77 – $81
🎯 First Recovery Targets: $83 → $85
👀 Strategy: Watch price action closely in this area. A clear bullish rejection signal here would be the first sign that a bounce is near. A break below $77 weakens the picture — patience first.
🧠 "Support isn't an automatic buy — it's where you watch for reaction." Don't anticipate; wait to see who takes control at this decisive level. The market always gives you time to enter well positioned. Stay sharp, team! 💪🔥
#solana #Crypto #analysis
🔍 Analysis:
After pulling back from highs above $120, $SOL is approaching a critical support area. Currently trading near $81.85, price is testing the $77–$81 zone — where buyers must show strength to halt the downward pressure. This zone is pivotal: holding it opens the door to a rebound, while losing it would deepen the correction.
📍 Key Support Zone: $77 – $81
🎯 First Recovery Targets: $83 → $85
👀 Strategy: Watch price action closely in this area. A clear bullish rejection signal here would be the first sign that a bounce is near. A break below $77 weakens the picture — patience first.
🧠 "Support isn't an automatic buy — it's where you watch for reaction." Don't anticipate; wait to see who takes control at this decisive level. The market always gives you time to enter well positioned. Stay sharp, team! 💪🔥
#solana #Crypto #analysis
1
46
·
--
Bullish
📊 $XRP — Bullish Reversal in Progress, Confirmation Is Key 🟢🚀
🔍 Market Analysis:
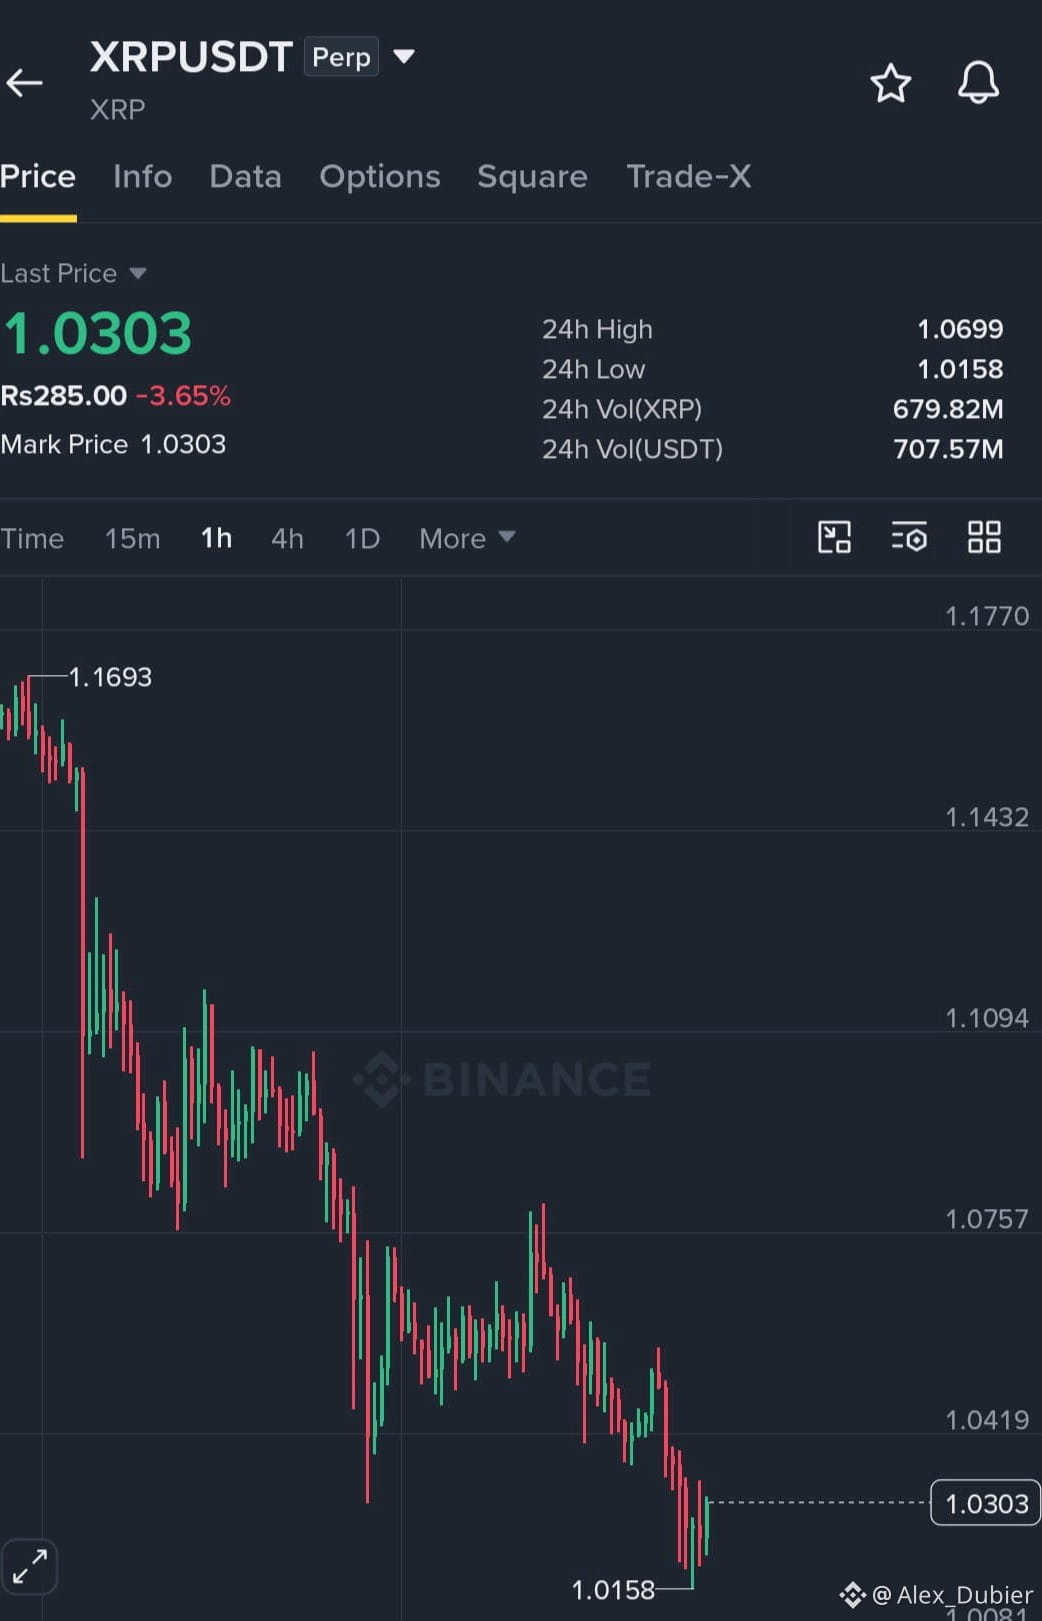
$XRP is attempting to recover after strong selling pressure, with buyers actively defending the critical zone near $1.0158. Although the broader trend still needs confirmation, holding the psychological $1.00 level keeps the possibility of a structural rebound alive. A convincing break above $1.07 would reinforce bullish momentum and pave the way toward higher targets.
📍 Entry Zone: $1.0303
🛑 Stop Loss: $0.9950 — clear invalidation of the bullish scenario
🎯 TP1: $1.0700 → first bullish confirmation
🎯 TP2: $1.1100 → continuation of the move
🚀 Final Target: $1.1500 — maximum rebound projection
💡 Trading Strategy:
Enter in the marked zone, but let the price prove its strength first. If it breaks above $1.07 with increasing volume, the move gains credibility and the path toward $1.11 and $1.15 opens up more clearly. If it breaks below $0.9950, the rebound is invalidated — protect your capital without hesitation.
🧠 "Holding support is the first step; conquering resistance is the confirmation." The reversal is at stake. Risk defined, targets clear, patience above all. Are you ready to ride the rebound? 🚀💪🔥
#XRPRealityCheck #XRPUSDT🚨 #XRPPredictions
{spot}(XRPUSDT)
📊 $XRP — Bullish Reversal in Progress, Confirmation Is Key 🟢🚀
🔍 Market Analysis:
$XRP is attempting to recover after strong selling pressure, with buyers actively defending the critical zone near $1.0158. Although the broader trend still needs confirmation, holding the psychological $1.00 level keeps the possibility of a structural rebound alive. A convincing break above $1.07 would reinforce bullish momentum and pave the way toward higher targets.
📍 Entry Zone: $1.0303
🛑 Stop Loss: $0.9950 — clear invalidation of the bullish scenario
🎯 TP1: $1.0700 → first bullish confirmation
🎯 TP2: $1.1100 → continuation of the move
🚀 Final Target: $1.1500 — maximum rebound projection
💡 Trading Strategy:
Enter in the marked zone, but let the price prove its strength first. If it breaks above $1.07 with increasing volume, the move gains credibility and the path toward $1.11 and $1.15 opens up more clearly. If it breaks below $0.9950, the rebound is invalidated — protect your capital without hesitation.
🧠 "Holding support is the first step; conquering resistance is the confirmation." The reversal is at stake. Risk defined, targets clear, patience above all. Are you ready to ride the rebound? 🚀💪🔥
#XRPRealityCheck #XRPUSDT🚨 #XRPPredictions
🔍 Market Analysis:
$XRP is attempting to recover after strong selling pressure, with buyers actively defending the critical zone near $1.0158. Although the broader trend still needs confirmation, holding the psychological $1.00 level keeps the possibility of a structural rebound alive. A convincing break above $1.07 would reinforce bullish momentum and pave the way toward higher targets.
📍 Entry Zone: $1.0303
🛑 Stop Loss: $0.9950 — clear invalidation of the bullish scenario
🎯 TP1: $1.0700 → first bullish confirmation
🎯 TP2: $1.1100 → continuation of the move
🚀 Final Target: $1.1500 — maximum rebound projection
💡 Trading Strategy:
Enter in the marked zone, but let the price prove its strength first. If it breaks above $1.07 with increasing volume, the move gains credibility and the path toward $1.11 and $1.15 opens up more clearly. If it breaks below $0.9950, the rebound is invalidated — protect your capital without hesitation.
🧠 "Holding support is the first step; conquering resistance is the confirmation." The reversal is at stake. Risk defined, targets clear, patience above all. Are you ready to ride the rebound? 🚀💪🔥
#XRPRealityCheck #XRPUSDT🚨 #XRPPredictions
1
592
·
--
Bullish
📊 $GOOGL — Bullish Counterattack: The Recovery Is Underway 🟢🚀
🔍 Market Perspective:
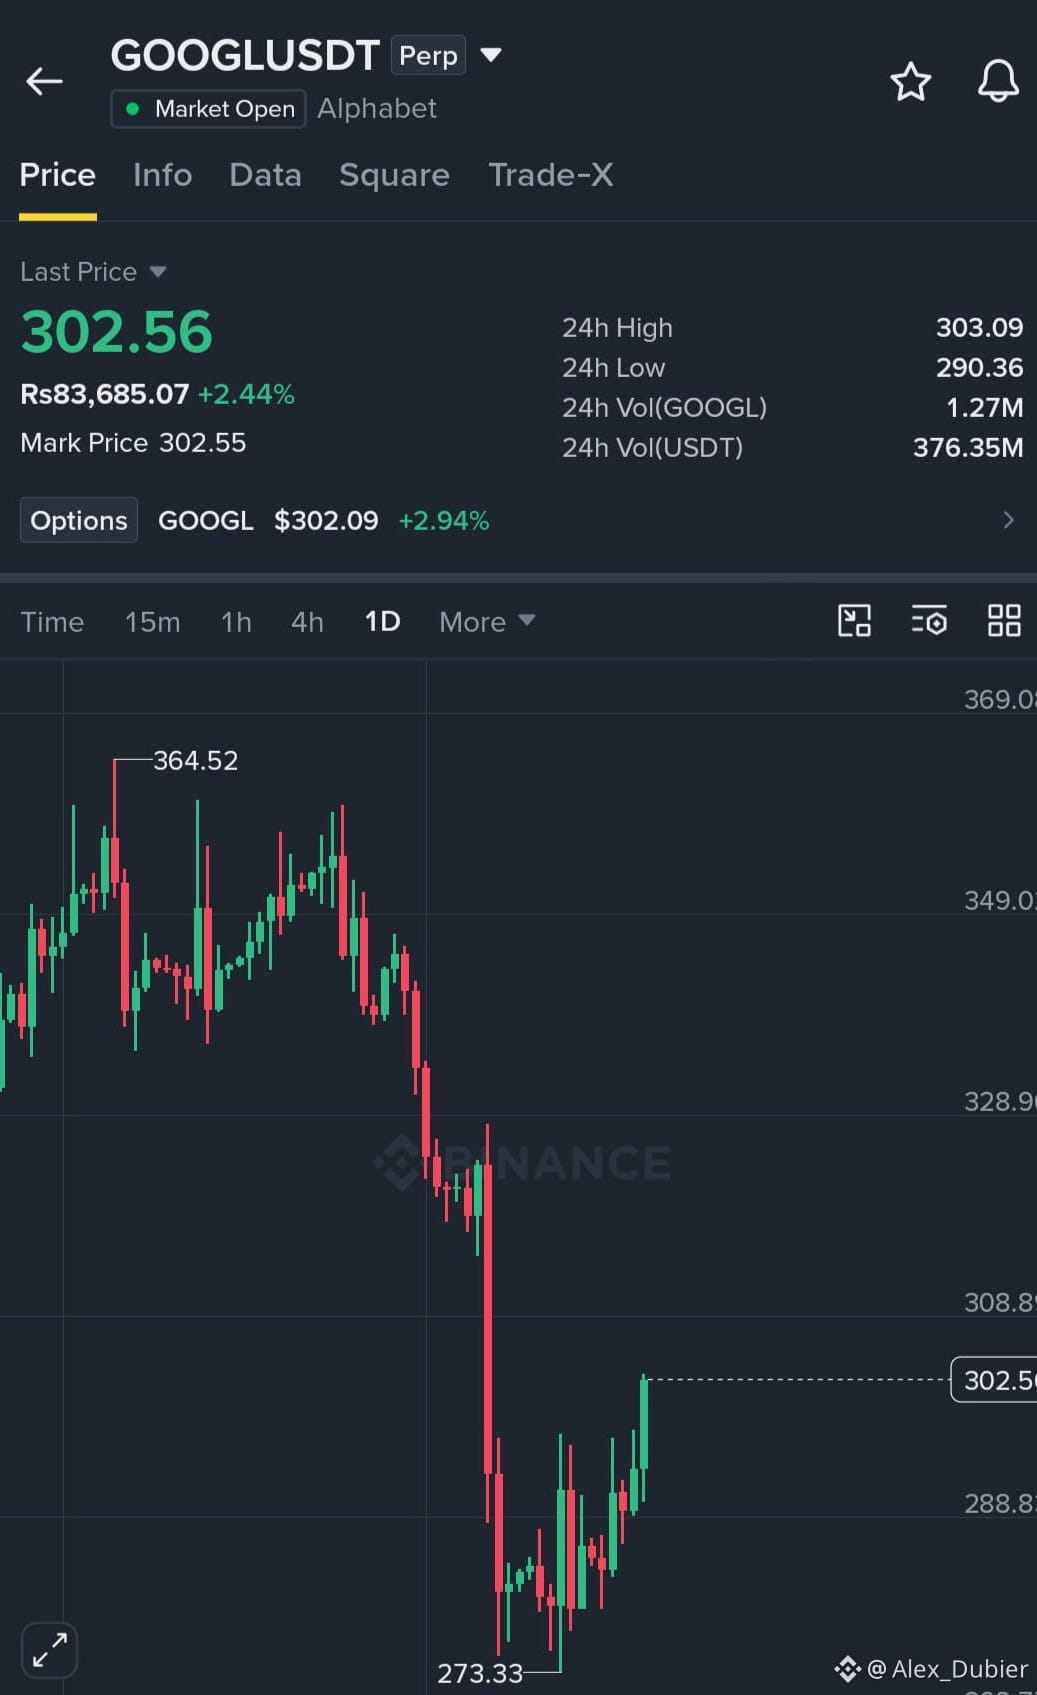
Following a deep correction from $364.52 down to $273.33, the outlook has begun to shift. Buyers have returned with renewed conviction, pushing price back above the psychological level of $300. Bullish momentum is strengthening, and this recovery may only just be getting started.
💡 "The best opportunities arise when fear fades and value becomes clear." The drop has done its work — now those who position wisely harvest the recovery.
📍 Key Support Zone: $288 – $290 — as long as this floor holds, bulls have the edge
🎯 First Target: $310 — immediate resistance ahead
🚀 Main Target: $330 — breaking above $310 with volume paves the way
💡 Entry Strategy:
Consider bullish positions while price holds above $290. A sustained break above $310 on rising volume confirms the continuation toward $330. Losing $288 weakens the setup — that's where we protect capital, not where we enter out of fear.
🧠 The opportunity is here. The market has already priced in the worst. Now patience gets rewarded. Don't wait for $330 to believe — position smartly, respect your risk, and let the recovery work for you. The counterattack has begun. Are you ready to climb with us? 🚀💪🔥
{future}(GOOGLUSDT)
📊 $GOOGL — Bullish Counterattack: The Recovery Is Underway 🟢🚀
🔍 Market Perspective:
Following a deep correction from $364.52 down to $273.33, the outlook has begun to shift. Buyers have returned with renewed conviction, pushing price back above the psychological level of $300. Bullish momentum is strengthening, and this recovery may only just be getting started.
💡 "The best opportunities arise when fear fades and value becomes clear." The drop has done its work — now those who position wisely harvest the recovery.
📍 Key Support Zone: $288 – $290 — as long as this floor holds, bulls have the edge
🎯 First Target: $310 — immediate resistance ahead
🚀 Main Target: $330 — breaking above $310 with volume paves the way
💡 Entry Strategy:
Consider bullish positions while price holds above $290. A sustained break above $310 on rising volume confirms the continuation toward $330. Losing $288 weakens the setup — that's where we protect capital, not where we enter out of fear.
🧠 The opportunity is here. The market has already priced in the worst. Now patience gets rewarded. Don't wait for $330 to believe — position smartly, respect your risk, and let the recovery work for you. The counterattack has begun. Are you ready to climb with us? 🚀💪🔥
🔍 Market Perspective:
Following a deep correction from $364.52 down to $273.33, the outlook has begun to shift. Buyers have returned with renewed conviction, pushing price back above the psychological level of $300. Bullish momentum is strengthening, and this recovery may only just be getting started.
💡 "The best opportunities arise when fear fades and value becomes clear." The drop has done its work — now those who position wisely harvest the recovery.
📍 Key Support Zone: $288 – $290 — as long as this floor holds, bulls have the edge
🎯 First Target: $310 — immediate resistance ahead
🚀 Main Target: $330 — breaking above $310 with volume paves the way
💡 Entry Strategy:
Consider bullish positions while price holds above $290. A sustained break above $310 on rising volume confirms the continuation toward $330. Losing $288 weakens the setup — that's where we protect capital, not where we enter out of fear.
🧠 The opportunity is here. The market has already priced in the worst. Now patience gets rewarded. Don't wait for $330 to believe — position smartly, respect your risk, and let the recovery work for you. The counterattack has begun. Are you ready to climb with us? 🚀💪🔥
1
219
·
--
Bullish
📊 $PENGU — In summary: 🐧⚠️
📅 Nov 17: 700M tokens are released (~$4.5M), with monthly unlocks through 2028
- ✅ The market already knows what's going to happen, but that doesn't guarantee there won't be volatility
- ⚠️ The real impact depends on how much is actually sold — it's not known yet
- 📉 Most common: caution for a few days before or after the event
- 💡 Advice: Don't rush in. Wait to see how the price reacts after the 17th before committing capital
🧠 "The calendar doesn't change, but the fear of the day does." It's better to wait for the smoke to clear than to risk an unpleasant surprise. Patience above all! 🙏
{spot}(PENGUUSDT)
📊 $PENGU — In summary: 🐧⚠️
📅 Nov 17: 700M tokens are released (~$4.5M), with monthly unlocks through 2028
- ✅ The market already knows what's going to happen, but that doesn't guarantee there won't be volatility
- ⚠️ The real impact depends on how much is actually sold — it's not known yet
- 📉 Most common: caution for a few days before or after the event
- 💡 Advice: Don't rush in. Wait to see how the price reacts after the 17th before committing capital
🧠 "The calendar doesn't change, but the fear of the day does." It's better to wait for the smoke to clear than to risk an unpleasant surprise. Patience above all! 🙏
📅 Nov 17: 700M tokens are released (~$4.5M), with monthly unlocks through 2028
- ✅ The market already knows what's going to happen, but that doesn't guarantee there won't be volatility
- ⚠️ The real impact depends on how much is actually sold — it's not known yet
- 📉 Most common: caution for a few days before or after the event
- 💡 Advice: Don't rush in. Wait to see how the price reacts after the 17th before committing capital
🧠 "The calendar doesn't change, but the fear of the day does." It's better to wait for the smoke to clear than to risk an unpleasant surprise. Patience above all! 🙏

3
337
·
--
Bullish
📊 $LAB — From dream to reality: honesty above all 📉
🔍 The story we all witnessed:
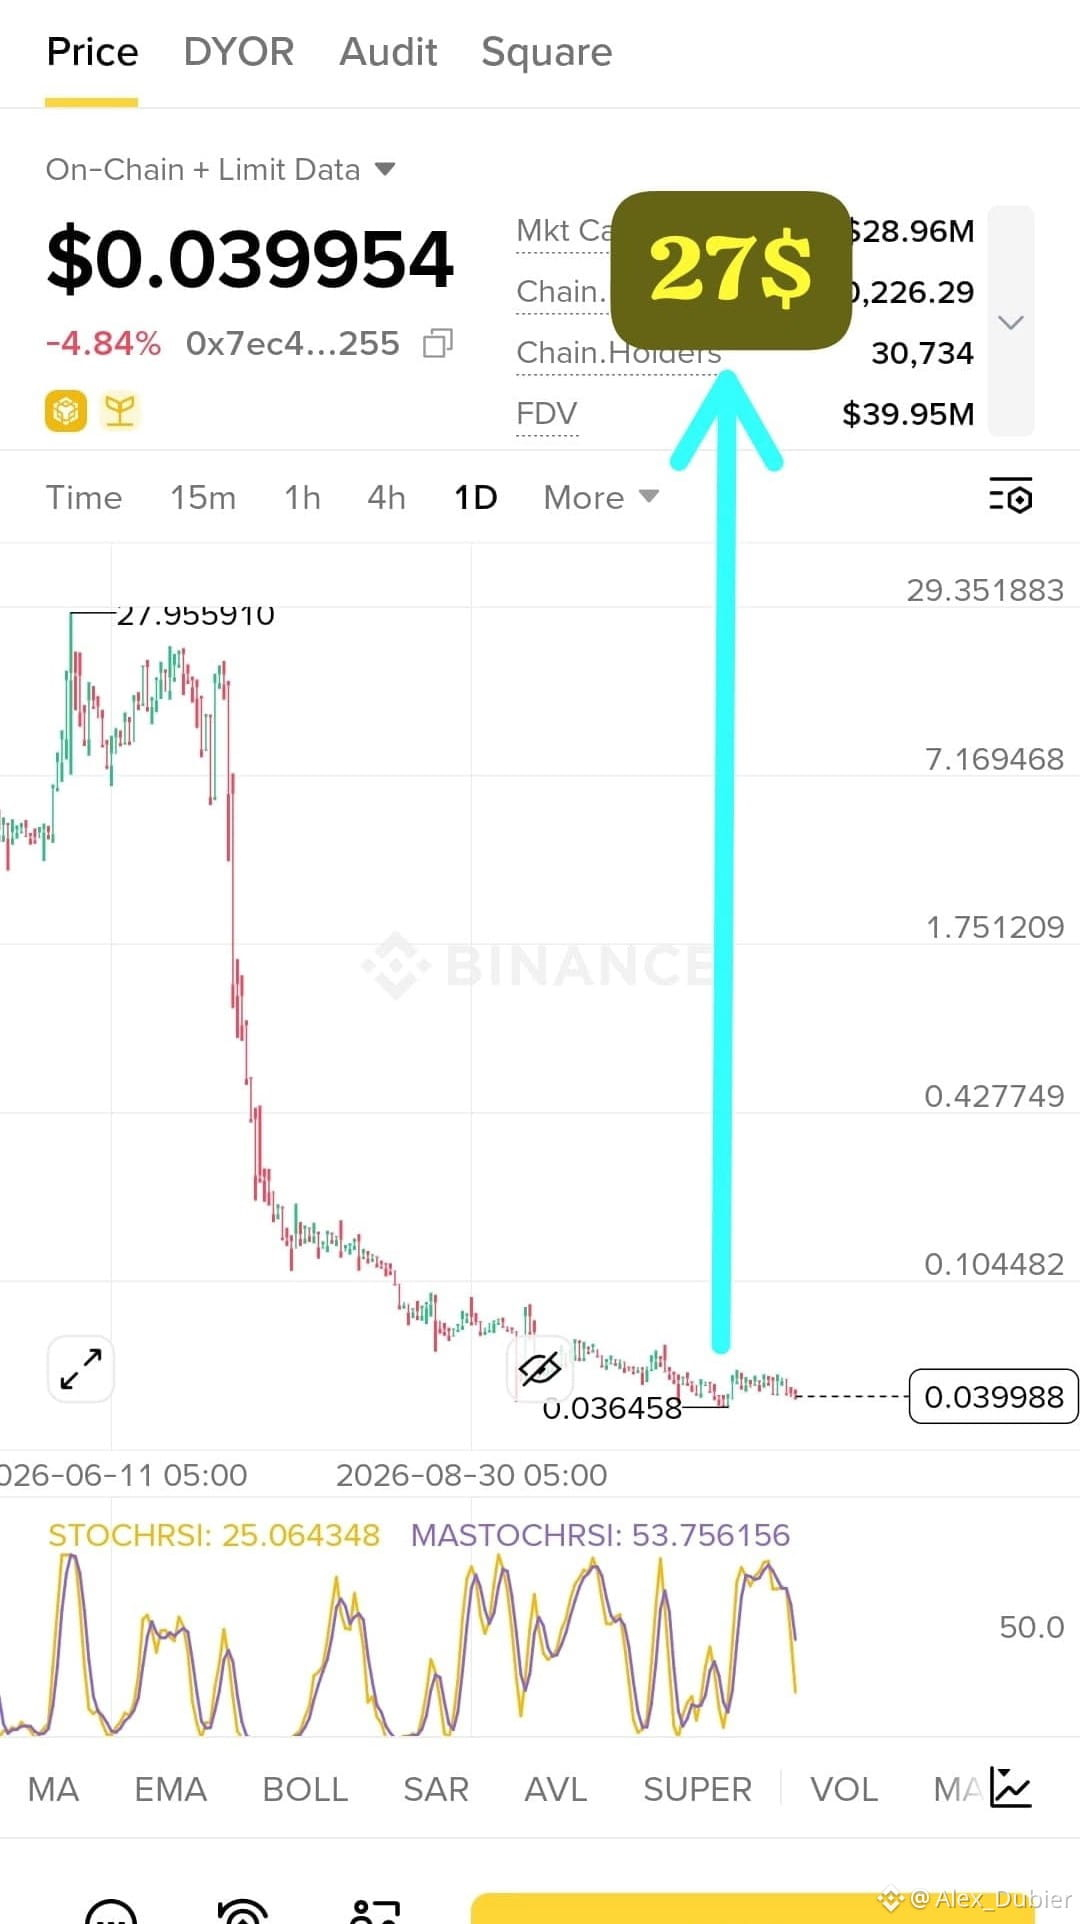
It's hard not to feel discouraged. $LAB reached a high of nearly $27 at its all-time peak, and today it's hovering around $0.04 — a drop of more than 99.9%. Many believed in the narrative, and watching it unravel hurts. It's completely valid to ask: can it even recover from something like this?
💡 The reality, seen with open eyes:
✅ Reaching $1 would indeed be a monumental achievement — it would represent more than 25 times its current price. But we need to be clear about why it fell so far: there were delays in token unlocks, concerns about insiders controlling the supply, and a loss of fundamental confidence. Those problems aren't resolved by "time" alone.
🧠 "It's not that it can't go up — it's that the road back isn't a straight line." Recovering from a 99.9% drop requires the project to rebuild trust, address its transparency issues, and for the market to value it again. None of that happens overnight.
💎 If you believe in the project:
Celebrate every real step it takes toward recovery. But separate your hopes from your money: don't bet more than you can afford to lose. Reaching $1 would be incredible 🔥, but the reality is that most assets that fall 99% don't return to their highs. Stay optimistic, but keep your feet on the ground too.
🚀 "The market owes you nothing. Your strategy owes you protection." If you decide to hold or get in, do so with your eyes wide open to both scenarios. And if it doesn't reach $1, your financial peace of mind is worth more than any token. Stay strong, team 💪🙏
{future}(LABUSDT)
📊 $LAB — From dream to reality: honesty above all 📉
🔍 The story we all witnessed:
It's hard not to feel discouraged. $LAB reached a high of nearly $27 at its all-time peak, and today it's hovering around $0.04 — a drop of more than 99.9%. Many believed in the narrative, and watching it unravel hurts. It's completely valid to ask: can it even recover from something like this?
💡 The reality, seen with open eyes:
✅ Reaching $1 would indeed be a monumental achievement — it would represent more than 25 times its current price. But we need to be clear about why it fell so far: there were delays in token unlocks, concerns about insiders controlling the supply, and a loss of fundamental confidence. Those problems aren't resolved by "time" alone.
🧠 "It's not that it can't go up — it's that the road back isn't a straight line." Recovering from a 99.9% drop requires the project to rebuild trust, address its transparency issues, and for the market to value it again. None of that happens overnight.
💎 If you believe in the project:
Celebrate every real step it takes toward recovery. But separate your hopes from your money: don't bet more than you can afford to lose. Reaching $1 would be incredible 🔥, but the reality is that most assets that fall 99% don't return to their highs. Stay optimistic, but keep your feet on the ground too.
🚀 "The market owes you nothing. Your strategy owes you protection." If you decide to hold or get in, do so with your eyes wide open to both scenarios. And if it doesn't reach $1, your financial peace of mind is worth more than any token. Stay strong, team 💪🙏
🔍 The story we all witnessed:
It's hard not to feel discouraged. $LAB reached a high of nearly $27 at its all-time peak, and today it's hovering around $0.04 — a drop of more than 99.9%. Many believed in the narrative, and watching it unravel hurts. It's completely valid to ask: can it even recover from something like this?
💡 The reality, seen with open eyes:
✅ Reaching $1 would indeed be a monumental achievement — it would represent more than 25 times its current price. But we need to be clear about why it fell so far: there were delays in token unlocks, concerns about insiders controlling the supply, and a loss of fundamental confidence. Those problems aren't resolved by "time" alone.
🧠 "It's not that it can't go up — it's that the road back isn't a straight line." Recovering from a 99.9% drop requires the project to rebuild trust, address its transparency issues, and for the market to value it again. None of that happens overnight.
💎 If you believe in the project:
Celebrate every real step it takes toward recovery. But separate your hopes from your money: don't bet more than you can afford to lose. Reaching $1 would be incredible 🔥, but the reality is that most assets that fall 99% don't return to their highs. Stay optimistic, but keep your feet on the ground too.
🚀 "The market owes you nothing. Your strategy owes you protection." If you decide to hold or get in, do so with your eyes wide open to both scenarios. And if it doesn't reach $1, your financial peace of mind is worth more than any token. Stay strong, team 💪🙏
2
771
·
--
Bullish
📊 $JCT — Bearish structure confirmed, disciplined execution 📉🚨
🔍 Analysis:
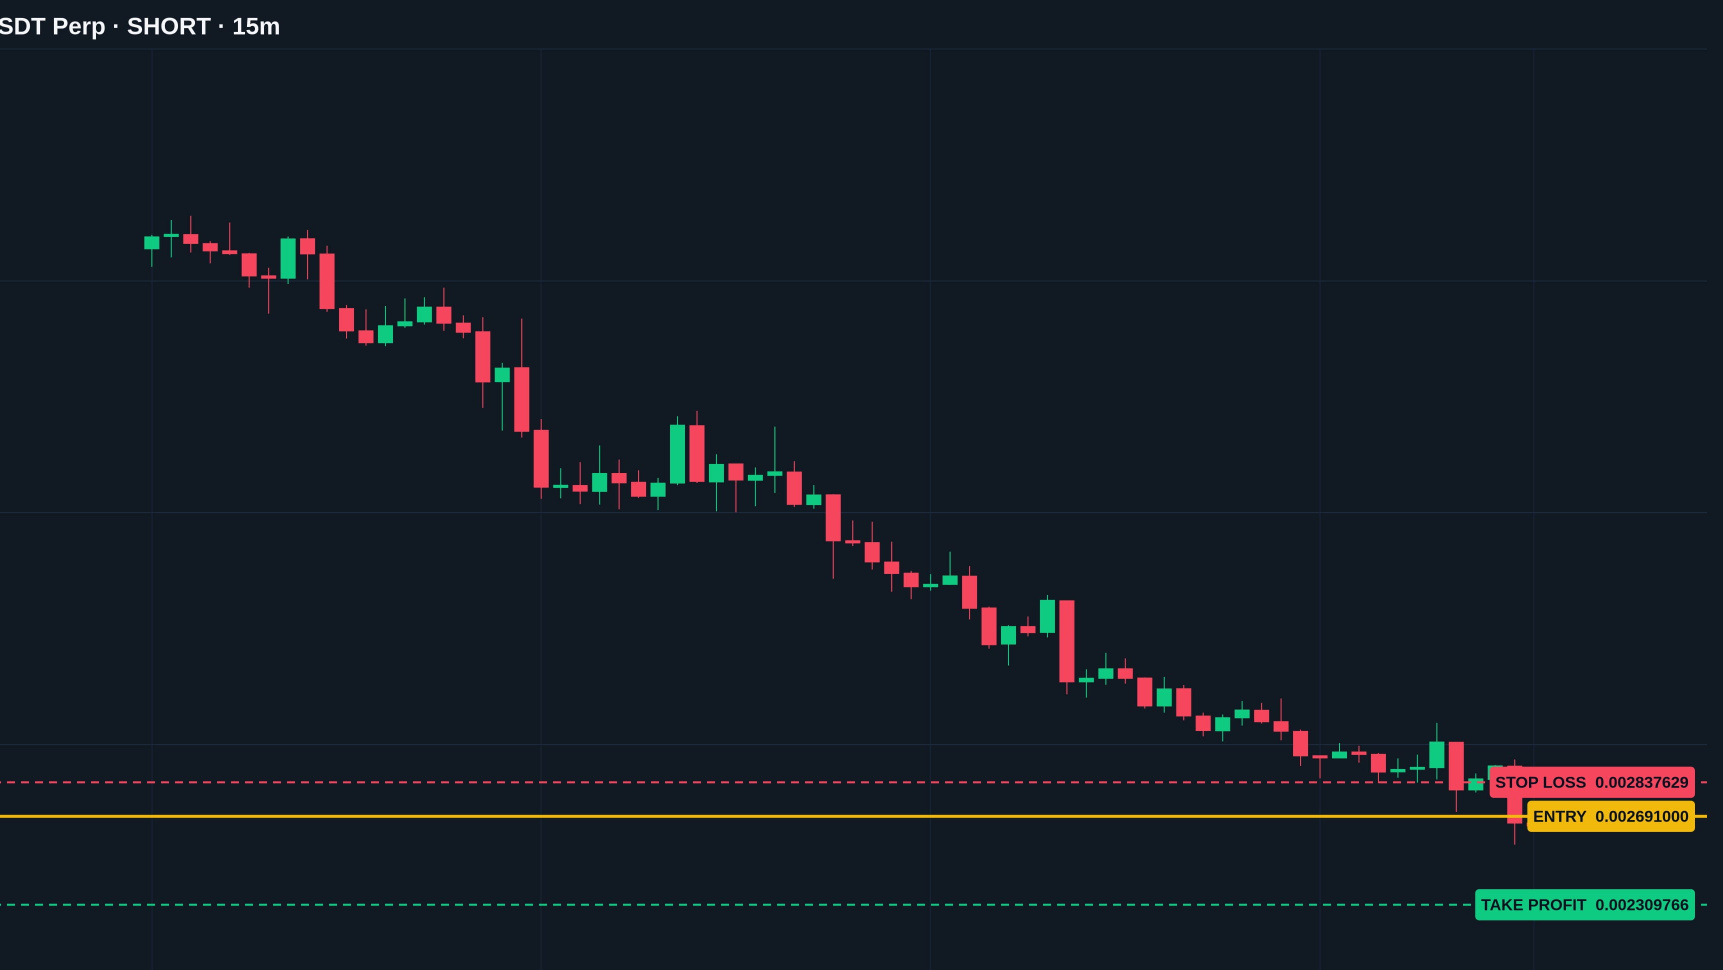
Volume is expanding and the 9/21/50 EMAs are aligned downward, confirming selling momentum. Your entry is above your targets and your Stop is above the trading zone — this is a SHORT position, not a long. I’m highlighting this so you’re clear when posting ✅
📍 Entry zone: $0.00266351 – $0.00271849
🛑 Stop Loss: $0.00283763 → +4.4% to +6.5% — clear invalidation level
🎯 TP1: $0.00254437 → -4.5% to -6.4%
🎯 TP2: $0.00242707 → -8.9% to -10.7%
🎯 TP3: $0.00230977 → -13.3% to -15.0%
💡 Strategy:
Enter in the marked zone. Take partial profits at each level and move your Stop to breakeven once TP1 is reached. If it breaks above $0.00283763, the scenario is invalidated — exit without hesitation. Watch the volume: as long as it remains high during the decline, the momentum remains intact.
🧠 "Aligned structure = defined trend. Stick to the plan; the market isn’t in a hurry, but it does have a price." Stay alert and execute calmly. Good trade, team! 💪🔥
📊 $JCT — Bearish structure confirmed, disciplined execution 📉🚨
🔍 Analysis:
Volume is expanding and the 9/21/50 EMAs are aligned downward, confirming selling momentum. Your entry is above your targets and your Stop is above the trading zone — this is a SHORT position, not a long. I’m highlighting this so you’re clear when posting ✅
📍 Entry zone: $0.00266351 – $0.00271849
🛑 Stop Loss: $0.00283763 → +4.4% to +6.5% — clear invalidation level
🎯 TP1: $0.00254437 → -4.5% to -6.4%
🎯 TP2: $0.00242707 → -8.9% to -10.7%
🎯 TP3: $0.00230977 → -13.3% to -15.0%
💡 Strategy:
Enter in the marked zone. Take partial profits at each level and move your Stop to breakeven once TP1 is reached. If it breaks above $0.00283763, the scenario is invalidated — exit without hesitation. Watch the volume: as long as it remains high during the decline, the momentum remains intact.
🧠 "Aligned structure = defined trend. Stick to the plan; the market isn’t in a hurry, but it does have a price." Stay alert and execute calmly. Good trade, team! 💪🔥
🔍 Analysis:
Volume is expanding and the 9/21/50 EMAs are aligned downward, confirming selling momentum. Your entry is above your targets and your Stop is above the trading zone — this is a SHORT position, not a long. I’m highlighting this so you’re clear when posting ✅
📍 Entry zone: $0.00266351 – $0.00271849
🛑 Stop Loss: $0.00283763 → +4.4% to +6.5% — clear invalidation level
🎯 TP1: $0.00254437 → -4.5% to -6.4%
🎯 TP2: $0.00242707 → -8.9% to -10.7%
🎯 TP3: $0.00230977 → -13.3% to -15.0%
💡 Strategy:
Enter in the marked zone. Take partial profits at each level and move your Stop to breakeven once TP1 is reached. If it breaks above $0.00283763, the scenario is invalidated — exit without hesitation. Watch the volume: as long as it remains high during the decline, the momentum remains intact.
🧠 "Aligned structure = defined trend. Stick to the plan; the market isn’t in a hurry, but it does have a price." Stay alert and execute calmly. Good trade, team! 💪🔥
3
2
821
·
--
Bullish
📊 $ONE — Divergence Delivered! Watch Key Resistance Next 🟢🚀
✅ Great job, team! The signal paid off 🎉
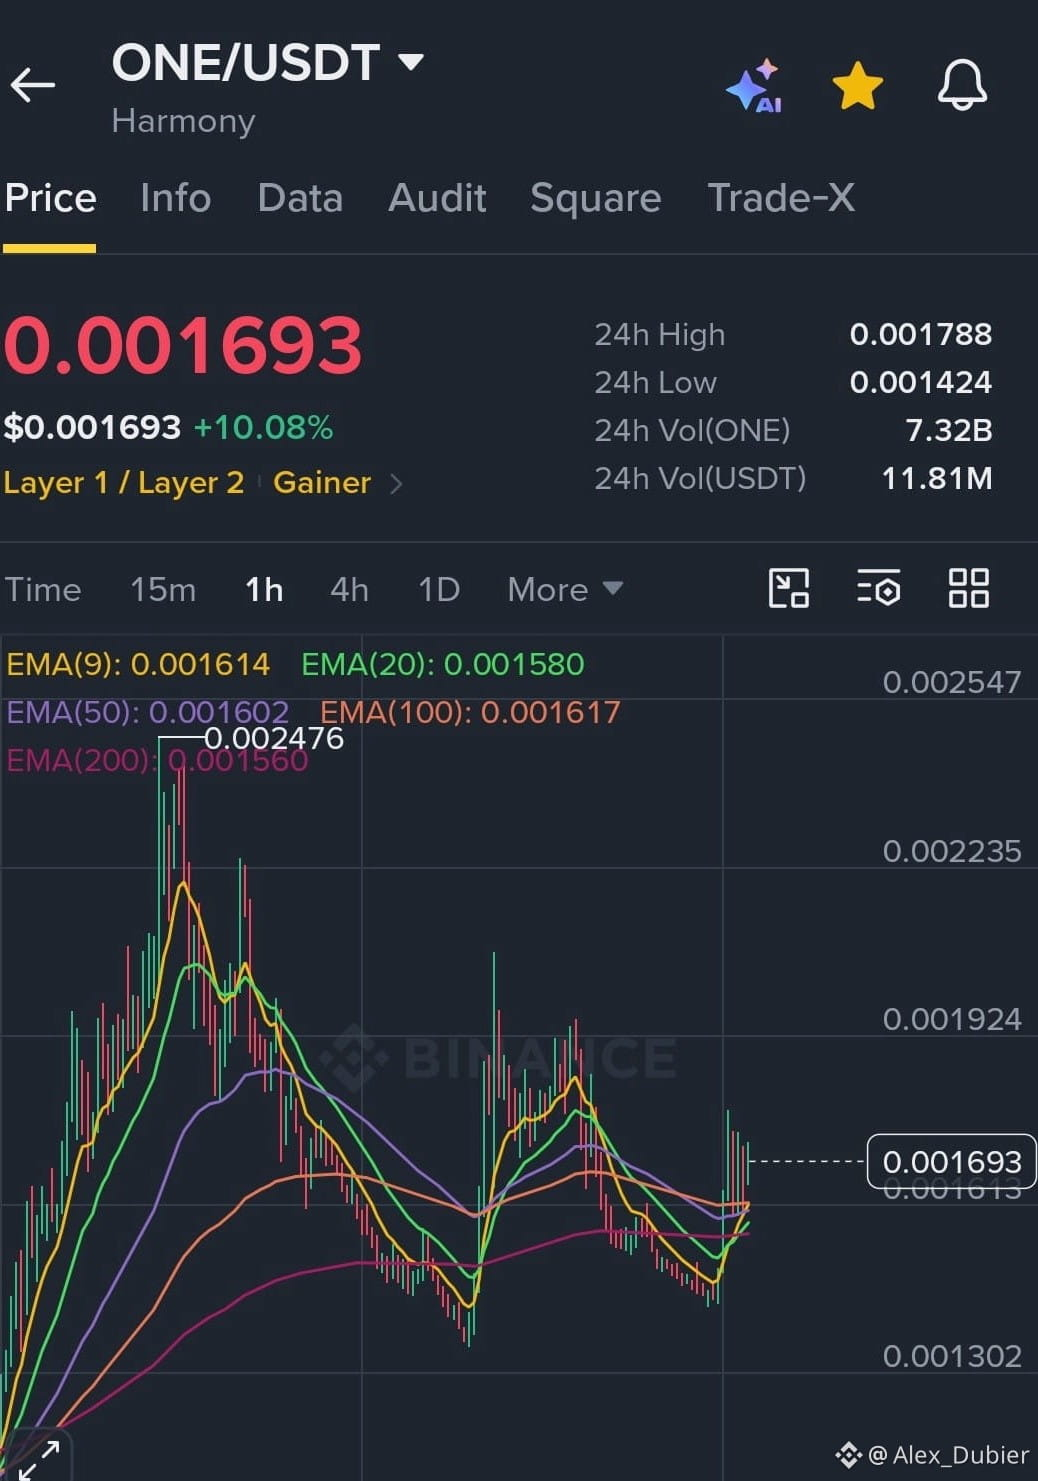
Price rebounded from $0.0013 all the way to $0.0017 — exactly what yesterday's bullish RSI divergence warned us about: price made lower lows, but momentum didn't follow = selling pressure was drying up before our eyes
🔍 What's next:
🎯 Next target: $0.0020 — but first, price needs to break immediate resistance at $0.0018 with rising volume
🛑 Support zone: $0.0015 — as long as we hold above this level, the bullish bias remains intact
💡 Strategy:
Already in? Protect your entry by moving your Stop Loss to $0.0015 and let the rest run toward $0.0018–$0.0020. Still on the sidelines? Wait for a confirmed breakout above $0.0018 — chasing price at the highs usually costs more than it pays
🧠 "Divergence warns; breakout confirms." Great read, great execution. Now patience as we test that next level. Well done to everyone who stayed sharp! 💪🔥
📊 $ONE — Divergence Delivered! Watch Key Resistance Next 🟢🚀
✅ Great job, team! The signal paid off 🎉
Price rebounded from $0.0013 all the way to $0.0017 — exactly what yesterday's bullish RSI divergence warned us about: price made lower lows, but momentum didn't follow = selling pressure was drying up before our eyes
🔍 What's next:
🎯 Next target: $0.0020 — but first, price needs to break immediate resistance at $0.0018 with rising volume
🛑 Support zone: $0.0015 — as long as we hold above this level, the bullish bias remains intact
💡 Strategy:
Already in? Protect your entry by moving your Stop Loss to $0.0015 and let the rest run toward $0.0018–$0.0020. Still on the sidelines? Wait for a confirmed breakout above $0.0018 — chasing price at the highs usually costs more than it pays
🧠 "Divergence warns; breakout confirms." Great read, great execution. Now patience as we test that next level. Well done to everyone who stayed sharp! 💪🔥
✅ Great job, team! The signal paid off 🎉
Price rebounded from $0.0013 all the way to $0.0017 — exactly what yesterday's bullish RSI divergence warned us about: price made lower lows, but momentum didn't follow = selling pressure was drying up before our eyes
🔍 What's next:
🎯 Next target: $0.0020 — but first, price needs to break immediate resistance at $0.0018 with rising volume
🛑 Support zone: $0.0015 — as long as we hold above this level, the bullish bias remains intact
💡 Strategy:
Already in? Protect your entry by moving your Stop Loss to $0.0015 and let the rest run toward $0.0018–$0.0020. Still on the sidelines? Wait for a confirmed breakout above $0.0018 — chasing price at the highs usually costs more than it pays
🧠 "Divergence warns; breakout confirms." Great read, great execution. Now patience as we test that next level. Well done to everyone who stayed sharp! 💪🔥
2
445
·
--

Article
$SUI — Roadmap: 4 Stages, 2 Scenarios 🟢📉📊 $SUI — Roadmap: 4 Stages, 2 Scenarios 🟢📉
🔍 Overview:
$SUI is trading below $1, but the weekly chart reveals a clear step-like structure. Three key levels separate the current price from the transformative zone near $8. Each level acts as either a springboard upward or a ceiling overhead.
📈 BULLISH SCENARIO — Step by step:
🔹 Level 1 — The initial breakout
Break above the downtrend line from the $0.8366 low. This opens the way to the first major obstacle: $1.97
$SUI — Roadmap: 4 Stages, 2 Scenarios 🟢📉
📊 $SUI — Roadmap: 4 Stages, 2 Scenarios 🟢📉
🔍 Overview:
$SUI is trading below $1, but the weekly chart reveals a clear step-like structure. Three key levels separate the current price from the transformative zone near $8. Each level acts as either a springboard upward or a ceiling overhead.
📈 BULLISH SCENARIO — Step by step:
🔹 Level 1 — The initial breakout
Break above the downtrend line from the $0.8366 low. This opens the way to the first major obstacle: $1.97
🔍 Overview:
$SUI is trading below $1, but the weekly chart reveals a clear step-like structure. Three key levels separate the current price from the transformative zone near $8. Each level acts as either a springboard upward or a ceiling overhead.
📈 BULLISH SCENARIO — Step by step:
🔹 Level 1 — The initial breakout
Break above the downtrend line from the $0.8366 low. This opens the way to the first major obstacle: $1.97
2
796
·
--
Bullish
📊 $AVA — Bounce from support; confirmation is key 🟢🚀
🔍 Market analysis:
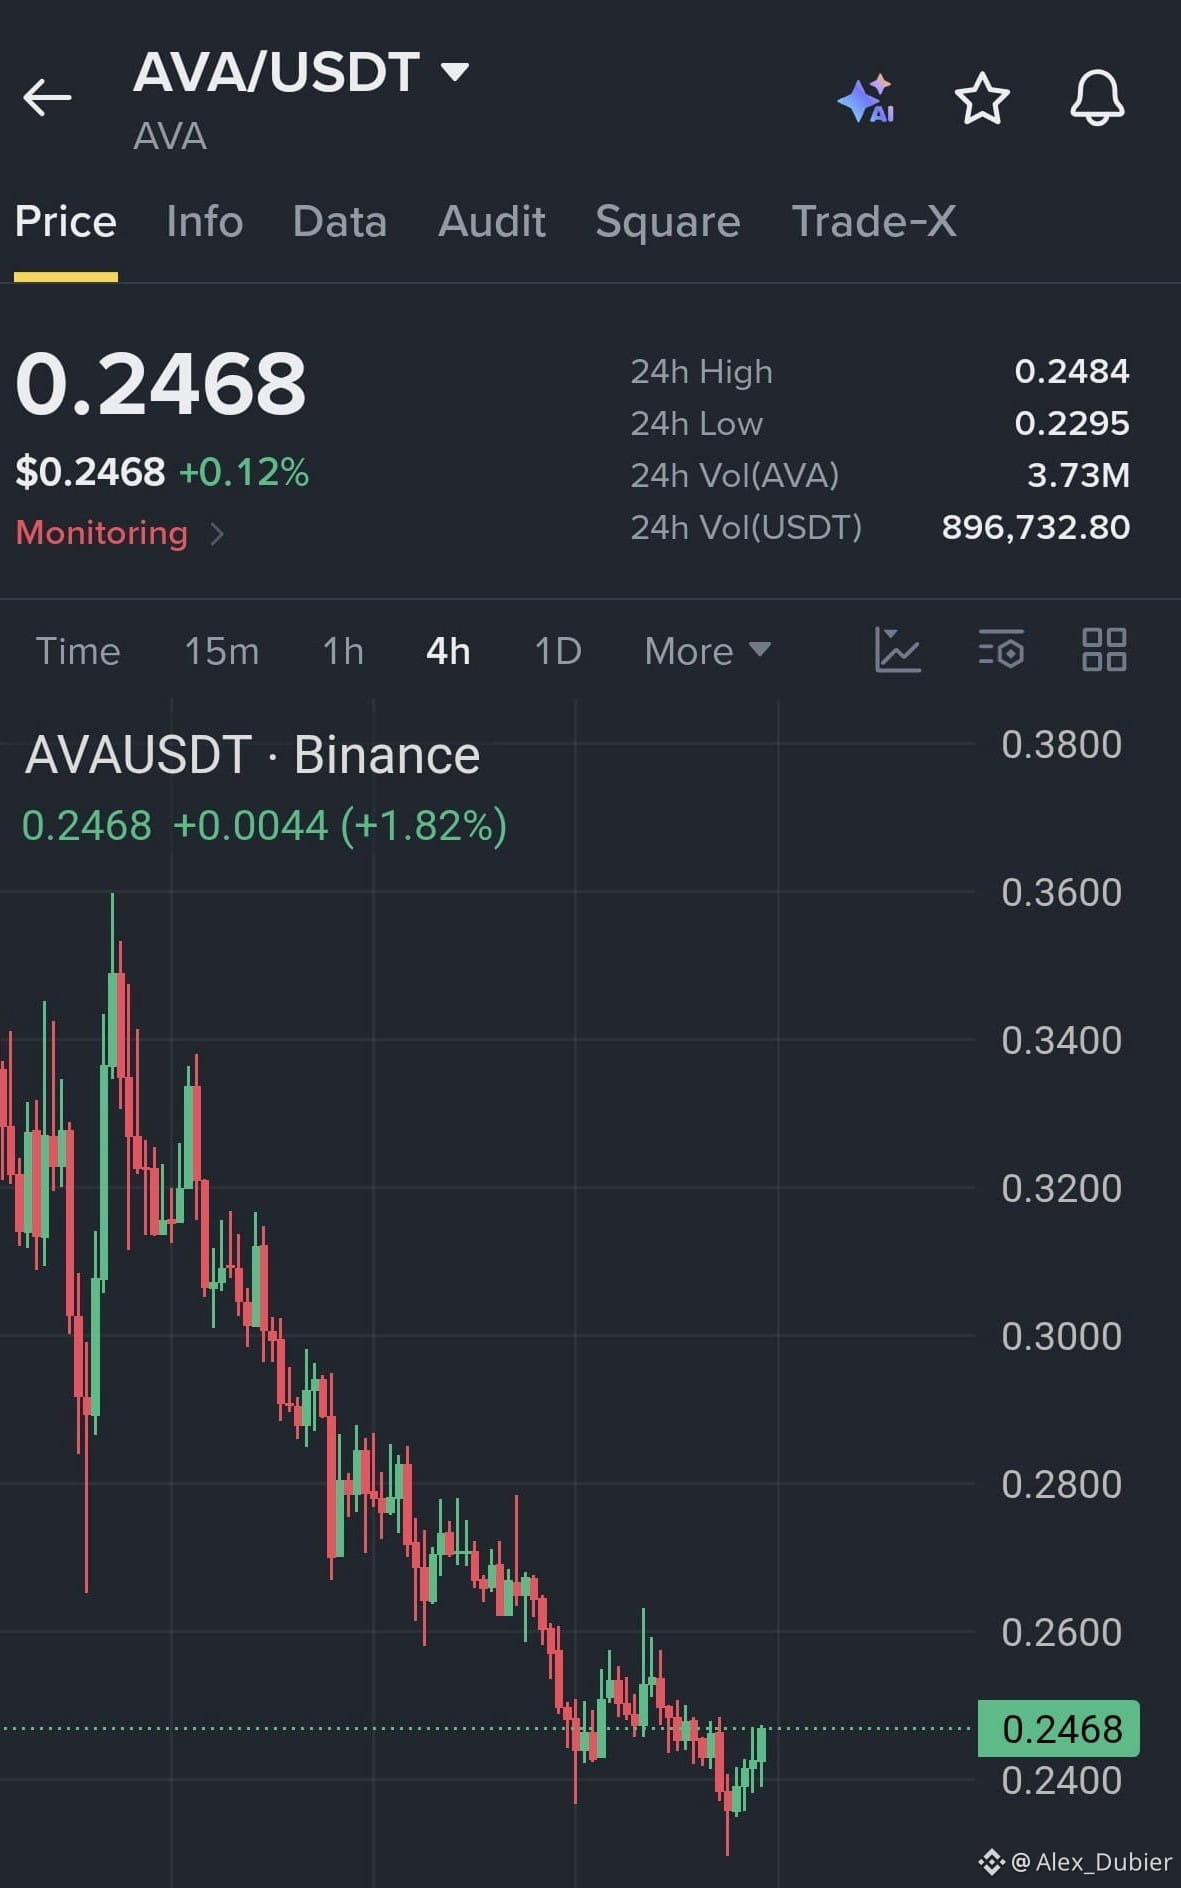
$AVA has rebounded strongly from the $0.235 support level, showing signs of regaining upward momentum. Buyers are gradually recovering lost ground, but the recent resistance at $0.250 is a key level for confirming whether this rebound is valid. Stay cautious until there is a high-volume breakout.
📍 Entry range: $0.245 – $0.248 (enter after upward momentum is confirmed)
🎯 Take profit: $0.260 → +4.8% to +6.1%
🛑 Stop loss: $0.238 → -2.8% to -4.0%
💡 Trading strategy:
Enter within the planned range, but first let the price prove its strength. A decisive break above the $0.250 resistance would open up further upside. If support fails, follow the stop-loss strictly and exit without hesitation.
🧠 "A bounce is an opportunity; confirmation is the signal to enter." Risk management comes first, profits second. A clear plan, executed with conviction. Once confirmed, we go all in! 💪🔥
{spot}(AVAUSDT)
📊 $AVA — Bounce from support; confirmation is key 🟢🚀
🔍 Market analysis:
$AVA has rebounded strongly from the $0.235 support level, showing signs of regaining upward momentum. Buyers are gradually recovering lost ground, but the recent resistance at $0.250 is a key level for confirming whether this rebound is valid. Stay cautious until there is a high-volume breakout.
📍 Entry range: $0.245 – $0.248 (enter after upward momentum is confirmed)
🎯 Take profit: $0.260 → +4.8% to +6.1%
🛑 Stop loss: $0.238 → -2.8% to -4.0%
💡 Trading strategy:
Enter within the planned range, but first let the price prove its strength. A decisive break above the $0.250 resistance would open up further upside. If support fails, follow the stop-loss strictly and exit without hesitation.
🧠 "A bounce is an opportunity; confirmation is the signal to enter." Risk management comes first, profits second. A clear plan, executed with conviction. Once confirmed, we go all in! 💪🔥
🔍 Market analysis:
$AVA has rebounded strongly from the $0.235 support level, showing signs of regaining upward momentum. Buyers are gradually recovering lost ground, but the recent resistance at $0.250 is a key level for confirming whether this rebound is valid. Stay cautious until there is a high-volume breakout.
📍 Entry range: $0.245 – $0.248 (enter after upward momentum is confirmed)
🎯 Take profit: $0.260 → +4.8% to +6.1%
🛑 Stop loss: $0.238 → -2.8% to -4.0%
💡 Trading strategy:
Enter within the planned range, but first let the price prove its strength. A decisive break above the $0.250 resistance would open up further upside. If support fails, follow the stop-loss strictly and exit without hesitation.
🧠 "A bounce is an opportunity; confirmation is the signal to enter." Risk management comes first, profits second. A clear plan, executed with conviction. Once confirmed, we go all in! 💪🔥
1
91
·
--
Bullish
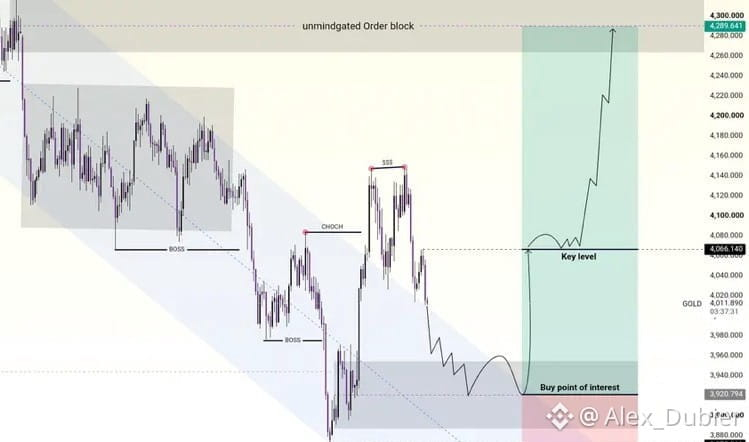
📊 $XAU — Support in Play, Patience Before the Rally 🟡🚀
🔍 Analysis:
Gold remains under bearish pressure near $4,012, but the critical support zone at $3,920–$3,950 is the floor that will define the next major move. Holding this level opens the door to a meaningful recovery, while losing it immediately shifts the outlook.
📍 Buy Zone: $3,920 – $3,950 (wait for confirmed bullish reaction)
🎯 Key Resistance to Clear: $4,066 — the gate that triggers the rally
🚀 Upside Targets: $4,200 → $4,290 (300+ pips potential)
🛑 Invalidation: Close below $3,870 — bullish scenario weakens significantly
💡 Strategy:
Don't buy just because "it's cheaper." Wait for price to reach your support zone and show clear upward rejection signals. Only once price breaks above $4,066 with conviction does the recovery gain credibility. If $3,870 breaks to the downside, step aside — your capital is worth more than a forced trade.
🧠 "Support isn't a guarantee of bounce — it's where your risk is best defined." 3,000 pips sounds amazing, but it happens in stages: hold the floor first, then conquer the ceiling. One step at a time, team. Discipline = profits that stay with you! 💪🔥
{future}(XAUUSDT)
📊 $XAU — Support in Play, Patience Before the Rally 🟡🚀
🔍 Analysis:
Gold remains under bearish pressure near $4,012, but the critical support zone at $3,920–$3,950 is the floor that will define the next major move. Holding this level opens the door to a meaningful recovery, while losing it immediately shifts the outlook.
📍 Buy Zone: $3,920 – $3,950 (wait for confirmed bullish reaction)
🎯 Key Resistance to Clear: $4,066 — the gate that triggers the rally
🚀 Upside Targets: $4,200 → $4,290 (300+ pips potential)
🛑 Invalidation: Close below $3,870 — bullish scenario weakens significantly
💡 Strategy:
Don't buy just because "it's cheaper." Wait for price to reach your support zone and show clear upward rejection signals. Only once price breaks above $4,066 with conviction does the recovery gain credibility. If $3,870 breaks to the downside, step aside — your capital is worth more than a forced trade.
🧠 "Support isn't a guarantee of bounce — it's where your risk is best defined." 3,000 pips sounds amazing, but it happens in stages: hold the floor first, then conquer the ceiling. One step at a time, team. Discipline = profits that stay with you! 💪🔥
🔍 Analysis:
Gold remains under bearish pressure near $4,012, but the critical support zone at $3,920–$3,950 is the floor that will define the next major move. Holding this level opens the door to a meaningful recovery, while losing it immediately shifts the outlook.
📍 Buy Zone: $3,920 – $3,950 (wait for confirmed bullish reaction)
🎯 Key Resistance to Clear: $4,066 — the gate that triggers the rally
🚀 Upside Targets: $4,200 → $4,290 (300+ pips potential)
🛑 Invalidation: Close below $3,870 — bullish scenario weakens significantly
💡 Strategy:
Don't buy just because "it's cheaper." Wait for price to reach your support zone and show clear upward rejection signals. Only once price breaks above $4,066 with conviction does the recovery gain credibility. If $3,870 breaks to the downside, step aside — your capital is worth more than a forced trade.
🧠 "Support isn't a guarantee of bounce — it's where your risk is best defined." 3,000 pips sounds amazing, but it happens in stages: hold the floor first, then conquer the ceiling. One step at a time, team. Discipline = profits that stay with you! 💪🔥
3
426
·
--
Bullish
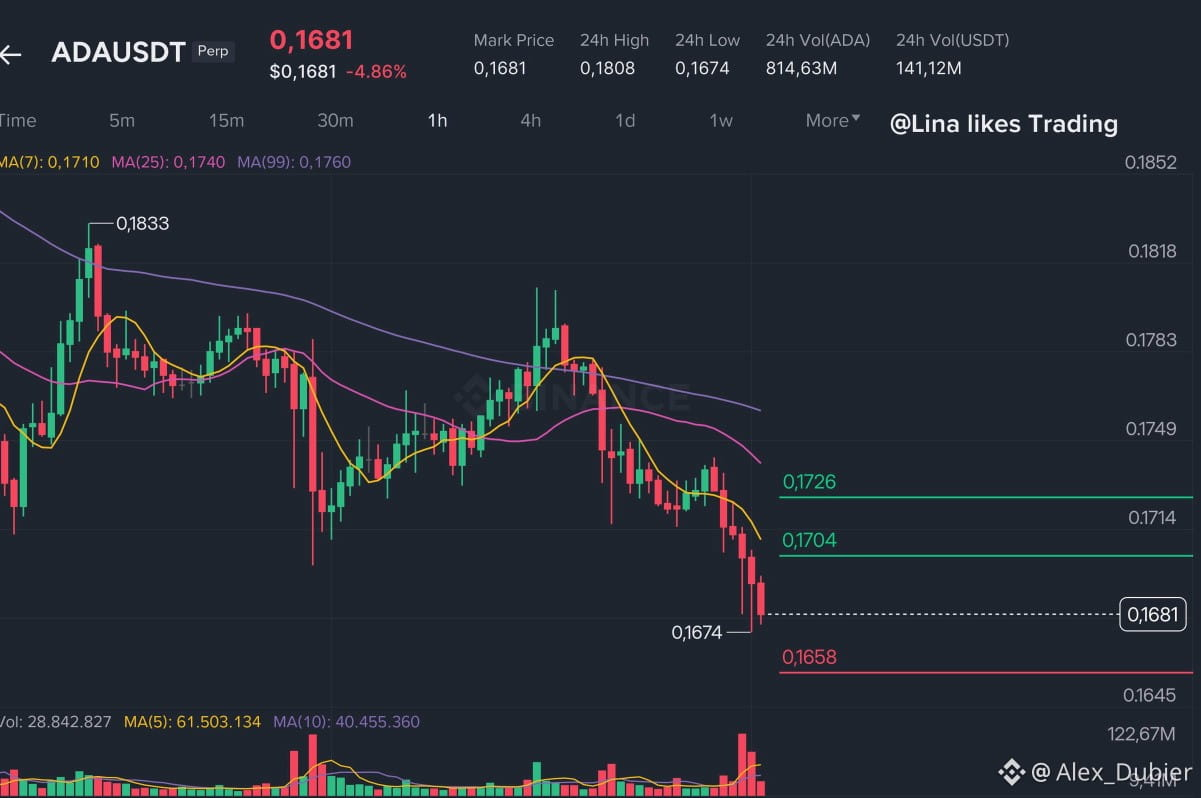
📊 $ADA — Bullish with caution: support is key 🟡🚀
🔍 Analysis:
The RSI shows extreme oversold conditions, and buyers are absorbing pressure in the support zone — conditions that favor a bounce toward the average. However, the warning is crucial: while we trade the bounce, if $0.1674 is lost on a closing basis, the structure weakens and the decline could deepen. We’re not ignoring the broader trend; we’re trading the bounce with it in mind.
📍 Entry zone: $0.1665 – $0.1681
🎯 TP1: $0.1750 → +4.1% to +5.1%
🎯 TP2: $0.1810 → +7.7% to +8.7%
🛑 SL: $0.1615 → -3.0% to -3.9%
💡 Strategy:
Enter in the marked zone, but keep an eye on $0.1674. If the price closes below that level, the bounce scenario loses strength — don’t force it; protect your capital. Take partial profits at TP1 and move your Stop to breakeven to safely ride the move toward TP2.
🧠 "Oversold doesn’t mean an automatic buy — it means you should watch the reaction." Your final reminder is golden: use an appropriate position size; never bet everything. Surviving today lets you trade tomorrow. Discipline above all, team! 💪
{spot}(ADAUSDT)
📊 $ADA — Bullish with caution: support is key 🟡🚀
🔍 Analysis:
The RSI shows extreme oversold conditions, and buyers are absorbing pressure in the support zone — conditions that favor a bounce toward the average. However, the warning is crucial: while we trade the bounce, if $0.1674 is lost on a closing basis, the structure weakens and the decline could deepen. We’re not ignoring the broader trend; we’re trading the bounce with it in mind.
📍 Entry zone: $0.1665 – $0.1681
🎯 TP1: $0.1750 → +4.1% to +5.1%
🎯 TP2: $0.1810 → +7.7% to +8.7%
🛑 SL: $0.1615 → -3.0% to -3.9%
💡 Strategy:
Enter in the marked zone, but keep an eye on $0.1674. If the price closes below that level, the bounce scenario loses strength — don’t force it; protect your capital. Take partial profits at TP1 and move your Stop to breakeven to safely ride the move toward TP2.
🧠 "Oversold doesn’t mean an automatic buy — it means you should watch the reaction." Your final reminder is golden: use an appropriate position size; never bet everything. Surviving today lets you trade tomorrow. Discipline above all, team! 💪
🔍 Analysis:
The RSI shows extreme oversold conditions, and buyers are absorbing pressure in the support zone — conditions that favor a bounce toward the average. However, the warning is crucial: while we trade the bounce, if $0.1674 is lost on a closing basis, the structure weakens and the decline could deepen. We’re not ignoring the broader trend; we’re trading the bounce with it in mind.
📍 Entry zone: $0.1665 – $0.1681
🎯 TP1: $0.1750 → +4.1% to +5.1%
🎯 TP2: $0.1810 → +7.7% to +8.7%
🛑 SL: $0.1615 → -3.0% to -3.9%
💡 Strategy:
Enter in the marked zone, but keep an eye on $0.1674. If the price closes below that level, the bounce scenario loses strength — don’t force it; protect your capital. Take partial profits at TP1 and move your Stop to breakeven to safely ride the move toward TP2.
🧠 "Oversold doesn’t mean an automatic buy — it means you should watch the reaction." Your final reminder is golden: use an appropriate position size; never bet everything. Surviving today lets you trade tomorrow. Discipline above all, team! 💪
3
618
Log in to explore more content
Join global crypto users on Binance Square
⚡️ Get latest and useful information about crypto.
💬 Trusted by the world’s largest crypto exchange.
👍 Discover real insights from verified creators.
Email / Phone number
Trending Topics
USPPIMissMayEaseBTCPressure
30,476 views
601 Discussing
US PPI Rises 6.5% a Year in October, Slightly Below 6.6% Forecast
Binance News
·16 Likes
·15.2k views
BitcoinCoreDisclosesTorTrafficVulnerability
11,522 views
294 Discussing
WhatWillDriveCryptoandStocks’NextRebound?
134,677 views
1,502 Discussing